Tuesday, February 26, 2019

Stampin' Up!'s Incredible Like You Project Kit Video Tutorial


Hello and welcome to my blog; today I am going to share with you one of my favorite new kits from the 2019 Stampin' Up! Occasions Catalog.  I just adore the Incredible Like You Project kit.  This is one of those kits that you have to purchase the additional stamp sets but it's so worth it. I am going to share a little walk through of the four different designs in this kit and next week I will be sharing ten alternative cards using this kit and a few additional projects.  But, you will have to wait till next week to see that.  Here's a look at the cards in this kit as well as a how to video tutorial.

Walk Through of the Kit and Card Designs: 

First off lets start with a look of what comes in the kit shall we.

Image by Stampin' Up! 
Here's all the items that come in your kit when you first open the package.  You get everything to make the 16 cards cut and ready to go.  Along with a instruction booklet to help you along the way.  The only additional supplies you need to provide is a Lovely Lipstick and Coastal Cabana ink pads and the Incredible like you stamp set.  This was a easy kit to put together.  I love the kits from Stampin' Up! and purchase them but for some reason I never get them put together, but with this kit I put all the cards together and loved every minute of it.  Let's look at all four card designs in the this kit. 


 See I told you they are very nice and I love the box that comes in this kit they you can keep the finished card in or even create them put them in the box and add a bow and a tag and give the finished products as a gift to someone that would love a set of handmade cards.


Video Tutorial: 


I hope that you have enjoyed my post today and found a little inspiration from my little walk through of the Incredible Like You Project Kit.  If you would like to have your own kit you can order all the supplies in my online store 24/7.

Happy Stampin'
Rick


Stampin' Up! Shopping List: 

Monday, February 25, 2019

Climbing Roses for Stampers Showcase Blog Hop


Hello and welcome to the first ever Stampers Showcase Blog Hop.  We are a group of Stampin' Up! demonstrators from different countries that got together to share inspiration with you monthly.   This month our theme is Thanks!  If you have came to my blog from Annette Ball's Blog or if you are starting here welcome. I am sure that you will find some great inspiration along the way.

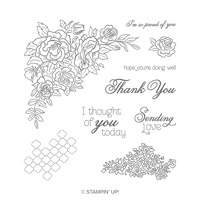
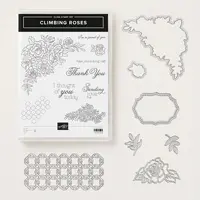
For my card today, I used the Climbing Roses stamp set from the 2019 Stampin' Up! Occasions Catalog.  This stamp set also comes with matching dies and you can get them both in a cost saving bundle.  I actually used both the stamp set and the matching framelits on my project.  Here's a look at my project.

Climbing Roses Stamp Set, Stampin' Up!, Rick Adkins, Thank You Card

Since this is the first blog hop I wanted to create something a little special.  So I created a card with a little off the edge element.  I started out by stamping the cluster of roses from the Climbing Roses stamp set at the top and bottom of a piece of Strathmore Bristol paper with Versamark ink and added Gold Stampin' Emboss Powder and setting it with my heat tool.  

Climbing Roses Stamp Set, Stampin' Up!, Rick Adkins, Thank You Card

After that was done I used my Subtle Stampin' Write Markers and a blender pen to color in each rose and leaf.  I used Petal Pink for the roses and Pear Pizzazz for the leaves.  On the open roses I used So Saffron for the center.  I started out by adding the marker to the darkest areas and used the blender pen to pull the ink out to the edge:  I repeated the process with each leaf.  This is were the Bristol paper comes in handy.  The ink sits on top of the paper longer so it allows me to more it around with the blender pen.  With normal cardstock the ink sinks into the paper a little to fast to do this same technique.  Once I got all the coloring done and the ink had dried I came back and added the So Saffron to the center of the open roses and blended it out in the same way.  

Climbing Roses Stamp Set, Stampin' Up!, Rick Adkins, Thank You Card

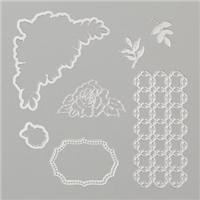
Once I had all the coloring done I came back and used the Rose Trellis Thinlits and lined up the matching die with the rose image and ran it through the Big Shot using the partial die cutting technique.  I then repeated it on the opposite side.  Once this was done I took a t-square ruler and lined up and drew a line with a #2 pencil matching up where the die cutting ended.  At this point I used my Stampin' Trimmer and cut each line stopping at the die cut line.  What was left I used my snips and trimmed off where I didn't cut through.  By doing this it allowed me to create the square and rose element you see above.  I then added two stitched lines around the square using my t-square ruler and a journaling pen and pear pizzazz stampin' write marker.  I finished off the main element by heat embossing the Thank You from the stamp set in gold stampin' emboss powder.  

Climbing Roses Stamp Set, Stampin' Up!, Rick Adkins, Thank You Card
I then took my card base (Petal Pink 4 1/4 x 11 scored at 5 1/2) and the trellis die and ran it through the Big Shot with the Stampin' Up! embossing mats.  This created a nice textural element to my card without having to die cut any additional cardstock and attaching it the the card base.  It's really subtle but very pretty.  

Climbing Roses Stamp Set, Stampin' Up!, Rick Adkins, Thank You Card

Thank you for dropping by today, I hope that you have a fun time hopping along.  Next on the hop is Sue Vine.  I am sure that she has created something super fun for you.  You can click on the next button below to go to view her blog post.  If you would like any of the supplies you have seen today you can pick them up in my online store by clicking on the shop button below or on the item in the shopping list below.  

Happy Stampin'
Rick


Stampin' Up! Shopping List: 

Price: $12.00
Price: $110.00
Price: $10.00

Saturday, February 23, 2019

Rick's Saturday Simple Stamping Episode 13: featuring the Amazing Life Stamp Set & Painted Seasons Bundle

#simplestamping, Stampin' Up!, Rick Adkins,

Hello and welcome to my blog and YouTube channel; today I am going to share with you the card that I made earlier today for this weeks episode of Rick's Saturday Simple Stamping.  For My card today I used two stamp sets and some designer series paper.  I used the Amazing Life Stamp Set, and the Painted Season Stamp Set along with some of the Painted Seasons Designer Series paper.  Here's a closer look at my cards.

#simplestamping, Stampin' Up!, Rick Adkins,

For today's card I started out by stamping the background using the succulent image in Lemon Lime Twist and Pool Party Classic Ink on whisper white cardstock (3 3/4 x 5).  I then used my Stamparatus to stamp the sentiment from the Amazing Life Stamp Set in Tuxedo Black ink.  I used the stamparatus because I figured I would need to stamp it twice to get a nice crisp black impression.  The Stamparatus makes this much easier than trying to line the stamped images up.  

#simplestamping, Stampin' Up!, Rick Adkins,

Video Tutorial: 


I did do a little something different then most cards.  Instead of using a piece of cardstock as my mat.  I used a piece of the Painted Season Designer Series Paper as the mat.  This not only frames the stamped image but adds a little more color and texture to the card.  

#simplestamping, Stampin' Up!, Rick Adkins,

For the inside of the card I stamped a couple of the succulent images on a piece of whisper white and attached that to the inside of the card.  

#simplestamping, Stampin' Up!, Rick Adkins,

That finishes my card for today, and for this weeks episode of Saturday Simple Stamping.  Thanks for taking the time to stop by and view my post or watch my video tutorial.  If you need any of the supplies you have seen today you can pick them up in my online store.  

Happy Stampin'
Rick


Stampin' Up! Shopping List: 

Template Designed by creativeworkerbee