Wednesday, February 6, 2019

A Ribbon Slider Card for #PCC325

Meant to Be Bundle, All My Love DSP, Stampin' Up!, Rick Adkins

Hello and welcome to my blog.  It's Wednesday and that means that it's time for this weeks Paper Craft Crew Sketch Challenge.  This week we have a really fun card sketch for you, I will share the sketch in just a few minutes.  For my card I created a couple different ribbon slider cards for you to view.  I saw this technique done a few weeks back and had to give it a try and it was perfect to show case my featured product of the week (the All my Love Designer Series Paper).  Here's a look at all three ribbon slider cards that I created.  

Meant to Be Bundle, Happy Tails Bundle, All My Love DSP, Stampin' Up!, Rick Adkins

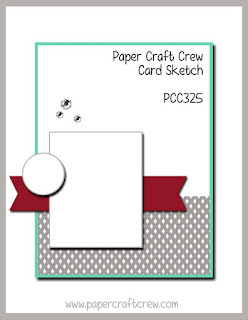
Here's a look at this weeks sketch.  You can click on the image below to visit the Paper Craft Crew site to see what the other design team members created.  If you are viewing this post before 5:30 am you will have to check back then to view what the other designers came up with.  


Tips & Tricks:  

You would think just from looking at these cards that it would be really hard to create but you couldn't be any more wrong.  It is really easy.  You will need a half sheet of cardstock; I used cardstock from the All My Love Cardstock pack for the Valentine card and Night of Navy for the Happy Tail Card.  Once you have your cardstock you will need a piece of 5 1/2 x 8 1/2 scored at 4 1/4 and then scored at a 1/4" on one side.  On the opposite side where you will cut off about 1/4".  Then flip it to the long side and cut off a 1/4".  You will use tear & tape to put the card base together to make a pocket.  If this is confusing you can watch the video below to see exactly how to put it together.  

Meant to Be Bundle, All My Love DSP, Stampin' Up!, Rick Adkins

Happy Tail Bundle, Ribbon Slider Card, Rick Adkins, Stampin' Up!

The ribbon slider cards will fit into a standard medium A2 size Envelope, so don't worry about having to make anything special to hold it.  Once you have the pocket created all you have to do is create the insert.  Place it inside the pocket and use a ruler to make a mark the center of the card about 1" down from the top.  Punch a hole through the pocket and the insert.  Flip the insert where the holes will line up together.  This is where you will add the ribbon.  Tie your bow.  Add your stamped images or designer series paper making sure to leave the top of the front open to let the ribbon move freely (see the video for details).  

Meant to Be Bundle, All My Love DSP, Stampin' Up!, Rick Adkins

Video Tutorial: 

click on the image above to watch the video. 

You can download a PDF instruction sheet for the All my Love Ribbon Slider Card here.  Thanks for dropping by today I hope that you give this technique a try and that you play along with us this week.  You will find a full list of the supplies that I used in the product list below.  


Product List
Big Shot
[143263]
$110.00
Crop-A-Dile
Crop-A-Dile
[108362]
$29.95
Glue Dots
[103683]
$5.25
Happy Stampin' 
Rick 


Tuesday, February 5, 2019

Meant to Be Popped Up Heart Card

Meant to Be Cling Bundle, All My Love Designer Series Paper, Balmy Blue Stampin' Blend Dark, Heart Epoxy Hearts, All My Love Ribbon Combo Pack, Rick Adkins

Hello and welcome to my blog.  Today, I am going to share with you a card that features products from the All My Love Suite from the 2019 Stampin' Up! Occasions Catalog.  With Valentine's Day right around the corner now's the perfect time to make those last minute cards for your loved ones.  And, why not make it a card that's very special.  My card today is one of those type cards.  It has a special feature that shows that special person just how much you really care.  This simple looking card on the outside has a little special love on the inside.  I know that you are wondering what the inside looks like so I am going to share it with you now. 

Meant to Be Cling Bundle, All My Love Designer Series Paper, Balmy Blue Stampin' Blend Dark, Heart Epoxy Hearts, All My Love Ribbon Combo Pack, Rick Adkins

Tips & Tricks: 

This card looks a lot harder than it really is, and if you have followed my blog you know that's how I roll.  I love cards and projects that look complicated but are quite easy.  I started out with a piece of Crumb Cake cardstock (5 1/2 x 8 1/2 scored at 4 1/4) as my card base.  I actually started this card on the inside instead of working on the outside design first.  I used the Be Mine Stitched Framelit dies to cut out a stitched edged heart in Lovely Lipstick and Flirty Flamingo cardstock.  I used the second die marked in the pictured to cut out the smaller heart from the All My Love Designer Series Paper.  I cut 3 hearts to use.  I cut the Lovely Lipstick heart in half and then scored the flirty flamingo cardstock heart and the designer series paper hearts in half.  I folded and burnished the hearts on the score lines.  I then took the designer series paper hearts and glued them to the cardstock hearts.  At this point it was time to put the outside heart pieces together.  I took the center hearts and glued one side to half of the lovely lipstick heart.  Then I glued the other side to the other piece the lovely lipstick heart.  Once they were all together I set them aside to dry.  
Meant to Be Cling Bundle, All My Love Designer Series Paper, Rick Adkins, Stampin' Up!, Heart Epoxy Droplets, All my Love Ribbon Combo Pack

You can see in the above photo how the heart on the inside stands out from the card base.  Before adding the hearts I had to stamp and add a few pieces of Whisper White Cardstock.  Actually I used two pieces on the inside of the card.   The inside measurements are 3 3/4 x 5.  At this point I could add the heart in the center that would pop up.  

Before adding the card front to the card I had to add a little ribbon from the All my Love Ribbon Combo pack so that I could close the card.  For the outside of the card I added a piece of Lovely Lipstick cardstock (4 x 5 1/4).  I layered a piece of the all my Love Designer Series Paper (3 3/4 x 5) on the outside.  I added one more Lovely Lipstick heart with the same designer series paper heart on the outside.  I added a sentiment banner (of whisper white) with the sentiment I love our life together.  Depending on what sentiment you put on the inside you could easily make this a wedding card or any other love themed card.  \

Meant to Be Cling Bundle, All My Love Designer Series Paper, Rick Adkins, Stampin' Up!, Heart Epoxy Droplets, All my Love Ribbon Combo Pack

I hope that I have inspired you to give this technique a try.  If you need any of the products you have seen today you can pick them up in my online store.  I wanted to take a few seconds and thank you for dropping by.  Remember that we are in the middle of Saleabration.  Where you can earn free products based on either each $50 or $100 you spend.  
Below you will find a full list of the supplies that I used for my card today.  


Product List: 

Happy Stampin'

Monday, February 4, 2019

Botanical Butterfly Circles Card


Botanical Butterfly Designer Series Paper, Stampin' Up!, Saleabration, Rick Adkins


Hello and welcome to my second post for today.  I am finally back on schedule with this post.  I was a couple posts behind according to my posting and video calendar.  I wanted to share this with you today, I shared it back in December at the downline meeting I attend.  My upline doesn't hold a meeting of her own so I attend a friends, and each month different people share projects, this was mine for that month.  I used the Saleabration Botanical Butterfly Designer Series paper for my card.  This was actually a super simple card to create.  It takes advantage of our circle punches, you could use the Layering Circle Framelits also if you wanted to.  But, I went for quick with just the punches to me that seemed quicker.  I did this card in a both Balmy Blue and Grapefruit Grove.  I pulled the colors from the designer series paper.

Botanical Butterflies Designer Series paper, Saleabration, stampin up, Rick Adkins

If you notice I started (well, after punching all the different size circles that is) with the Needlepoint Nook Framelit dies and used the large stitched die and ran it through the big shot twice to create the background.  On the grapefruit grove piece I added a thin boarder of basic black to make it pop better.  You can let me know in the comment below which version you like better.  The one with or without the boarder.  Then I simply layered up the circles and glued them down to the cardstock. 

Botanical Butterflies designer series paper, Saleabration, stampin up, rick adkins

I stamped a simple sentiment from the Butterfly Gala stamp set on a 1/2" strip of whisper white and made a flag tail banner.  I added a little of the petal pink and silver bakers twine in a bow to add just a little sparkle. 

The inside was just simply stamped with one of the butterfly stamps from the set in the matching color to the cardstock.  This is super easy since all the ink and cardstock matches from Stampin' Up!. 
Here's a little closer look at the Balmy Blue card. 
Botanical butterfly designer series paper, saleabration, stampin up, rick adkins

Thanks for dropping by today, I hope that you have a wonderful day and I will see you tomorrow with a new card.  If you would like any of the products you have seen today you can order them in my online store 24/7 by clicking on the shop now tab above the shop image below or by clicking on the image in the supply list.  Remember that the Botanical Butterfly Designer Series Paper is a free Saleabration item with any $50 purchase in my online store.  


Product List
2-1/2" Circle Punch
2-1/2" Circle Punch
[120906]
$18.00
Big Shot
[143263]
$110.00
Glue Dots
[103683]
$5.25

Happy Stampin' 
Rick 

Template Designed by creativeworkerbee