Tuesday, February 5, 2019

Meant to Be Popped Up Heart Card

Meant to Be Cling Bundle, All My Love Designer Series Paper, Balmy Blue Stampin' Blend Dark, Heart Epoxy Hearts, All My Love Ribbon Combo Pack, Rick Adkins

Hello and welcome to my blog.  Today, I am going to share with you a card that features products from the All My Love Suite from the 2019 Stampin' Up! Occasions Catalog.  With Valentine's Day right around the corner now's the perfect time to make those last minute cards for your loved ones.  And, why not make it a card that's very special.  My card today is one of those type cards.  It has a special feature that shows that special person just how much you really care.  This simple looking card on the outside has a little special love on the inside.  I know that you are wondering what the inside looks like so I am going to share it with you now. 

Meant to Be Cling Bundle, All My Love Designer Series Paper, Balmy Blue Stampin' Blend Dark, Heart Epoxy Hearts, All My Love Ribbon Combo Pack, Rick Adkins

Tips & Tricks: 

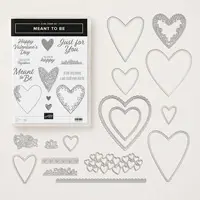
This card looks a lot harder than it really is, and if you have followed my blog you know that's how I roll.  I love cards and projects that look complicated but are quite easy.  I started out with a piece of Crumb Cake cardstock (5 1/2 x 8 1/2 scored at 4 1/4) as my card base.  I actually started this card on the inside instead of working on the outside design first.  I used the Be Mine Stitched Framelit dies to cut out a stitched edged heart in Lovely Lipstick and Flirty Flamingo cardstock.  I used the second die marked in the pictured to cut out the smaller heart from the All My Love Designer Series Paper.  I cut 3 hearts to use.  I cut the Lovely Lipstick heart in half and then scored the flirty flamingo cardstock heart and the designer series paper hearts in half.  I folded and burnished the hearts on the score lines.  I then took the designer series paper hearts and glued them to the cardstock hearts.  At this point it was time to put the outside heart pieces together.  I took the center hearts and glued one side to half of the lovely lipstick heart.  Then I glued the other side to the other piece the lovely lipstick heart.  Once they were all together I set them aside to dry.  
Meant to Be Cling Bundle, All My Love Designer Series Paper, Rick Adkins, Stampin' Up!, Heart Epoxy Droplets, All my Love Ribbon Combo Pack

You can see in the above photo how the heart on the inside stands out from the card base.  Before adding the hearts I had to stamp and add a few pieces of Whisper White Cardstock.  Actually I used two pieces on the inside of the card.   The inside measurements are 3 3/4 x 5.  At this point I could add the heart in the center that would pop up.  

Before adding the card front to the card I had to add a little ribbon from the All my Love Ribbon Combo pack so that I could close the card.  For the outside of the card I added a piece of Lovely Lipstick cardstock (4 x 5 1/4).  I layered a piece of the all my Love Designer Series Paper (3 3/4 x 5) on the outside.  I added one more Lovely Lipstick heart with the same designer series paper heart on the outside.  I added a sentiment banner (of whisper white) with the sentiment I love our life together.  Depending on what sentiment you put on the inside you could easily make this a wedding card or any other love themed card.  \

Meant to Be Cling Bundle, All My Love Designer Series Paper, Rick Adkins, Stampin' Up!, Heart Epoxy Droplets, All my Love Ribbon Combo Pack

I hope that I have inspired you to give this technique a try.  If you need any of the products you have seen today you can pick them up in my online store.  I wanted to take a few seconds and thank you for dropping by.  Remember that we are in the middle of Saleabration.  Where you can earn free products based on either each $50 or $100 you spend.  
Below you will find a full list of the supplies that I used for my card today.  


Product List: 

Happy Stampin'

Monday, February 4, 2019

Botanical Butterfly Circles Card


Botanical Butterfly Designer Series Paper, Stampin' Up!, Saleabration, Rick Adkins


Hello and welcome to my second post for today.  I am finally back on schedule with this post.  I was a couple posts behind according to my posting and video calendar.  I wanted to share this with you today, I shared it back in December at the downline meeting I attend.  My upline doesn't hold a meeting of her own so I attend a friends, and each month different people share projects, this was mine for that month.  I used the Saleabration Botanical Butterfly Designer Series paper for my card.  This was actually a super simple card to create.  It takes advantage of our circle punches, you could use the Layering Circle Framelits also if you wanted to.  But, I went for quick with just the punches to me that seemed quicker.  I did this card in a both Balmy Blue and Grapefruit Grove.  I pulled the colors from the designer series paper.

Botanical Butterflies Designer Series paper, Saleabration, stampin up, Rick Adkins

If you notice I started (well, after punching all the different size circles that is) with the Needlepoint Nook Framelit dies and used the large stitched die and ran it through the big shot twice to create the background.  On the grapefruit grove piece I added a thin boarder of basic black to make it pop better.  You can let me know in the comment below which version you like better.  The one with or without the boarder.  Then I simply layered up the circles and glued them down to the cardstock. 

Botanical Butterflies designer series paper, Saleabration, stampin up, rick adkins

I stamped a simple sentiment from the Butterfly Gala stamp set on a 1/2" strip of whisper white and made a flag tail banner.  I added a little of the petal pink and silver bakers twine in a bow to add just a little sparkle. 

The inside was just simply stamped with one of the butterfly stamps from the set in the matching color to the cardstock.  This is super easy since all the ink and cardstock matches from Stampin' Up!. 
Here's a little closer look at the Balmy Blue card. 
Botanical butterfly designer series paper, saleabration, stampin up, rick adkins

Thanks for dropping by today, I hope that you have a wonderful day and I will see you tomorrow with a new card.  If you would like any of the products you have seen today you can order them in my online store 24/7 by clicking on the shop now tab above the shop image below or by clicking on the image in the supply list.  Remember that the Botanical Butterfly Designer Series Paper is a free Saleabration item with any $50 purchase in my online store.  


Product List
2-1/2" Circle Punch
2-1/2" Circle Punch
[120906]
$18.00
Big Shot
[143263]
$110.00
Glue Dots
[103683]
$5.25

Happy Stampin' 
Rick 

Lovely Lattice Rainbow Card Stepped up Version

Lovely Lattice stamp set, stampin up, Rick Adkins

Hello and welcome to my blog.  Today, I am going to share with you a stepped up version of the card I shared a few weeks ago using this same stamp set and the same ink colors, creating a rainbow stamped card using the stamparatus.  You can find the details and photos of that card here.
For today's card I actually added one additional element to the card and it changed the entire appearance.  You may be asking well what in the world did you have to add it looked pretty as it was.  Well I wanted a little sparkle to the card so I added in a fourth ink color to my Lovely Lipstick, Daffodil Delight, Bermuda Bay color combo.  I added in versamark and silver embossing powder.  Yes, that's right silver embossing powder and versamark.

Lovely Lattice Stamp Set, Saleabration, Stampin' Up!, Rick Adkins

You can see the shine when the card is slightly turned to the side.  As in the above picture.  You can also see (as I mentioned in the other post) that your ink colors when combined create different tones and hues.  This card shows off more of the purple color that the Lovely Lipstick and Bermuda Bay created.  I still have a little of the daffodil and the other colors that were created in there but the purple took the more dominate tone this time.  I inked up the stamp the same way in the stamparatus but instead of inking up and filling in the entire stamp with colors I went and added versamark to the areas that were blank.  

I then removed the card front and added the silver embossing powder and embossed the card.  Super easy addition, but with a very nice result.  

Lovely Lattice Stamp Set, Saleabration, Rick Adkins, Stampin' Up!

To finish off the card I stamped the Lovely Lipstick card base (4 1/4 x 11) with matching ink and used the tiny flower from the set to create a background.  I trimmed down my whisper white panel to 3 1/4 x 4 1/2.  Next I layered the focal image on a piece of Old Olive cardstock (3 1/2 x 4 3/4) and placed it on the card base.  I added a piece of whisper white to the inside for my written message.  

Thanks for dropping by today I hope that you will give this technique a try.  If you need any of the supplies you have seen today you can pick them up in my online store.  The Lovely Lattice stamp set is a Saleabration item and can only be earned with a $50 order in my online store.  You will find a full list of the supplies below.  


Product List
Stamparatus
[146276]
$49.00
Heat Tool
[129053]
$30.00


Happy Stampin'
Rick 

Template Designed by creativeworkerbee