Today's the day the new 2020-2021 Stampin' Up! Annual Catalog goes live. I am hosting an all day launch party on my Facebook Business Page to launch the new catalog. During today you will find all types of posts today to kick off the new catalog. I will be doing a Catalog walk through at 9 am this morning over there as well as posting every hour or so with other videos, pictures, and a ordering special. So you will will want to check it all out.
If you want to join me at 9 am CST and have a look at the catalog please join me over on my business page. I will be sharing tips and tricks about the new catalog as well as sharing some of my favorite new products.
If you don't have a catalog you can download the PDF version here. And a copy of the new Beginners Brochure that has a lot of great stuff not just for the new crafter but some great ideas for anyone by clicking here.
As of this post the website is currently down as they transition to the new catalog and should be up no latter than 12 noon MT today.
Hello and welcome to my blog; today I have a quick little tip video for you on refilling your ink pads. This is something that we all must do to keep our ink pads working properly. Or, you can just toss it and buy a new one, believe me I feel you, but refilling is so much cheaper. And not as hard as you may think.
What do I have to Have:
All you really need is your ink pad, an ink refill, and a plastic spoon. Once you have these basic items on hand you can quickly and easily refill your ink pads without too much of a mess; unless you are like me and get ink everywhere. If you are, bless you I feel your pain. But in all honesty, it is not that hard.
Tips & Tricks:
Now, as I mentioned above, I do not use any fancy tools to do this I just bought a box of plastic spoons from the store and I use the back of it. And I clean it off when I am done with a baby wipe so one spoon will last you for a while. I simply take a few drops of my chosen ink refill and put on my ink pad and move the ink around with the spoon and press it into the pad a little. It does not take a lot of pressure you really want gravity to do the work for you. The ink will soak into the pad.
You can also look at the side of the pad to see if color of the foam is getting darker. As the ink soaks into the pad you will see it soaking into the pad. But the spoon allows you to spread the ink around the pad so that you have good coverage. Now another little tip is you can use this same technique to move ink out of your way if you are using a distinktive stamp. These types of stamps work better with an ink pad that is not as juicy. In this situation to much ink is not your friend.
Now, one thing that I like to do after refilling my ink pad is: I like to let it sit for a little while before I use it. A freshly inked pad can still be to inky, so you do have to watch the amount of ink refill you put on. To me it is best to do a little let it sit and come back and add more if need be. Ink pads can be a finicky little so and so, but if you know how to take care of them when they are low on ink it will make your life so much easier.
Another piece of advice I have for new stampers and well any stamper is to make sure when you order your ink pad go ahead and get the ink refill as well. That way you will have one on hand and want have to wait for one to arrive when you pad is running low on ink.
Video Tutorial:
I hope that you enjoy this bonus video tip this week and it helps you out. I know there’s a lot of new stampers and crafters out there that may not know how to refill their ink pad and may just toss it and buy new or get frustrated and stop stamping because they are not getting the results they want. Remember to get your ink refills at the same time you purchase your ink pads it saves time, money, and heartache.
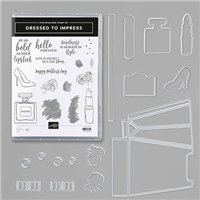
Hello and welcome to my blog; today I am sharing with you the other box that I made last week and told you I would share it with you later. This is a very famine version of the Beautiful World and Forever Greenery Boxes I shared last week. If you missed those posts, I have linked them for you above. With this box I wanted to showcase the Dressed to Impress Bundle and products that are in that suite from the January-June Mini Catalog. Sadly, most of these products are on the retiring list. But I am quite sure everything I used is still available. Here is a look at my project.
For this box you will need a piece of Petal Pink Cardstock cut at 8 ½ x 10 1/2. I scored on the 10 ½” side at ½”, 3 ½”, 5 ½” and 8 ½”. The other two score lines are on the 8 ½” side and they are at 2” and 6 ½”. I told you it was simple. The box is made the same as the other two so make sure to check out those post. The Forever Greenery Box has a video tutorial that walks you step by step on how to make the boxes.
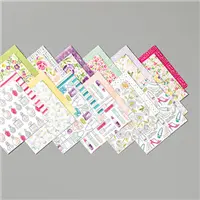
For this box I went with the stripped pattern from the Best Dressed Designer Series Paper Pack and added it to the front, two sides, and top. I picked Purple Posy Cardstock to mat the designer series paper before adding it to the box. I thought that the Purple Posy was a great choice to add to the box since it was in my chosen paper.
Next, I stamped the lipstick and perfume images from the stamp set in Basic Gray Classic Ink on Whisper White Cardstock and cut them out with the matching dies. Then I added a little color to each image with the wash image from the stamp set. There are a couple different size images to color the images without having to color. I stamped the lipstick base in Basic Gray Classic Ink and the top in Lovely Lipstick Classic Ink. The inside of the perfume bottle was stamped with Petal Pink Classic Ink.
After I had the focal images stamped and colored it was time to do a sentiment. I stamped the Be as Bold as Your Lipstick Sentiment in Basic Gray Classic Ink on Whisper White Cardstock. And then punched it out with a 2” Circle Punch.
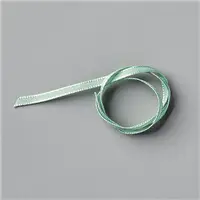
After all the stamping was complete, I took the 1/8” Sheer Mint Macaron Ribbon and tied around the box. I then layered the perfume bottle and lipstick tube up on dimensionals. I let the perfume bottle layer over the ribbon but still allowed the ribbon to slide through. I then added my sentiment on dimensionals.
To finish off the box I added a few Basic Rhinestones to add just the right amount of sparkle and shine. Thanks for dropping by today. If you need any of the supplies you have seen today you can pick them up in my online store from the links below.
Happy Stampin'
Rick Adkins
Use the Host Code on any order of $50 (before taxes & shipping) or more during the month and receive a gift from me in May as a Thank You. If your order is $150 or more, please do not use the host code. You will forfeit your Stampin' Rewards if you do; and I want you to get those rewards.
If you place any size order with me during the month of May, you will receive the May Creative Stampers Tutorial Bundle from me as a little thank you. This month's tutorial bundle features Birthday Bonanza Suite of Products from the January-June Mini Catalog. The Creative Stampers Tutorial Bundle can either be earned for FREE with any size order or Can be purchased for $20 from me.
Hello and welcome to my blog; today I am going to share with you a card featuring one of my favorite stamp sets from the new catalog and the 2020-2022 In Colors. I mentioned Monday that I would be highlighting the new In Colors from Stampin’ Up! All week. So, with that said: here is my card.
What Are In Colors:
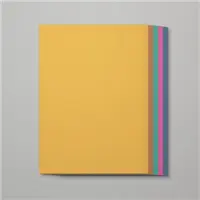
Some of you may not know what I am talking about when I say In Colors. We get five new colors that are not currently in one of the Stampin’ Up! Color Families. These colors are colors that you see every day in magazines, cloths, home décor, and so many other places. They are also colors that are very on trend. In Colors change out every two years, and then five new colors replace the ones leaving. So, you can see how important they are in your crafting. They help keep your crafting stash trendy and up to date and they help add a little spice to your life.
This is an easy card that you can reproduce quickly. You can even use scraps of cardstock to recreate it. Because that was exactly what I did. Using up your scraps makes for a fun way to get more bang for your buck. And, not to mention less clutter in your craft room. I used post-it-tape to hold my cardstock in place while I lined them all up and stamped each image. But you can use whatever you want to hold the cardstock in place. Or just go freestyle and let the stamped images land where they land.
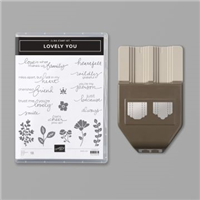
You only will use one ink pad for all the delicate florals, fronds, and flourishes from the Lovely You Stamp Set. Yes, only one to get all the colors you see. I used Versamark to achieve the look of all the In Colors. I had to use Versamark because it is a nice watermark ink, and we were not able to order the In-Color ink pads yet. But Versamark worked fine for the look I wanted. Once you have all the images stamped on each piece of cardstock: It is time to get everything glued in to place. Now you can use your favorite adhesive to do this, but I used Multipurpose Liquid Glue, or Snail Adhesive to attach each layer. You will want a base to attach the layers to, so a scrap piece of Whisper White cardstock is an excellent choice.
Once you have all the 2020-2022 In Color stamped cardstock strips arranged you will add them to the Whisper White layer, you are going to need to trim this layer down to 3 ¾ x 5. Next you will pop it up on the 4 ¼ x 11 (scored at 5 ½) Thick Whisper White Card base with a few Stampin’ Dimensionals.
Once I had my colorful background all in place it was time to create a little sentiment and focal image. For my sentiment strip I used the new Lovely Labels Pick A Punch. And I am going to go ahead and say I predict that this punch sales out quickly. Because it is going to be such a versatile tool in your craft room. What is unique about this new punch is you get two designs in three different widths. As you can see on my card example. The sentiment was stamped in Tuxedo Black Ink onto a strop of ¾” Whisper White Cardstock. The decorate edges where one of the sides from the Lovely Label Pick A Punch, I actually punched the other design in the Basic Black Cardstock but you really can not see the end.
To finish off the card you are going to add some linen thread that you will make into a little string nest. You will secure the little nest with a little Tear & Tape and place the sentiment strip over it. Add a few rhinestones to dress it up and you are good to go.
Video Tutorial:
Thanks for dropping by today, I hope that you have enjoyed my little walk through of the new In Colors and that you will give the watermark stamping a try. Remember that the new products that you have seen today will be available starting June 3 or you can add them to your Stampin’ Up! Starter Kit right now when you join my team.
Happy Stampin'
Rick Adkins
Use the Host Code on any order of $50 (before taxes & shipping) or more during the month and receive a gift from me in May as a Thank You. If your order is $150 or more, please do not use the host code. You will forfeit your Stampin' Rewards if you do; and I want you to get those rewards.
If you place any size order with me during the month of May, you will receive the May Creative Stampers Tutorial Bundle from me as a little thank you. This month's tutorial bundle features Birthday Bonanza Suite of Products from the January-June Mini Catalog. The Creative Stampers Tutorial Bundle can either be earned for FREE with any size order or Can be purchased for $20 from me.