
Hello and welcome to my blog; today I am going to share with you the card I designed for a card swap that I took part in May or June one I can not remember when it was. I think it was May and I got them back in June, but anyway that's neither here nor there. For the swap card that I decided I used some of the products in the Forever Greenery Suite on pages 108 - 110 of the Stampin' Up! Annual Catalog. Here's a look at my super cute little card.

Tips & Tricks:
When you are mass producing cards for any reason the best course of action is to do the following after you figure out your design. Gather your supplies. This way you can see if you need to order additional supplies and have them in time for your project to be complete. Once you have everything gathered like a little squirrel in the Fall that has stored enough food up for the winter months, it's time to start cutting. Yes, this is the long drawn out part of the process that takes the most time. But it's also the most necessary part of the process. This is what I need for my card. I cut all the supplies for the twenty-one cards I had to make for this design.

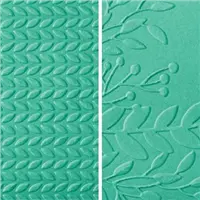
Next I did all my die cutting and embossing work even before I put stamps to ink and to paper. I cut all the circles for my cards which I used my Layering Circle Dies to create what would become the sentiment and the vellum layer behind. After I had all those cut I die cut all the fern pieces from Just Jade Cardstock using the Forever Flourishing Dies from the Forever Fern Bundle. I had to use a couple shims underneath my cutting pads to get everything to cut out nice and smooth. So just be aware of that you may need to add a few shims under this die to get a nice smooth cut. After the die cutting was complete I cut my card bases and all the layering cardstock and designer series paper. I then took my Just Jade Cardstock layer and used one of the Greenery Embossing Folders and embossed each one.

After all the hard work was complete it was time to do my stamping, putting together and embellishing. For the stamping I stamped my sentiment in Soft Sea Foam Classic Ink. I picked the sentiment that read "to a friend that makes me smile" I thought that that would be a wonderful sentiment to recieve on a card. I then added my embossed Just Jade Layer to my Thick Whisper White card bases all at one time. I did everything for each card at one time to make the process go faster. So remember that when you are mass producing. You are going to do each step for each card once and not create each card one at a time. You are going to add all the layers for each step to ALL of your cards at the same time. I had to say that again because it's so important and makes the process so much faster.

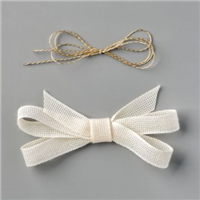
Next in the process was building up the focal image. So I layered my Shaded Spruce, Soft Sea Foam, and Forever Greeny Designer Series Paper pieces together. After that I added the die cut fern pieces to the focal image. I then added the vellum circles and the sentiment layers. To finish my card off I added a few basic rhinestones and then decided that it needed just a little more something something to enhance the card. So I sat down and tied twenty-one bows with the gold metallic thread from the Forever Greenery Ribbon Combo Pack and attached each with a Mini Glue Dot that I made smaller by rolling them into a little ball. After that all I had to do was place them all in their little Clear Envelopes from Stampin' Up! and drop them in the mail to the Swap Coordinator. I am actually working on two more sets of swap cards from the new August - December Mini Catalog now that will be going out soon.
Project Recipe:
I have created a little graphic for you to save to your Pinterest Boards that will show you and help you shop for the main products for this card design. If you would like to see more of my Project Recipe Cards you can find them on my Project Recipe Board on my Pinterest Page by clicking here.

Thanks for dropping by today I hope that you found some great tips for mass producing your cards and you found a little inspiration here. If you need any of the supplies that you have seen today you can order them in my online store by clicking on the items in the Stampin' Up! Shopping List below.

Happy Stampin'
Rick Adkins
Rick Adkins

Use the Host Code on any order of $50 (before taxes & shipping) or more during the month and receive a gift from me in June as a Thank You. If your order is $150 or more, please do not use the host code. You will forfeit your Stampin' Rewards if you do; and I want you to get those rewards.

If you place any size order with me during the month of July, you will receive the July Creative Stampers Tutorial Bundle from me as a little thank you. This month's tutorial bundle has ten project tutorials that feature our favorite new products from the 2020-2021 Stampin’ Up! Annual Catalog. The Creative Stampers Tutorial Bundle can either be earned for FREE with any size order or Can be purchased for $22 from me.

Don't forget about Bonus Days are going on now! You get reward for shopping now with every $50 qualifying order. and you get to spend the $5.00 coupon codes when you shop in August.

If you enjoy card making and love to play games I have a fun event for you coming up in August. I always loved playing Bingo as a kid, and even as an adult. This is a card class but we will be playing a few games of Bingo for fun as well. You can find out all about my Online Stampin' Bingo and Card Class along with Register by July 31, 2020 by clicking here.


")


