Saturday, March 21, 2020

Botanical Prints Product Medley - Saturday Simple Stamping

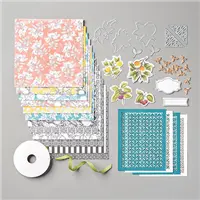
Hello and welcome to my blog; today I am going to share a Simple Stamping card with you using products from the Botanical Prints Products Medley plus a few additional supplies.  Creativity comes easy when you've got amazing coordinating products. Stampin' Up! doesn't want to brag, but coordination is one of their strong points. The Botanical Prints Product Medley is a perfect example. The medley includes stamps, paper, dies, and accessories for creating cards and more.  With everything included in this product medley it's perfect to make Simple Stamping Cards with when you are just starting out.  Because a majority of what you need plus more is right in the box.  Here's a look at my Saturday Simple Stamping card for this week.

Tips & Tricks: 

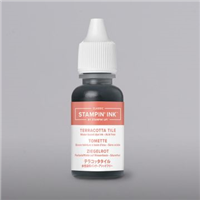
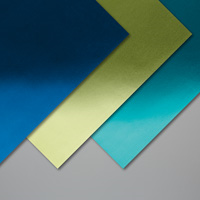
Since simple stamping is all about stamps, ink, and paper I found the products in the Botanical Prints Product Medley perfect to create some #simplestamping cards.  I cut a piece of the Botanical Prints Designer Series Paper down and added a matching mat layer behind my designer series paper to enhance the mix of black and white imagery with the bold beautiful colors on the paper.  I added my layer to a piece of Thick Whisper White cardstock that I cut down to 4 x 5 1/4.  I simple stamped friend in Terracotta Tile Classic Ink at the bottom of this layer and added it to a Thick Whisper White Base that I cut to 5 1/2 x 8 1/2.  


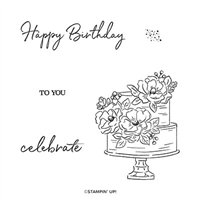
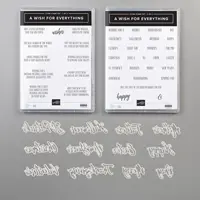
For the inside of the card I stamped the Happy Birthday sentiment from the Happy Birthday to You Stamp Set (which is a Saleabration set this year and can be earned for Free with a qualifying order).  I added a couple of the matching floral images from the Botanical Prints Stamp Set on the inside of the card to tie it in.  I keep the color pallet simple and only used the one color ink.  When you are a beginner this makes your card making so easy because you don't have to hunt for matching ink colors or colors that coordinate.   But if you have followed me for anytime at all you know that I firmly believe as long as you pull your colors from a pack of designer series paper they will match because Stampin' Up! has done all the coordinating work for us.  So, you can rest assured that the colors you pick from the designer series paper will be a perfect match on your card or project.  


To create a perfect matching envelope I stamped the same botanical print in Terracotta Tile Classic Ink on the flap of the envelope.  This creates the perfect coordinating envelope and gives the person on the receiving end a little hint at what's inside.  If you need any of the products you have seen today you can order them in my online store by clicking on the items in the shopping list below.  Thank you for stamping bye don't forget to follow my blog for daily inspiration.  
Happy Stampin' 
Rick Adkins 


Use the March Host Code on any order of $50 (before taxes & shipping) or more during the month and receive a gift from me in April as a Thank You.  If your order is $150 or more, please don't use the host code.  You will forfeit your Stampin' Rewards if you do; and I want you to get those rewards.


If you place any size order with me during the month of March, you will receive the March Creative Stampers Tutorial Bundle from me as a little thank you.  This month's tutorial bundle features fourteen floral themed tutorials.  The Creative Stampers Tutorial Bundle can either be earned for FREE with any size order or Can be purchased for $20 from me.

Stampin' Up! Shopping List: 


Thursday, March 19, 2020

Peaceful Moments Lidded Poppy Box

Hello ans welcome to my blog; today I am going to share with you my Lidded Poppy Box, that I made.  I used the Peaceful Moments Bundle for my flower and sentiment and created this super cute little box for you today.  The Peaceful Moments Bundle includes the Peaceful Moments Stamp Set and the Poppy Moments Dies.  Create fancy, layered die-cut poppies, leaves, and more to add beauty and depth to your handmade cards, scrapbooks, journals, and other paper crafts using the Poppy Moments Dies. Pair the dies with the coordinating Peaceful Moments Stamp Set to add heartfelt sentiments to your projects for birthdays, congratulations, sympathy, thank you, and more.  Here's a look at today's project.

Tips & Tricks: 

To created the multi colored flower on the top of my box I used the Peaceful Moment Dies and cut out all the pieces of cardstock.  I used scraps to create the flower.  As far as cardstock goes I used scraps of Daffodil Delight, Mango Melody, for the flower and Mossy Meadow and Old Olive for the leaves.  I did a little sponging of the colors onto the cardstock to create the different values.  I also added a little Whisper White Craft Ink for the highlights.  I used a sponge dauber to get into the areas and sponged on the ink.  Once all the inking was completed and dried I glued everything together with a little liquid glue.  


I then created my box top and base with a little cardstock and put them together with a little Tear & Tap.  The box was a basic box construction so nothing fancy there.  The base was created from a 8 x 8 piece of Daffodil Delight cardstock and the top was made from a 6 x 6 piece of Thick Whisper White Cardstock.  I wrapped a little of the Daffodil Delight Ruched Ribbon around the top and tied it into a pretty little knot so it would stay in place.  You can add a few mini glue dots under the ribbon if you don't want it to move at all.  


Once the box was completed I added the poppy with a few Stampin' Dimensionals.  I then created a double fish tail banner for my sentiment which comes from the Peaceful Moments Stamp Set in Mango Melody Ink.  Greetings, greetings, and more greetings. Whatever the situation, the Peaceful Moments Stamp Set has the words you need to express your thoughts.  I thought this made for a prefect little gift box for someone.  Thanks for dropping by today I hope that you have a wonderful day and stay safe.  If you need any of the supplies you can order them in my online store by clicking on the item below.  
Happy Stampin'
Rick Adkins


Use the March Host Code on any order of $50 (before taxes & shipping) or more during the month and receive a gift from me in April as a Thank You.  If your order is $150 or more, please don't use the host code.  You will forfeit your Stampin' Rewards if you do; and I want you to get those rewards.


If you place any size order with me during the month of March, you will receive the March Creative Stampers Tutorial Bundle from me as a little thank you.  This month's tutorial bundle features fourteen floral themed tutorials.  The Creative Stampers Tutorial Bundle can either be earned for FREE with any size order or Can be purchased for $20 from me.

Stampin' Up! Shopping List: 


Tuesday, March 17, 2020

Luck of the Irish - A Wish for Everything The Spot Challenge #102 Good Luck

Well today is St. Patrick's Day and we thought it would be fun to share cards and projects that featured a Good Luck theme for this week's themed challenge over at The Spot.  So I went a little traditional with my card for today.  I kept with the Good Luck Theme but went very St. Patty's Day with it.  I used some scraps of green cardstock, the Wish for Everything Bundle, and a little heat embossing for my card today.  Here's a look at my card.


Here's a look at this weeks Challenge card that inspired my project.  Remember that you can click on the image below to play along with us this week and to check out all the great designs that the Design Team cam up with.

Tips & Tricks: 

I started out by cutting different shades of green cardstock all on a slight angle for my project.  I used Old Olive, Garden Green, Pear Pizzazz, Shaded Spruce, Granny Apple Green and Call Me Clover Cardstocks for my project, and just a touch of Basic Black to make all the greens pop.  I started out with my card base which was cut from a piece of Garden Green Cardstock (5 1/2 x 8 1/2 scored at 4 1/4) to make a top folding card.  Then I cut a piece of Basic Black Cardstock to mat all my little angle pieces of cardstock on to.  I glued each piece of cardstock with a little Multipurpose Liquid Glue alternating each one by color.  I found the liquid glue to be the best option for this because it allowed me to move any piece just a little closer together but still leave a little of the black showing between as needed.  

After I had all the green in place I cut off the excess cardstock hanging over the edge and then added it to a mat made slightly larger from some Basic Black Cardstock. I then attached this to my card base.  At this point I used the Word Wishes Dies and cut out Happy St. Patricks Day from some Basic Black Cardstock and attached it to the focal image of the card.  I then used some of the Old Olive Foil from the Nobel Peacock Foil Sheets and the smallest stitched heart from the Stitched Be Mine Dies and cut out four stitched hearts to make the four leaf clover.  I added it with a mix of liquid glue and dimensionals.  I added a call me clover enamel dot from the Happiness Blooms Enamel Dots to the center and around the card for a little more color and interest.  


I added a sub sentiment from the same stamp set that I heat embossed in gold on a strip of black cardstock that reads "May the luck of the Irish go double for you"  I thought that just added a perfect extra little touch for my card today.  And maybe it would bring whomever gets it a little more luck in their lives right now.  I hope that you are inspired to give this a try and that you will take a little time this week and play along with us over at The Spot your place for creativity.  If you need any of the supplies you have seen today you can pick them up in my online store 24/7 by clicking on the image or image in the shopping list below.  
Happy Stampin' 
Rick Adkins 


Use the March Host Code on any order of $50 (before taxes & shipping) or more during the month and receive a gift from me in April as a Thank You.  If your order is $150 or more, please don't use the host code.  You will forfeit your Stampin' Rewards if you do; and I want you to get those rewards.


If you place any size order with me during the month of March, you will receive the March Creative Stampers Tutorial Bundle from me as a little thank you.  This month's tutorial bundle features fourteen floral themed tutorials.  The Creative Stampers Tutorial Bundle can either be earned for FREE with any size order or Can be purchased for $20 from me.

Stampin' Up! Shopping List: 


Template Designed by creativeworkerbee