Tuesday, February 25, 2020

Wishing You The Best - Tags in Bloom New Saleabration Stamp Set

Hello and welcome to my blog; today I am going to share with you a card I made using the New Tags in Bloom Stamp Set.   Brighten someone’s day with a tag or card you make using the Tags in Bloom Stamp Set. This Two-Step Stampin’ set lets you layer images to create more depth and interest. Stamp the outline flower image in one color, then stamp the corresponding solid flower image over it with a different color. The photopolymer clear stamps make it easy to align the images. Earn this stamp set FREE with a qualifying purchase March 3–March 31, 2020, during part two of our Sale-A-Bration.  Here's a look at my card.

Tips & Tricks: 

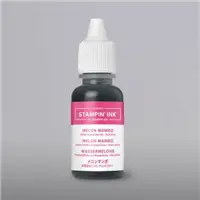
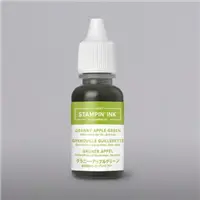
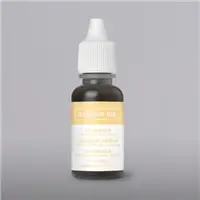
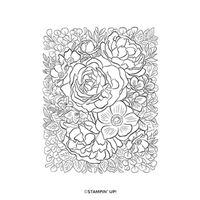
I started out with stamping the floral frame in Melon Mambo on a piece of Whisper White cardstock.  Next I stamped the fill in stamps to add the colors to the flowers, and leaves.  For that I used Melon Mambo stamped off for the outside of the flowers.  For the inside I used So Saffron, and for the leaves I used Granny Apple Green.  
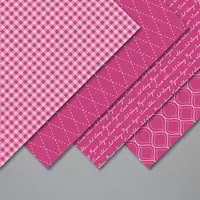
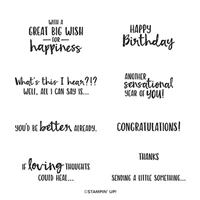
Once I had everything on the floral frame stamped I stamped the stitched label in Granny Apple Green Ink and then the sentiment in So Saffron.  I used the Label me Lovely Punch and punched out the stitched tag and popped it up in the center of the floral one using dimensionals.  I then layered that piece onto a piece of Melon Mambo cardstock, and then popped that up onto the card base (Melon Mambo) over the Granny Apple Green Gingham pattern from the Brights DSP paper pack.  
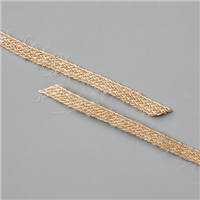
To finish off the card I added a few rhinestones to the card front along with a double bow that I made using pieces of the burlap that I removed from the Burlap Braided Trim from the Tropical Oasis Suite.  I love the texture that the twine from this ribbon gives to the project.  It has great texture that's hard to come by.  You also get a ton when you start pulling it apart.  

Video Tutorial: 

If you are viewing this post by email you may have to click here or click on the image below to view the video.  Not all mail servers will show the embedded video.  

The Tags in Bloom stamp set will be available starting March 3, 2020 to earn with a qualifying order.  This is not the only item that's will be part of the second release.  Be watching this week for more sneak peeks.  If you want to earn the Tags in Bloom Stamp Set the products that I have listed below in the shopping list will get it for you.  The total cost of the items listed was $108 before taxes and shipping so you would have a qualifying Sale-a-bration order for this stamp set.  
Happy Stampin' '
Rick Adkins 

Stampin' Up! Shopping List: 


Monday, February 24, 2020

So, Inviting! How to Create Custom Invitations Online Class Announcement


Learn how to create elegant invitations for parties and weddings with ease in my So Inviting Online Class.  We will be using the So Inviting Stamp Set to create beautiful invitations in four different styles.  You will make 8 invitations (2 each of four designs).  You will then be able to combine the phrases from the So Inviting Stamp Set with your favorite image stamps to customize the invite for any kind of event. 
Image by Stampin' Up! 

Class Cost:   Depends on the Cost Saving Options You Pick


·         Option 1:  Mega Invitations Bundle $67.00         
o   Includes the following
§  Magnolia Blooms Stamp Set
§  So Inviting Stamp Set
§  ½ pack Magnolia Lane Designer Series Paper
§  1 bolt – 5/8” Organdy Stripped Ribbon (Free Gift)
§  Frosted & Clear Epoxy Droplets
§  Card kit with all the precut supplies Ready to go
§  Video & Printable Step by Step Tutorial emailed to you free ($25.00 value)
·         Option 2:  Medium Invitations Bundle $40.68 (no stamp sets)
o   Includes:
§  ½ pack Magnolia Lane Designer Series Paper
§  1 bolt – 5/8” Organdy Stripped Ribbon
§  Frosted & Clear Epoxy Droplets
§  Card kit with all the precut supplies Ready to Go
§  Video & Printable Step by Step Tutorial emailed to you free ($25.00 value)
·         Option 3:  PDF Printable Step by Step Tutorial Only $15.00
·         Option 4: (Kinsmon Crafters Team Only Option Make & Take Packets) $12.00

Image by Stampin' Up! 

Deadline:  Deadline to order my So Inviting Online Class is Friday, March 13, 2020. 

Once all the orders have been received, I will order all the supplies needed for everyone on Saturday March 14, 2020 and have everything sent to me.  Once I receive everything, I will cut all the card kits and supplies needed for the class repackage them and get them in the mail to you by or on March 20th. 
To reserve your spot click here and I will email you the link to pay for your budget saving option. 

Wishing You Much Happiness today and Always - So Sentimental - Bird Ballad Notecard

Hello and welcome to my blog; today I am going to share with you a super cute and easy notecard using products from the January-June Mini and the 2019 Stampin' Up! Annual Catalog  For my project today I created a note card to share with someone that maybe getting married, or maybe they are going through something, or maybe they just need a little encouragement.  These little notecards are perfect for all those occasions you may run into.  I picked one of my favorite Sentiment sets and one of my favorite Designer series papers for this project.  Here's a look at the notecard.


I used the Bird Ballad designer series paper and the So Sentimental Bundle for my project today.  I love the fun spring feel of the designer series paper.  I am really feeling the spring-fever right now, as you may have noticed from my projects as of late.  And, the Bird Ballad Designer series paper helps kind of curves the I am Ready for Spring feeling I've got going on.  I wanted to showcase the big sentiment from the So Sentimental Stamp Set so I keep the card really simple in design.  Just a little designer series paper and a few colored rhinestones.  Which by the way I colored with my Dark Daffodil Delight Stampin' Blend.


My note card was cut from a piece of thick whisper white cardstock which measures 4" x 10 1/2" and I scored it at 5 1/4" to make the top folding note card.  I actually did this by accident I thought was cutting down two pieces of whisper white for another project but learned after I had it cut that it was a Thick Whisper White Card base; I think it all worked out because I adore the card that it made.  The Bird Ballad Designer Series Paper was cut to fit the entire front of the card.  I used another piece that I had cut down for the center of the card to add a little color interest plus to help ground the sentiment.  I also added a little strip to the inside of the card to make everything tie in.
After all the designer series paper was attached I stamped my sentiment onto a scrap of the thick whisper white cardstock in Daffodil Delight ink and used the matching dies from the bundle to cut it out.  The So Sentimental Bundle includes the So Sentimental Stamp Set and the Stitched So Sweetly Dies.

SO SENTIMENTAL CLING STAMP SET

Create tags, labels, and more with the phrases in the So Sentimental Stamp Set. These greetings are suitable for so many occasions—celebrating birthdays, welcoming new babies, saying “thank you.”
* 11 cling stamps
* Suggested clear blocks (sold separately): a, b, c, d


STITCHED SO SWEETLY DIES

Create frames and tags of various shapes and sizes using the Stitched So Sweetly Dies. Pair the dies with the coordinating So Sentimental Stamp Set to quickly cut out sentiments for your handmade cards, tags, and more. You’ll love the versatility of these dies and the all-occasion sentiments from the stamp set.

Thanks for dropping by today, I hope that I have inspired you to power thorough your mess ups and try to create something beautiful with them.  Sometimes it's just a matter at looking at things just a little differently to get over that hurdle.  If you need any of the supplies that I used today you can pick them up in my online store 24/7 by clicking on the items in the shopping list below.

Stampin' Up! Shopping List: 


Happy Stampin' 
Rick Adkins 

Friday, February 21, 2020

Breathtaking Bouquet Spotlight Coloring

Hello and welcome to my blog; today I am going to share with you another card using the beautiful background stamp Breathtaking Bouquet.  I shared three cards yesterday using this same stamp set.  If you missed that post you can check it out by clicking here.  Today's card is using the Spotlight coloring technique this is a super fun and easy technique that allows you to spotlight a certain area of a stamped image.  Or you can use it to add interest to your card.  I used it to do both, and here's a look at today's project.  

Tips & Tricks: 

Use the Breathtaking Bouquet Background Stamp to create beautiful floral backgrounds you can use all year long for card making and other paper projects. This background image is ideal for coloring techniques.  To create today's card I started out by stamping the background image onto the So Saffron cardbase in matching So Saffron Ink.  Once I had that done I then stamped it again onto a piece a whisper white cardstock in Tuxedo Black ink.  After stamping it the second time it was time to start some Stampin' Blends Coloring.  


I colored all the flowers using the following Blends;  So Saffron, Daffodil Delight, Seaside Spray, Rococo Rose and Mossy Meadow for the leaves.  I used both the light and dark of each color to color most of the flowers, using the dark to light coloring technique.  Meaning I started with the darkest color in the shadow areas and then blended them out with the lighter colors.  I did this for all of them but the rose.  For the rose I started out with Daffodil Delight light in the dark areas and then used the So Saffron dark over that before blending it out with the light So Saffron blends.   For the leaves I added the dark in the shadow areas that are overlapped by the flowers, and along the center of the leaves.  I then colored over them with the light Mossy Meadow.  

Once all the coloring was done I used my paper snips and cut out the flowers that I had colored.  I added it to the card base by attaching it with dimensionals.  I then stamped my sentiment from Sending you Thoughts Stamp Set (which can be earned with a $50 order during Saleabration for Free).  I then popped it up over the bouquet also using dimensionals to give it a nice lift.  I finished off the card by adding a little bling with the Basic Rhinestone Jewels.   Thanks for dropping by I hope that you are inspired to give spotlight coloring a try.  If you need any of the products that I used today you can pick them up in my online store by clicking on the shopping list below.  

Stampin' Up! Shopping List: 


Happy Stampin'
Rick Adkins 


Join my NEW Online Technique & Fancy Fold Club!  You can find out all the details by clicking here!

Last day to sign up for my Monthly Card Club by February 20, 2020!  Sign up and learn more about Card club by clicking here!  February's featured stamp set is the Morning Star Stamp Set.  Stamps sets are not included in the club but may be purchased using the host code as an add on.  Or you may use something you already own.  


Receive the January Creative Stampers Tutorial Bundle with any size order!  Features 17 projects designed by Stampin' Up! demonstrators from around the world.  This month we all featured a item in the Sale-a-bration Brochure.  

Template Designed by creativeworkerbee