Friday, November 15, 2019

Paper Pumpkin Thank You Cards & December's Kit Details

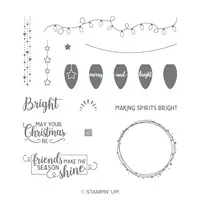
Hello and welcome to my blog; today I am going to share with you my Thank you card that will be going out to all my Pumpkin Pumpkin Subscribers from last month.  I used a fun demonstrator only stamp set designed just for this purpose.  I used the One Stop Box stamp set which again is a demonstrator only stamp set.  But, I love to show my customers and my Paper Pumpkin Subscribers how much I appreciate them.  Here's a look at my card.

Tips & Tricks: 

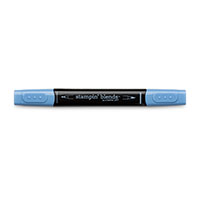
I started out with a piece of Terracotta Tile Cardstock and stamped the Paper Pumpkin box all over the background.  I then added a piece of whisper white stamped with the same box and my thank you sentiment.  I used Balmy Blue ink and cardstock for this.  I layered the whisper white image and then matted it with Balmy Blue.  This was popped up on the front of the card. 
You can receive a card like this when you become one of my Paper Pumpkin Subscribers.  Why, should you subscribe?  Well, if you love to craft but don't think that you have time to craft.  Paper Pumpkin is for you, because it they usually take about 30 to 45 minutes to create.   If you love to craft but don't want to have a large craft room or a lot of supplies on hand.  Then Paper Pumpkin is great for you!  Everything comes shipped to you in a cute little box.  Everything in the box is cut prepped and ready to go.  You also get a ink spot (which coordinates with the monthly craft kit) and a exclusive stamp set.  In your very first kit if you are a new subscriber you also get a reusable clear block to use with your stamp set each month.  Another great thing about Paper Pumpkin is you control your subscription.  If you don't want to receive that month's kit you can choice to skip that month.  

December Kit: 

December’s Something for Everything kit includes a super-versatile stamp set complete with 13 sentiments that can be used for occasions ranging from wedding, to get well, birthdays, and more! Plus, the three full-sized card designs (four of each) are gorgeous AND multiuse—making this kit super fun.  The December Paper Pumpkin kit makes it easier than ever to give a handmade card to a friend—no matter what the occasion!  Start the new year right with cute, fun, and easy cards for 2020.
Before I go I also want to mention that Paper Pumpkin makes a perfect gift for this Holiday Season.  If you have a crafter or someone that loves to do arts and crafts no matter what the age Paper Pumpkin is the perfect gift for them.  You can pick a gift subscription for them.  Just contact me and let me know this is what your are wanting to do.  To get the December kit you have until December 10th to subscribe.  If you choice the gift subscription there are a few options for you, and they do not start until the person you gift them to redeems them.  If you would like to take advantage of a gift subscription for someone I have a gift certificate for you to give them.  Thanks for dropping today. 

Happy Stampin' 
Rick Adkins 

If you live in the US.  I would love you to choose me as your demonstrator.  If you would like to purchase any of these products you can click on the Shop Now Button or by clicking on any of the images below.  Alternatively, you can also contact me by email to place your order.  Please be sure to use the monthly host code and I’ll send a little something out to you the following month to say Thank You!  

November HOST CODE:  QU2TJBJN
  1. Spend any amount with me this month and receive the Creative Stampers Tutorial Bundle.  Plus get a gift from me in December.
Please remember that if you use the host code you cannot use that order towards my KCRP’s (Kinmon Crafty Reward Points) that would be double dipping and is not allowed.  For more information on KCRP’s click here.  


Three main reasons to Join!  
1.     You Get at least a 20% discount on all your orders while you are a demo.   
2.     You get to join my fun Kinsmon Crafters Team and Private Facebook Group.
3.     Access to directions to all my online classes 

Stampin' Up! Shopping List: 

Thursday, November 14, 2019

How to Create a Layered Look with the Making Christmas Bright Stamp Set and Stampin' Blends Video Tutorial

Hello and welcome to my blog; today I am going to share with you the card that I made during last night's Facebook Live.  I wanted to share with everyone how to create a layered look to a solid stamp.  I used the Making Christmas Bright Stamp Set and a few Stampin' Blends to do this.  This is a great technique to stretch the life of your stamps and give them a new look without to much work.  Here's a look at my card.

Tips & Tricks: 

I started out making a one layer card but my plans changed a little once I decided on which stamp set I wanted to use.  Once I made that choice I made a mask with some post it tape and one of the stamps from the set.  I stamped the curved line on the post it tape and cut it out.  I added this to my card front and did a little ink blending with Mossy Meadow Ink.  Once I had the ink on the top of my Whisper White Thick cardstock I flicked on some gold and white perfect pearls.  
 Once I had the ink blending done I stamped the line that would hold the Christmas lights.  I then sat my card front aside and worked on the christmas bulbs.  I started out my stamping each colored bulb with the lightest color ink that I was going to use.  This is my base layer and also the next lightest color besides the highlights.  The highlight is added last with a white gel pen.  For the ink colors that I used for the bulbs are as followed; Call Me Clover, Flirty Flamingo, Mano Melody, Pineapple Punch, and Balmy Blue.  So once they were all stamped I let them sit for awhile to let the ink dry completely.  
Once the ink had dried I then took my Stampin' Blends and added in multiple colors to enhance the color and this created a layer look to the bulbs.  I added three different colors to each bulb in most cases.  For the Call Me Clover bulb I only did a two color blend.  So since I mentioned that lets start there.  For the Call Me Clover one I added a layer of Call me Clover light stampin blend and dark.  This added more tones and a glow to the bulb.  For the rest I did a three layer blend.  I used the following blends on each bulb starting with the red.  Reb Bulb; Flirty Flamingo ink, Stampin' Blends in Dark Flirty Flamingo, and light and dark Real Red.  Orange Bulb; Mango Melody ink, Pumpkin Pie light and dark stampin' blend with a little Mango Melody Dark blend.  Yellow bulb; pineapple punch ink with dark Pineapple Punch blend and light and dark Daffodil Delight Blends.  The finial bulb was done in Balmy Blue ink with balmy blue light and dark blends with a little Night of Navy light stampin' blends.  You can see by adding the blends to the images it adds more layers to them.  

Video Tutorial: 

If you are viewing this post by email you will need to click here or click on the image below to view the video.  
Thanks for dropping by today, I hope that you have a wonderful day.  I will see you tomorrow for another project.   
Happy Stampin' 
Rick Adkins 

If you live in the US.  I would love you to choose me as your demonstrator.  If you would like to purchase any of these products you can click on the Shop Now Button or by clicking on any of the images below.  Alternatively, you can also contact me by email to place your order.  Please be sure to use the monthly host code and I’ll send a little something out to you the following month to say Thank You!  

November HOST CODE:  QU2TJBJN
  1. Spend any amount with me this month and receive the Creative Stampers Tutorial Bundle.  Plus get a gift from me in December.
Please remember that if you use the host code you cannot use that order towards my KCRP’s (Kinmon Crafty Reward Points) that would be double dipping and is not allowed.  For more information on KCRP’s click here.  


Three main reasons to Join!  
1.     You Get at least a 20% discount on all your orders while you are a demo.   
2.     You get to join my fun Kinsmon Crafters Team and Private Facebook Group.
3.     Access to directions to all my online classes 

Stampin' Up! Shopping List: 

Price: $49.00

Template Designed by creativeworkerbee