Tuesday, November 12, 2019

How to Make a Star Easel Card - Video Tutorial

Hello and welcome to my blog; today I have a super fun fold card for you.  As you know if you have followed me or been here be for you know that I love cards that look complicated but are super easy todo.  And, today's cards no exception.  My project today is a Star Easel card.  I made this card after seeing it in a UK card magazine and just had to figure it out.  Here's a look at my project.

Tips & Tricks: 

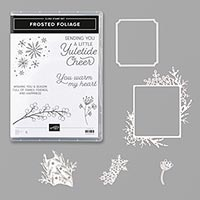
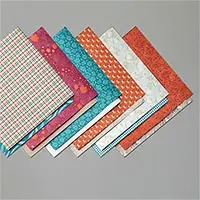
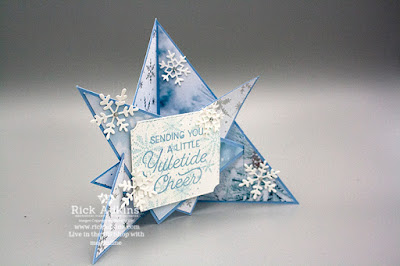
You can create this card with a half sheet of cardstock for the base.  Along with that you need just a little whisper white and a couple sheets of six by six pattern paper.  For my card I used Seaside Spray as my card base and the Feels Like Frost Designer Series Paper. 

You can fit this card in a standard A2 size envelope.  So it's easily mailed, without any extra postage.  Which is always good.  Once I had the designer series paper attached to the card and put together I added some snowflakes and rhinestones to decorate the card.  I also stamped some snowflakes on the sentiment piece, but stamped off first.  I then added the sentiment full strength. 

When you go to put the points in place as you will see in the video you may have to use your snips to cut the cardstock all the way through. 

Video Tutorial: 

If you are viewing this post by email you may have to click here or the image below to view the video. 


Here's another version of the star easel card that I made.  With this version I used the Toile Tidings Designer Series Paper.  
Thanks for dropping by I hope that you enjoyed this card, and I hope that you give it a try.  
Happy Stampin' 
Rick Adkins 


If you live in the US.  I would love you to choose me as your demonstrator.  If you would like to purchase any of these products you can click on the Shop Now Button or by clicking on any of the images below.  Alternatively, you can also contact me by email to place your order.  Please be sure to use the monthly host code and I’ll send a little something out to you the following month to say Thank You!  

November HOST CODE:  QU2TJBJN
1.     Spend any amount with me this month and receive the Creative Stampers Tutorial Bundle.  Plus get a gift from me in December.
Please remember that if you use the host code you cannot use that order towards my KCRP’s (Kinmon Crafty Reward Points) that would be double dipping and is not allowed.  For more information on KCRP’s click here.  


Three main reasons to Join!  
1.     You Get at least a 20% discount on all your orders while you are a demo.   
2.     You get to join my fun Kinsmon Crafters Team and Private Facebook Group.
3.     Access to directions to all my online classes 

Stampin' Up! Shopping List: 

Monday, November 11, 2019

Kylie's Demonstrator Training Program Team Blog Hop


Hello and welcome to this month's Demonstrator Training Blog Hop.  It's Fall still even with the temperature that has dropped to a cool Winter chill.  But sometimes it happens that it starts getting colder during Thanksgiving.  Thanksgiving in the States is only three weeks away, and we all have a lot to be thankful for.  During this time of the year in the US we celebrate Thanksgiving a time to be thankful for everything in your life.  Over the last year there has been a lot of ups and downs good and bad that have happened.  I am thankful for so much during this season of thanks.  I am thankful for the time that my Baby brother had to stay with us during his recovery before his untimely passing, I am thankful for my supportive customers and friends.  I am thankful for being part of this training program again this year.  I am thankful for so many things so with all that in mind I wanted to create a card to represent these and all the other things I am Thankful for this season.  Let's have a look at my card. 


Basically for my card I used scraps of the Come Together Designer Series Paper and puzzle pieced these scraps into a design that was pleasing to the eye.  I like to refer to this as the Puzzle Piecing or Patchwork technique.  This is a fun way to create especially if you have hit a brick wall in the creative process.  By working in this technique you free up your mind to get past the blocks that could be keeping you from creating.  Once I had the design figured out I added mats to the designer series paper.  Some of the layers were popped up on dimensionals, some where just glued down using liquid glue.   After stamping the pumpkins I used my Wink of Stella to create a watercolor look on the pumpkins.  I cut them out using the matching dies, and added them to my card.  
If you are viewing this post on my wordpress blog you will have to click here to view the blog roll. 

 Blog Roll: 


Happy Stampin' 
Rick Adkins 


If you live in the US.  I would love you to choose me as your demonstrator.  If you would like to purchase any of these products you can click on the Shop Now Button or by clicking on any of the images below.  Alternatively, you can also contact me by email to place your order.  Please be sure to use the monthly host code and I’ll send a little something out to you the following month to say Thank You!  


November HOST CODE:  QU2TJBJN
1.     Spend any amount with me this month and receive the Creative Stampers Tutorial Bundle.  Plus get a gift from me in December.
Please remember that if you use the host code you cannot use that order towards my KCRP’s (Kinmon Crafty Reward Points) that would be double dipping and is not allowed.  For more information on KCRP’s click here.  


Three main reasons to Join!  
1.     You Get at least a 20% discount on all your orders while you are a demo.   
2.     You get to join my fun Kinsmon Crafters Team and Private Facebook Group.
3.     Access to directions to all my online classes 

Stampin' Up! Shopping List: 

You Fill My Heart - Day of Thanks Stamp Set by Stampin' Up!

Hello and welcome to my blog; today I am going to share with you this super cute card featuring the Day of Thanks Stamp Set, which is a wonderful set that hasn't gotten a lot of love.  It's a very underrated set that I think at this time of year deserves some more love.  So, don't be a turkey. Express your thanks with the Day of Thanks Stamp Set. The realistic images and heartfelt sentiments radiate gratitude.  Here's a look at my card.

Tips & Tricks: 

To start this card I cut a piece of Early Espresso cardstock in half to 4 1/4 x 11 scored at 5 1/2.  I added a piece the Come to Gather Designer Series paper to the card front.  I stamped the turkey from the stamp set on a stitched oval after stamping off once.  I then stamped the sentiment on that piece full strength.  To finish the card I stamped the feather in the set three times and cut it out.  I added them to card with a mixture of liquid glue and dimensionals.
Thanks for dropping by today. I hope that you have enjoyed this quick little card.
Happy Stampin' 
Rick Adkins 
If you live in the US.  I would love you to choose me as your demonstrator.  If you would like to purchase any of these products you can click on the Shop Now Button or by clicking on any of the images below.  Alternatively, you can also contact me by email to place your order.  Please be sure to use the monthly host code and I’ll send a little something out to you the following month to say Thank You!  

Stampin' Up! Shopping List: 


Sunday, November 10, 2019

Case the Catalog - Night Before Christmas Memory & More Card

Hello and welcome to my blog; today I am going to share with you another Case the Catalog project.  For today's project I am going to share with you; a card from the Holiday Catalog.  The card that I am going to share was CASEd from one of the projects on page 25.  The project that I am going to CASE today features the Night Before Christmas Memory and More Card pack and the Night Before Christmas Memories & More Card and Envelopes.  If this is your first time here welcome and if you are returning welcome back.  If you are new to my blog and crafting; you may not know what the term CASE means.  CASE is a term that card makers use to learn by copying a project.  CASE stands for Copy and Share Everything or Copy and Selectively Edit.  By doing this you can learn new skills or techniques.  Here's a look at my card.  

Tips & Tricks: 

I always love the Memory and More card packs and the matching cards and envelopes that we offer in our catalogs.  The holiday catalog has a lovely pack of Memory and More cards and matching Night Before Christmas Memory and More Cards and Envelopes.  Both of these items match the Night Before Christmas Suite.  The Memory and More card pack includes 54 double sided cards 6 each of 9 designs in 3" x 4" and 4" x 6" size along with 6 sticker sheets.  This card pack is also designed for a Holiday Memory Book (which was I offered as one of my online classes last month).  
To use the Night Before Christmas Memory & More Card Packs and the Night Before Christmas Memory & More Cards and Envelopes together to create cards is really really easy.  All you have to do is simply adhere cards from the card pack to the cards.  With just these products you can make 20 cards and coordinating envelopes.  
For this card I took the card that said To Santa and used some scrap Crumb Cake Cardstock and punched out a 1/2 circle using my 1/2 Circle Punch.  I attached that with a little liquid glue to the card from the Card pack.  I then took a hand held punch (retired) and punched a hole in the center of the crumb cake piece through the card.  I added some of the Cherry Cobbler 3/8" Diagonal Stripped Ribbon through the hole and tied it into a bow.  I then attached this to the card with a few Stampin' Dimensionals.  
And just like that you have a complete card all done.  Really and truly it's just that quick to create tons of cards just using these products.  Thanks for dropping by today.  I am glad that you are here.  I am preparing as I type this blog post to get ready to attend the OnStage Local in Atlanta next weekend, so be on the watch out on my Social Media channels for little sneak peeks of upcoming products from the 2020 Occasions Catalog and Saleabration Brochure.  
Happy Stampin' 
Rick Adkins 


If you live in the US.  I would love you to choose me as your demonstrator.  If you would like to purchase any of these products you can click on the Shop Now Button or by clicking on any of the images below.  Alternatively, you can also contact me by email to place your order.  Please be sure to use the monthly host code and I’ll send a little something out to you the following month to say Thank You!  

November HOST CODE:  QU2TJBJN
1.     Spend any amount with me this month and receive the Creative Stampers Tutorial Bundle.  Plus get a gift from me in December.
Please remember that if you use the host code you cannot use that order towards my KCRP’s (Kinmon Crafty Reward Points) that would be double dipping and is not allowed.  For more information on KCRP’s click here.  


Three main reasons to Join!  
1.     You Get at least a 20% discount on all your orders while you are a demo.   
2.     You get to join my fun Kinsmon Crafters Team and Private Facebook Group.
3.     Access to directions to all my online classes 
I All Ready Know I Want to Join!  Sign Me UP!

Stampin' Up! Shopping List 

Template Designed by creativeworkerbee