Thursday, September 26, 2019

A Paper Pumpkin Thing Blog Hop: Bone Appeitit

Hello and welcome to my blog; today I am going to share with you my alternative projects for this months Paper Pumpkin Thing Blog Hop.  I have four alternatives featuring the September Paper Pumpkin Kit Bone Appetit.  This was such a fun kit to work with.  With all it's spooky charm and fun Halloween themed treat boxes and stamp set.  Here's a look at my alternative projects then we will look at them closer in just a few minutes.
The September kit was designed to create 20 treat boxes for Halloween.  And believe me they are the perfect little teat boxes for a spooky night.  I will be making mine up and filling them with a little candy for trick or treaters this year.  Here's a little look at how the kit was intended to be put together.

Alternatives: 

The first alternative project I came up with a fun little card using one of the treat boxes as DSP and a little stamping.  I took my inspiration for this card from one of the tags that was designed in the original kit.  I trimmed the box down to 2 x 5 1/2 and then added a piece of Pumpkin pie cardstock as a mat.  I stamped my card base with the little skull and cross bones around the Gorgeous Grape cardbase.  I used elements from the kit to embellish my card.  
After creating my first card I started thinking that the box would be the perfect size for our tiny treat boxes.  I figure out that you could cut off the bottom flaps and the top flaps.  You are left with the perfect insert to place inside one of the treat boxes.  I added a little ribbon and a tag to finish off the design.  
For my next alternative card I got a little artistic.  I stamped a layer of basic black cardstock with the two skeleton from the stamp set in versamark ink and covered them with white embossing powder.  I wanted to create a card for Dia De Muertos (Day of the Dead) so I stamped a crown of flowers and heat embossed it.  I then used some colored pencils and drew a skeleton face.  Once done I matted both pieces with a piece of whisper white.  The flowers I colored in with my colored pencils.  
My last card was inspired by the skeleton background from the card above.  I wanted to do a card doing a little ink blending.  So I heat embossed a panel of whisper white with embossing powder and used only three colors to blend the background. I then added the wicked die cut in black foil paper and heat embossed two sentiments.  
Those are my super cute little projects for this month's kit.  If you are viewing this post on my word press site you will need to click here to view the blog roll.  
Happy Stampin' 
Rick 

Blog Roll: 


Wednesday, September 25, 2019

Gather Together Window Card #PCC352

Hello and welcome to my blog!  Have you ever wanted to show off your designer series paper and a fun colored image on the same card but thought that they each were to much for the same card?  If you have I have the solution for you with today's project.  I am going to share with you a quick solution that was probably in your crafting wheel house but you my have forgotten about.

I had this same problem with today's card for the Paper Craft Crew Sketch Challenge this week.  I wanted to use a piece of the Come to Gather Designer Series Paper but wanted to create a colored pencil piece for the card featuring the large leaf from the Gather Together Stamp Set.  I had to thing about how to do this plus tie in my design to go along with the sketch.  It took a little thinking but I did figure out a very cute solution to all the problems that I had facing me.  Here's a closer look at my card.
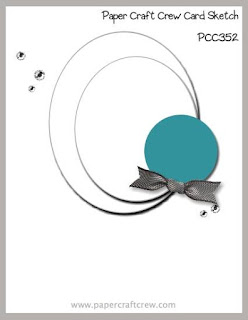
Here's the sketch that inspired my card today.  You can click on the sketch below to go to the Paper Craft Crew Website and check out what the other Design team members came up with from being inspired from this sketch.  You can also join in with this weeks sketch challenge by following the same link.

Tips & Tricks: 

For my card as I mentioned above I had several things I wanted to accomplish, but had to give it a lot of thought to come up with something that was inspired by this weeks sketch.  And, also to fit my style of card making along with accomplishing all the goals I had set fourth.  So I started with trying to figure out how to use the stamp set I waned along with the designer series paper.  My solution to the problem was actually very simple and we sometimes forget about it.  The solution was like a brick wall smacking me in the face.  Create a Window card!   By doing so it would accomplish all my goals.  So I started out by cutting my window in the piece of Designer Series Paper I selected for my card.  Which by the way provided my color inspiration for my card as well.  
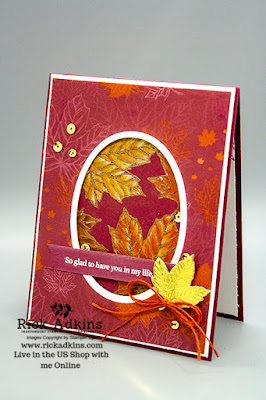
For the Window I decided to use the Layering Oval Dies.  The ovals not only would provide the window that I needed but also keep the shape from the card sketch.  I used the two largest ovals from the set to use for my windows.  And I guess I should have called this a double window card because I actually do have two windows on the card front.  Anyway I used the largest oval from the set to cut out the oval in the center of the Designer Series Paper.  Once I had that cut out I took my Whisper White Cardstock that I was going to use for the mat and created the second window.  I used the second oval die and the piece of designer series paper I just talked about and lined them up together how they would go on the card.  Once I had the designer series paper lined up perfectly I added the oval and lined it up in the cut oval and ran that through my die cutting machine.  
Once that was cut out I went ahead and layered them together and adhered them.  I then took and lined them up on my card base and used a pencil and outlined the oval.  At this point I started stamping the large leaf image from the stamp set in Versamark ink and added Gold embossing powder and heat set it until it was smooth and melted.  Once I was cooled I started coloring with my Polycromus Color Pencils.  Once I had everything colored I layered the card front on to the card base using dimensionals.  I then cut out one of the small leaves from the Gather Leaves dies from Gold Foil.  I added it to the card front using a dimensional.  I stamped a piece of Merry Merlot cardstock with my sentiment and heat embossed it with white embossing powder.  I added a few gold sequins to the card to finish everything off.  I added a piece of whisper white cardstock with a couple of the leaves stamped on it for the inside.  
Thanks for dropping by today, I hope that you enjoyed my little card today.  You can find a full list of the supplies I used below besides the color pencils.  I purchased them from Amazon.  My suggestion is to always purchase the set that you can afford; you can work wonders with just a few colors.  So don't ever think you have to have the biggest set that's out there.  
Happy Stampin' 
Rick 


If you live in the US.  I would love you to choose me as your demonstrator.  If you would like to purchase any of these products you can click on the Shop Now Button or by clicking on any of the images below.  Alternatively, you can also contact me by email to place your order.  Please be sure to use the monthly host code and I’ll send a little something out to you the following month to say Thank You!  
September  HOST CODE:  SQ2WWJZN
  1. Spend any amount with me this month and receive the Creative Stampers Tutorial Bundle featuring Fancy Fold or Interactive Projects.  Plus get a gift from me in October. 

Please remember that if you use the host code you cannot use that order towards my KCRP’s (Kinmon Crafty Reward Points) that would be double dipping and is not allowed.  For more information on KCRP’s click here. 


Product List

Tuesday, September 24, 2019

14 Techniques and Tips for Using the New Delicata Metallic Inks

Hello and welcome to my blog; today I am going to share with you a few tips and tricks with using the NEW Delicata Metallic Inks.  I have tried a lot of the metallic inks on the market and I have never found one that like until now.  I find that the Delicata Metallic Inks have great coverage and are easy to work with.   I have created a video for you where I just had a little play time to create some card fronts or just to see what these inks will do.  I just cut a lot of 4 1/4 x 5 1/2 pieces of cardstock in various colors and just played.  I have compiled a list of the techniques for you in today's post.  Let's get started shall we.

There are three new Delicata Inks and ink refills in the Stampin' Up! Holiday Catalog this Year; Golden Glitz, Celestial Copper, and Shimmery Sliver.  These inks add amazing shine to your projects be it with just stamping them or any other fun technique you try.

Techniques Using Delicata Inks: 

  • Stamping:  Yes just plain old stamping!  These Inks stamp wonderfully on both Whisper White Cards stock and colored cardstock.  I did find that they dry faster on the colored cardstock rather than the Whisper White.  The Whisper White cardstock is a much smoother service and takes just a little longer for the inks to set into the paper.  You will notice that the inks do show up a little more on the colored cardstock.  
All three inks on Whisper White 

All three inks on Basic Black 
  • Fine Line Stamping:  I too a fine line open image and stamped the each of the inks on a colored piece of cardstock.  And they stamped beautifully.  They look a better than this picture shows them.  

  • Border Stamping:  You can stamp them in a row to create a border or use a border stamp.  
  • Using Background Stamps:  These inks work great on Background stamps.  Depending on how you ink your stamp you can get some great looks.  I really like the silver image in this picture.  
  • Ink Smooshing:  The Delicata Inks work great for the Ink Smooshing technique.  Since they are water based they act nicely with water, and creates beautiful effects.  

  • Splatter and Watercolor Washes:  You can water these inks down to a cream consistency and create a beautiful splatter or watercolor background wash.  You can get a nice gradient of color.  Some of the inks are a little more transparent than others so something to be aware.  

  • Dragging:  You can easily drag the ink pad across your projects to create a fun textural look.  

  • Stencils:  They work nicely through a stencil no matter which application you use.  


    • Monoprinting:  Before you clean you stencil press it to another piece of cardstock and transfer the left over ink.  Do this a few times and create a fun textural background without any extra work.  


    • Reverse Embossing:  Ink up the raised side of your embossing folder to transfer the ink to the little nooks of the indented cardstock.  


    • Embossing:  Ink up the most solid side of the embossing folder to transfer all the ink to the raised areas of the cardstock. 

    • Sponging:  Ink up a sponge and just sponge your paper to create a fun looking textural background.  (Not Pictured)  Use all three ink colors for a super fun look 
    • Heat Embossing:  You have a little time once you stamp your image to add embossing powder to the ink and heat emboss it.  It works better if you use the same color embossing powder as the ink.  For example Golden Glitz with Gold embossing powder.  (Not Pictured) 

    Clean Up:  

    Cleaning up these inks are easy.  The recommended cleaner for these pigment inks is Stazon Cleaner but I did find that you can clean them off your photopolymer stamps with just soap and water.  Make sure that you clean them as soon as you are done.  You don't want to let them sit on your stamps or stencils very long because they will dry quickly.  I recommend that you clean them ASAP as soon as your done stamping them.  You do have a little more time on photopolymer but not excessive stamping sessions.  

    Video Tutorial: 

    .

    If you are viewing this post by email you may have to click here to see the video.  Some mail servers will not show the embedded video.  

    Thanks for dropping by today I( hope that you have found this tutorial helpful and and that you have found some useful information.  If you live in the US.  I would love you to choose me as your demonstrator.  If you would like to purchase any of these products you can click on the Shop Now Button or by clicking on any of the images below.  Alternatively, you can also contact me by email to place your order.  Please be sure to use the monthly host code and I’ll send a little something out to you the following month to say Thank You!  
    Happy Stampin' 
    Rick 


    Product List

    Template Designed by creativeworkerbee