Hello and welcome to my blog; today I am going to share with you the second post for my Finding Color Inspiration Series and a little Sneak Peek at one of my Favorite Stamp Sets from the New 2019 Holiday Catalog. If you missed the first post in this new bi-weekly series you can
click here to view that post and where I found Color Inspiration for my Cuckoo For You Friendship Card. This week I am going to share with you a Christmas Card and where I found the most unlikely source for it's color inspiration. You can find color inspiration anywhere sometimes you just have to look outside and you can come up with thousands of ideas for color combinations.

One of my favorite treats during the Summer Months is watermelons. Yes, I love watermelons, I love the sweet juicy taste and the feeling of the cool summer sun filled juices running down my face when I take a big luscious bite. I love the bright sun rich color from the outside to the point when you cut into the largest piece of fruit you can find on the vine, and that deep rich red begins to be exposed to your longing sun beat eyes. Once you crack it open and you can see the wet juices glistening in the rays of bright white light from the Summers sun's warm golden rays on a hot dry southern summer afternoon. Here's a look at the card I created using Holiday Catalog Products inspired by of all things a Watermelon. I know hard to believe that my little Christmas Card here was inspired by one of Summers favorite fruits.
The Inspiration Process:
This was how I started my journey looking for the inspiration for this card. I went outside and and found my inspiration in the Watermelon Fields. Once I had my color inspiration then I had to gather up all the things that I thought I would want to use in creating my card. One of the things that I pulled was the
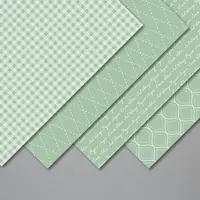
Toile Tidings Designer Series Paper from the 2019 Holiday Catalog. I pulled this paper because the colors reminded me of the outside and inside of this favorite Summertime treat. With it's succulent Garden Greens and luscious Real Red Toile Patterns, the colors just screamed watermelons to me. I also love how each piece of paper has the same pattern in both of these colors; on one side you have the pattern in Real Red and a light shade of Very Vanilla and on the other other the same pattern in Garden Green and a light shade of Very Vanilla. All three of these colors reminded me of the outside and inside of that sweet sweet fruit of the Southern watermelon fields from my childhood. It didn't hurt that the Toile pattern also is a very country pattern that brings up feelings of being on a farm on a hot southern summers day.
With the designer series paper chosen it wasn't hard to pull the other elements of the card together. I knew I wanted to use some
Garden Green, Real Red, and Soft Sea foam cardstock and matching inks on my card but I just wasn't sure where yet. I also needed something to represent the black of the seeds that you find in most of the watermelons from a Southern Garden. So I decided that I would use the
Memento Tuxedo Black ink pad and some of the
1/2" Basic Black Satin Ribbon.
So with all the products finalized it was time to start designing this beautiful Christmas Card. I Started out with my card base from Garden Green Cardstock (4 1/4 x 11 scored at 5 1/2). Once I had that cut and folded I cut my Toile Tidings Designer Series Paper down to size (4 x 5 1/4). I picked a pattern that was filled with foliage in Real Red. I used this to represent the meat of the watermelon since it was on the outside of the card and one of the main things that you would see. Since Garden Green was my dominate color on the card and Real Red being my secondary color of the design. I then added in a mat of Soft Sea foam Cardstock (5 3/8 x 4 1/8) to represent the Rhine of the garden green flesh of the watermelon.
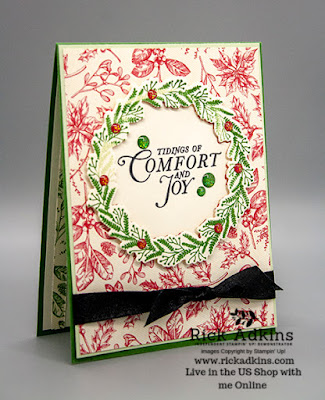
I then added the Black satin ribbon to the bottom of the card and tied a nice pretty knot for interest. Basic Black and Soft Sea foam became my accent colors. In design you always have a dominate color, a secondary color and one or two accent colors. These color hues help to guide the eyes around your project, and stop on the important parts plus they usually add interest and color harmony as well. Now, since we have all the supporting players in place its time for the focal image; that element on your project that draws the viewers eyes to your message.
For my card today that was the wreath that I stamped from the Tidings All Around Stamp Set. Which by the way is part of a cost saving bundle and the matching dies coordinates with another stamp set in the Holiday catalog that's perfect for fall and other seasons as well. I stamped the large wreath from the stamp set in both Soft Sea Foam ink and then Rock n Rolled (if you want to see how to do this technique you can
click here and see how I did the Rock N Roll Technique on another project) it in Garden Green Ink. Once I had the image stamped the way I wanted it I used the matching dies and cut out the wreath. I used the piece from the middle of the die cut and stamped my greeting in Tuxedo Black ink and just pieced it back into the center with a little adhesive. I then popped up the wreath with a few
Stampin' Dimensionals to add a layer to the focal image. To add a little more sparkle to the card (not that the satin ribbon didn't add enough shine) I added a few of the
Toile Tidings Glitter Enamel Dots (#150433) in Real Red around the wreath to represent holly berries and a few of the Garden Green ones around the sentiment to help draw your eye there as well. These Glitter Enamel Dots add just enough sparkle to the card that it draws your attention to the main focal image but doesn't take away from it either.
Pin Worthy Inspiration:
I have created a pin worthy inspiration graphic for you to pin to your Color Inspiration Board on Pinterest, that will help you with your own unlikely Christmas Card inspiration this year. I added all the elements that you would need to find your inspiration easily with this pin. So feel free to pin away.
Thanks for dropping by today and I hope that this has helped you find a little inspiration in the unexpected and has taught you to think outside the box with looking for color inspiration for your projects. When your raised in the South these are some of the things you remember doing as a child on a hot summer afternoon, you remember the details and feelings of walking through that hot field of leafy green searching for the biggest fattest juiciest watermelon you can find. Waiting with anticipation for it to be cracked open and getting to taste that suite juice for the very first time during the summers blistering heat. So when searching for inspiration for color combinations for your cards remember your childhood and the adventures you took, take a walk in your memories and go outside and find retrace those childhood footprints you are sure to find the color inspiration you're looking for.
Happy Stampin'
Rick
Stampin' Up! Shopping List
Holiday Catalog Items will be available starting September 4, 2019 in my Online Store
AUGUST HOST
CODE: QM9NBQR9
Spend any amount (using this month’s host code) and get the August
Creative Stampers Tutorial Bundle FREE (This month we are featuring products
from the Come Sail Away Suite in the 2019-2020 Annual Catalog)
- Spend $25 (before taxes and shipping) or more using this
month’s host code and get my August Monthly Card Class Make & Takes Mailed
to you FREE as a Thank you.
- Spend $75(before shipping and taxes) or more and get the August
Monthly Make & Take Class and a Sample of the Iridescent Sequins for FREE
as a Thank You gift when you use this month’s host code.
- Spend $150 or more and get the July Creative Stampers
Tutorial Bundle, July Monthly Card Class Make & Takes, & the Iridescent
Sequins pack for FREE as my thank you.
If your order is over $150 please don’t use the host code. You will give up your Stampin’ Rewards if you
do.
Please
remember that if you use the host code you can not use that order towards my KCRP’s
(Kinmon Crafty Reward Points) that would be double dipping and is not
allowed. For more information on KCRP’s
click here.
You have two ways
to get the August Creative Stampers Tutorial Bundle. 1.) Earn it FREE
with a qualifying order (see above host code information). 2.) You can
purchase it from my Tutorial Store for $20 US by clicking here as a Instant Download. This
month's Creative Stampers Tutorial Bundle features projects using products from
the Come Sail Away Suite.

Only a few
more days left to take advantage of this Extra Extra Joining Special, you earn
2 times the Extras! Join my family of Kinsmon Crafters now and earn an extra $30 in
FREE items to add to your $99 Starter kit. That means you can pick out
$155 of wonderful Stampin' Up! Products for only $99. And you get FREE
shipping on your starter kit. Extra #2 You will receive a $10
Coupon Code if you Sign up in July to use in August. If you sign
up in August, your will get the Coupon Code to use in September. Have
questions visit my Join my Team Page and my FAQ page for more details.
Three main
reasons to Join!
1.
You
Get at least a 20% discount on all your orders while you are a demo.
2.
You
get to join my fun Kinsmon Crafters Team and Private Facebook Group.
3.
Access
to directions to all my online classes
Redeem Your Coupons Now before August 31, 2019 Click here to find out how!
Holiday Catalog
Paper and Product Share Reservations are open now! Take advantage of this cost saving way to get
your hands on a sampling of all the new papers and ribbons in the 2019 Stampin’
Up! Holiday Catalog. Click
here to Reserve your Spot
today! Deadline is September 2,
2019.
Get your spook on
with the September Paper Pumpkin Click here to Subscribe today!

Are you on my
list to get a NEW 2019 Holiday Catalog? If
you are not a demonstrator or don’t have a demonstrator that you work with in
the US I would love to:
1.
Send you a Copy of the 2019 Holiday Catalog and
Idea Book
2.
Add You to My mailing list for 10 + PDF tutorials
in my Monthly Newsletter each month
3.
Ordering opportunities and my customer Ordering
specials
Only a few days left to get your
name in the Coconut for my Slizzin’ Summer Promotion! Summer's here and I am ready to beat the
heat! To celebrate Summer, I am going to run a three-month promotion with
the chance to earn a prize in September! I will be giving away a few
prizes from the Holiday Catalog in September and you can get your name in the
Coconut now!
Details:
Get your name in the Coconut for some free Holiday Products to be given away in
September! Here's how you will earn tokens during June, July, &
August!
- 1
token for purchasing one of my Online Classes
- 1
token for every $30 you spend during June, July, & August!*
- 2
tokens for referring a friend and they sign up for a class with me &
mention in their email that you referred them
- 5
tokens for joining my team
- 10
tokens for hosting a party online or in your home
Names will all be put into a hat and
drawn live on Tuesday, September 17th at 4 pm CST during my Facebook
Live!
Fine Print:
*Can not be combined with any other
special offer This is not a promotion ran or endorsed by Stampin'
Up! This promotion is solely ran by Rick Adkins Independent Stampin' Up!
Demonstrator This offer is only good for those that live in the United States
and prizes can only be won by a US Resident


")
")


 Satin Ribbon")


