Thursday, April 25, 2019

A Paper Pumpkin Thing Blog Hop: Sentimental Rose


Hello and welcome to this month's Paper Pumpkin Thing Blog hop.  This month's kit is super cute and beautiful and features a wonderful set of cards and gift box.  Plus the bonus perk of this month's kit was that it featured our very first distinktive stamp set.  For my Alternative projects I created a fun card and gift packaging.  Here's a look at my projects.
Here's a look at this month's intended projects from the kit.

All Wrapped Up!:  

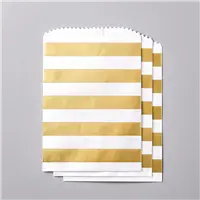
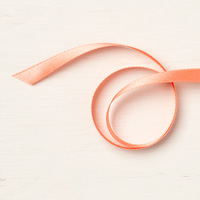
For my gift packaging I used one of the striped gold and filled it with Hershey's kisses.   Folded over the top and added one of the background panels from the kit.  I stamped Fore you of this panel using poppy parade ink.  I then stamped three of the roses from the kit in Flirty Flamingo and one each in So Saffron and Poppy Parade.  I then fussy cut them each out. With the three Flirty Flamingo roses I took different sections from two of them and layered them on the third.  I stamped a few of the leaves from the stamp set in mint macaron and cut them out also.  I then added ribbons in Calypso Coral, Mini striped Poppy Parade Ribbons and a little bakers twine I took from my kit.  I placed the ribbon and twin on the tag that I used the panel for and stapled the ribbon on.  Then I made a double bow with bakers twine and attached over the staple.  
Next i added the flowers onto the tag.  I then added some of the leaves around.  To finish off the tag I added faceted clear gems to the center of each rose.  

My Card: 

 For my card I started out with a piece of whisper white cardstock and stamped two of the roses and leaves in on opposite sides leaving enough room between each so that I would have a nice window.  Next I took a circle and traced around that connecting the roses.  With a craft knife I cut out the center of the circle making sure to cut around each rose and leaf that was in the circle.  I took one of the note cards from the kit and trimmed it down to fit behind the opening.  I then layered this panel onto a Flirty Flamingo card base.  I used the same faceted clear gems on the inside of the roses on the card as I did the gift packaging.  

I added a whisper white panel to the inside with one of the roses stamped on the it.  And, then added my sentiment stamped on one of the banners from the kit and added some baker's twine at the top of the card to finish everything off.  

I hope that you have enjoyed my projects for this month.  If you are viewing this post on my wordpress site you will need to click here to view the blog roll.  If you are viewing on my new blogger website you will find the blog roll below.  Below the blog roll you will find a list of the supplies I used to do both projects.  Thanks for dropping by I hope that you will hop along to the end.  I know everyone have came up with some great projects for you.  
Happy Stampin' 
Rick Adkins 

Blog Roll: 

Stampin' Up! Shopping List: 


Wednesday, April 24, 2019

Believe You Can Host Set Sneak Peek for #PCC334

Hello and welcome to my second post today; this post is for this weeks Paper Craft Crew Challenge.  This week we have a fun color challenge for you.  We are using Poppy Parade, Coastal Cabana, Lemon Lime Twist and a Mystery Color.  So this makes it super fun to play with.  I am giving you a little sneak peek a new Host set that will be coming in the 2019 Annual Catalog.  This is a super fun stamp set, and very encouraging.  Here's a look at my card today.


Here's a look at the color challenge image that inspired my card today.  You can also take a little time and play along with us here as well.  You can also see what the other designers came up with.  All you have to do is click on the sketch image.  
As I said my card is a sneak peek of one of the new host sets that will be in the new Stampin' Up! Catalog.  This is a fun set that allows you to use any color media you would like.
I used my Stampin' Write markers to color the flowers on the die cut.  I used Poppy Parade, Coastal Cabana, Lemon Lime Twist.  The mystery color I threw in was Mango Melody.  The colored strip of card stock going up the right hand side of the card was repeatedly stamped in the alternating colors that were used.  Then I trimmed it down and added it to the embossed panel.  Which by the way was embossed with the Country Floral 3D embossing folder.
This will be a fun host set to pay with and I can not wait to share with you a few more cards using it.  I hope that you have enjoyed my card today and that you will take time to play along.  Thanks for dropping by.
Happy Stampin'
Rick Adkins 

Stampin' Up! Shopping List: 


How to Paint a Sweet Cup using Arteza Acrylic Paint & Fable Friends Stamp Set

Hello and welcome to my blog and YouTube Channel; today I am going to share with you how I decorated a sweet cup a couple weeks ago for a blog hop.  I used the Fable Friends Stamp Set and some acrylic paint.  The acrylic paint that I used was from Arteza.

I was asked to review the Arteza Acrylic Paints and I had to come up with a way to do it and Incorporate Stampin' Up! as well.  It was super easy to come up with a project to do this.  I admittedly thought about a project that I did in the 5th or 6th grade in art class.  The art teacher had us paint ice cream containers.  This project stuck with me and I had to recreate it using the great Arteza paint and a sweet cup.  Here's a look at the finished project.


Yes I am loving the quality of the Acrylic paint from Arteza it has a great body and painted easily.  So I would highly recommend it.  Using this paint was even easy to stamp on top of and paint it in as you can see in the video tutorial about how I painted the sweet cup.

Video Tutorial: 

If you are getting this post by email you may not see the embedded video; some mail services will not show the video you may have to click here to see it.   

Tips & Tricks: 


  • I did cover the sweet cup with a very thin coat of Gesso (which is a hard compound of plaster of Paris or whiting in glue, used in sculpture or as a base for gilding or painting on wood canvas or paper.)  When you do this before you add acrylic paint It will take less paint to cover the surface and provides a better archival surface.  
  • After the gesso was dry I painted in the background.  Using a mixture of blues and greens.  I also added a little yellow to the green to create different shades.  
  • I stamped the image in archival black ink (yes I kept mine) but you could use stazon instead.  You do have to let the ink dry before painting.  
  • The Arteza acrylic painted very well, much like I have found in more expensive paint.  I also blended with ease.  I could also paint dark to light without a problem.  
  • To finish off the sweet cup after it dried I added a couple strips of the gingham gala designer series paper around the rim.  
  • To decorate the top I cut out a circle from matching cardstock and placed it on top.  I then punched four daisies using the daisy punch and the same gingham designer series paper.  I curled the ends up and down on some of the layers using my bone folder.  I added a clear faceted gem to the top, and a few leaves punched with the leaf punch under it.  
  • I layered each daisy up with mini glue dots and stampin' dimensionals.  
  • The handle was made with a little cardstock and was secured with tear & tape.  
If you like mixed media projects the Arteza Acrylic paint is a great option.  It comes at a great price and there are different size kits you can buy.  You can check them out here.  You will find all the other supplies I used int he shopping list below.  
Happy Stampin'
Rick Adkins 

Stampin' Up! Shopping List: 

I send catalogs to all my customers that have purchased from me in the last six months.  If you haven't placed a order I asked that you pay $6.00 for the catalog.  This way it helps me cover the shipping.  I purchase all my catalogs and mail them so I am out this cost if you don't order or order from someone else.  

Template Designed by creativeworkerbee