Saturday, March 30, 2019

Rick's Saturday Simple Stamping Episode 18: A Spring Wedding Card using #simplestamping

Hello and welcome to my Blog and YouTube Channel today; is the 18th Episode of Saturday Simple Stamping.  Wow, can you believe it!  Since Spring is here and there are a ton of weddings that are going on or coming up I thought it would be a great time to do a wedding card.  And since it's that time and there are so many new stampers out there I thought it was a perfect kind of card todo.  Here's a look at my card.

Bloom by Bloom Stamp Set, #simplestamping, Rick Adkins, Floral Card
  I just love simple stamping and it's such a great way to share with new stampers how to create cards that are easy for them to recreate.  All these projects can be found in my Simple Stamping Playlist on my YouTube Channel if you missed a episode.

Tips & Tricks: 

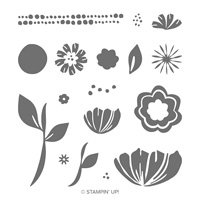
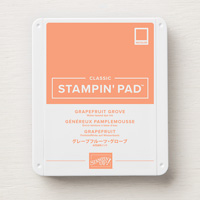
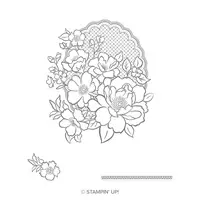
I started out my card by using a piece of Whisper White Cardstock cut at 5 1/2 x 4 1/4 (so actually quarter sheet of cardstock).  I then started stamping with first and second generation stamping for the large flowers using Petal Pink ink.  Petal Pink seems to be my new go to color lately, I seem to go to it when I am not sure what to use.  Petal Pink actually goes very well with So Saffron and Garden Green; which is why I picked those two colors.  
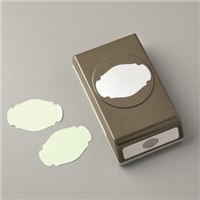
I then stamped the smaller flowers in Petal Pink and the other flowers I used was So Saffron (stamped off once with the solid circle and then stamped full strength with the other stamp to create the daisy like flower.  
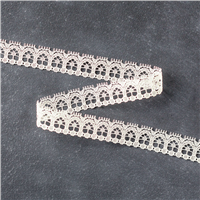
I then cut down the card front to 4 x 5 1/4.  Make sure that you save the long piece that you cut off so that you can add it to the inside of the card, this makes a great accent to tie the inside into the front.  I then layered that onto a piece of Petal Pink Cardstock cut at 5 3/8 x 4 1/8.  Then I added my ribbon.  I designed the card using the Very Vanilla lace Trim to begin with but wasn't sure if I liked it or not so in the video I change to the Whisper White Dotted Tulle Trim.  So leave me a comment on which one you prefer.  I will draw a winner from all the comments on my YouTube Channel and here for a prize. You will need to live in the United States to be a winner due to Stampin' Up! policies.  I will be giving away a roll of the Rich Razzleberry 1/4" Velvet Ribbon.  I will announce the winner on Monday evening.  
Image by Stampin' Up! 

Video Tutorial: 


If you are viewing this post in your email you may have to click here to view the video because I've noticed that some emails will not play the video.  
Bloom by Bloom Stamp Set, #simplestamping, Rick Adkins
Thanks for dropping by for this weeks Simple Saturday Stamping Episode.  Last week I didn't do a video for the card so encase you were wondering where it was I thought I would try something a little different.  This also told me that you all love the videos and wanted to see them so I went back to the old format.   You can find all the supplies in the Shopping List below; I would love to be your demonstrator and help your along your paper crafting journey.  

Happy Stampin' 
Rick 

Stampin' Up! Shopping List: 


Friday, March 29, 2019

A Dazzling Demonstrators Team Card

Hello and welcome to my blog; today I am going to share one of the cards that I made for my team this month.  I wanted to send my team members a card this month letting them know what they mean to me.  I used a stamp set that was designed for demonstrators to welcome team/family members and to show encouragement to them.  The stamp set is called Stamping Your Way to the Top and can only be ordered by a demonstrator.  Along with the encouragement set I used some of the Painted Seasons Designer Series Paper a level one and level two Saleabration item.  Here's a look at my card.
Kinmon Crafters, Team Card, Stampin' Up!, Rick Adkins, Painted Seasons, Story Label Punch, Stamping Your Way to the Top

Okay, I mentioned that the Painted Seasons designer series paper was a level one and level two Saleabration item.  It's both because it's a level one with the third release of Saleabration items.  And it's a level two because it's part of the Painted Seasons bundle which was part of the second Saleabration Release.  This pack of paper is by far one of my favorites.  It features imagery for all four seasons. There's only a couple more days left to get this item; Sale-a-bration ends March 31, 2019 at 11:59 pm, so get those qualifying orders in now to get this wonderful freebie.
Kinmon Crafters, Team Card, Stampin' Up!, Rick Adkins, Painted Seasons, Story Label Punch, Stamping Your Way to the Top

For my card I used colors from the designer series paper for my stamped images.  I started out with a piece of whisper white thick cardstock cut at 4 1/4 x 11 scored at 5 1/2.  I took a piece of the designer series paper that was cut at 4 x 5 1/4 and then cut it in a diagonal from corner to corner.  If you cut a piece of 12 x 12 designer series paper into 4 x 12" strips and then cut each strip down to 5 1/4 you can get six card fronts from each sheet so that would be 72 from a whole pack of designer series paper.   This is the best way to get the most from your designer series paper.
Kinmon Crafters, Team Card, Stampin' Up!, Rick Adkins, Painted Seasons, Story Label Punch, Stamping Your Way to the Top

So for my card I used mainly Poppy Parade and Grapefruit Grove inks, but used a variety of different papers.  You may be wondering why I used only those two ink colors with that pack of paper.  Well if you look on your designer series paper it will tell you all the colors that coordinate with that pack.  They coordinate because those same colors listed are all the colors in that one pack of paper.  So it could lead you to some totally different color combos than you may be expecting or have never thought of.  And the best part is that they would work together without issue thanks to Stampin' Up! doing all the color coordination work for us.
Thanks for dropping by I hope that you like my cards that my team (stampin' family members as I like to call them) will be getting in the mail very soon.  If you would like to become part of the Kinsmon Crafters you still have time to take advantage of the great Sale-a-bration Joining Special going on now!
Join Now! 


Happy Stampin' 
Rick 

Stampin' Up! Shopping List: 


Do you want all the Stampin' Blends that we have, but it's just not in your budget to get such a large order at one time?  Well I am here to help with my New Stampin' Blends Monthly Club.  Click here to join
Coming April 1, 2019 Learn more here! 

Lovely Lattice (Here's to Those That Inspire Us) Card

Hello and welcome to my blog; today I am going to share with you a little card that I designed at the start of Sale-a-bration.  This card was designed to share with someone that inspires you and they don't even know it.  It is a great RAK (Random Act of Kindness) Card.  Who wouldn't love to get a card in the mail letting them know that they inspired you and they didn't even know it.  Everyone!  Here's a look at my card.

Tips & Tricks: 

My card today features the Lovely Lattice Stamp set as the main image.  I started off my card by stamping the large image from the Lovely Lattice Stamp Set using Tuxedo Black Memento Ink knowing that I was going to do a little Stampin' Blends coloring.  I love my Stampin' Blends because they make alcohol marker coloring so easy.  And I am super excited with the announcement of a storage solution coming for our Stampin' Blends, as well as our new ink pad style April 1, 2019 with Storage by Stampin' Up!.  If you missed my post about the new storage coming you can find those details by clicking here.  
Once I had the image stamped it was time to start coloring.  I used Rich Razzleberry, Bermuda Bay, Petal Pink, Mossy Meadow, Mint Macaron, and a little Pineapple Punch to color my image.  I also used the color lifter to soften some of the lighter transitions.  

The main colors for my card were Rich Razzleberry, Bermuda Bay, and Petal Pink: While Mossy Meadow, Pineapple Punch, and Mint Macaron were my secondary colors.  Meaning I used those three colors as the accent for the primary colors on the card.  Each of these colors will work with each other and work fine together.  

Once I had everything colored I stamped my sentiment and did a some partial fussy cutting.  After I had the part of the Lovely Lattice Image fussy cut that I wanted to stand out I then used my Stampin' Trimmer to cut the excess off to have a nice straight edge.  I then sat this image aside for a little while and took a piece of Petal Pink cardstock and used the Tufted Dynamic Texture Embossing Folder and ran it through the Big Shot to create a little texture and interest to the card.  Next I used Stampin' Dimensionals behind the cut image and layered my panels together.  To finish it off I added a few rhinestones to the front that I colored using the dark rich razzleberry stampin' blend marker.  I also stamped the inside of the card using the other stamps from the Lovely Lattice stamp set and added it to the inside of the card.  
I stamped those images at the bottom of the whisper white cardstock this allows plenty of room for me to write my message inside.  The sentiment on the outside of the card came from the Part of My Story Stamp Set which is also a level 1 Sale-a-bration item.  And you can get these two items for free by placing a $100 order in my online store.  There are only a couple more days left of Saleabration so don't delay if you want these two sets and have not gotten them yet.  

Thanks for dropping by today, I hope that I may have inspired you just a little. And, I hope you give this technique a try.  Remember there are only two and a half days left of Saleabration and to get any of the items from the Saleabration Coordination products as well.  
Happy Stampin' 
Rick

Stampin' Up! Shopping List: 

Price: $110.00
Price: $10.00
Coming April 1, 2019 Click here to learn more! 
Join my Family of Crafters and SAVE! Only a few more days to take advantage of this special offer. 
Want all the Stampin' Blends colors but don't have the money to buy them all at once Join my Stampin' Blends club and get 3 new sets each month! 

Template Designed by creativeworkerbee