Monday, February 18, 2019

Sweetest Thing Hidden Z Fold card by Rick Adkins

Sweetest Thing Bundle, Stampin' up!, Rick Adkins, birthday card

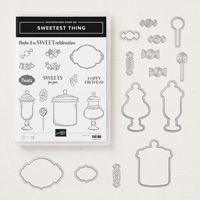
Hello and welcome to my blog; today I am going to share with you a fun little card using the Sweetest Thing Bundle and products from that suite.  This was one of my favorite suites in the 2019 Stampin' Up! Occasions Catalog or as some like to call it the Spring/Summer Catalog.  I loved this set as soon as I show it back in November as I attended OnStage.  I loved it 's bright colors, and cheerful demeanor.  Not, to even mention how happy it makes me just by looking at it.  Here's a look at my card.  

Sweetest Thing Bundle, Stampin' Up!, Rick Adkins, Birthday Card

Tips & Tricks:


I designed this card to look like just a standard card but with a interactive element.  I used the How Sweet It Is Cardstock Pack plus a little whisper white cardstock to create my card.  There really isn't a lot of stamping with this card.  The actual star of this card is the How Sweet It Is Designer Series Paper.  I used a lot of the designer series paper to create it.  Event the candy jar on the front came from the designer series paper.

Sweetest Thing Bundle, Stampin' Up!, Rick Adkins, Birthday card

  • This is actually a easy card to create it needs a good burnishing to make it lay flat; so you don't see the fold.  Sometimes when you create a z-fold card the card will stick up slightly, but by burnishing the fold really well it will lay properly.  
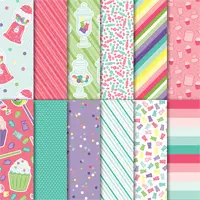
  • I used the Jar of Sweets Framelits to cut out one of the Jars from the designer series paper.  Not only do they cut out the images from the matching stamp set but select images from the designer series paper as well.  So that's a big plus when you really thing about it.  Less fussy cutting can be a good thing. 
  • I used the layering circles to cut the two circles for the front of the card.  I used the 2 1/2" circle framelit to cut the Coastal Cabana circle, but used a 2 1/4" circle punch for the designer series paper circle.  You could use a 2 1/2" circle punch if you have one.  
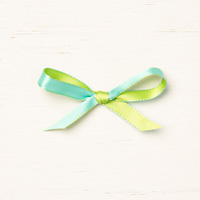
  • The Coastal Cabana/Granny Apple Green Reversible Ribbon helps to hold the card together.  It's secured on the back with a mini glue dot.  Once you undo the ribbon your card will open to reveal this fun inside.  
  • To add my sentiment I stamped on a piece of 1/2 whisper white cardstock using Coastal Cabana Cardstock.  At the end I used my Paper Snips and created a fish tail banner.  
Sweetest Thing Bundle, Stampin' Up!, Rick Adkins, Birthday Card

Sizes & Dimensions: 

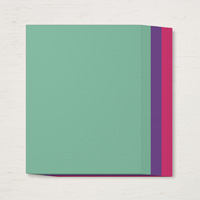
  • Gorgeous Grape Cardstock:  5 1/2 x 8 1/2
  • Coastal Cabana Cardstock:  1 1/2 x 8 1/2 (scored at 2 1/8 & 4 1/4), 4 x 5 1/4
  • Whisper White Cardstock:  1 7/8 x 5 1/8, 1/2" x 4 
  • How Sweet It Is Designer Series Paper:  (3) 5 1/4 x 1 7/8, (2) 1 7/8 x 1 1/4, 1 1/4 x 4, 1 1/4 x 4
Thanks for dropping by today, I hope that you have a wonderful start to your week.  If you would like any of the supplies that you have seen today you can order them in my online store 24/7.  

Happy Stampin'
Rick 


Stampin' Up! Shopping List: 


Saturday, February 16, 2019

Saturday Simple Stamping Episode 12: Best Catch Masculine Birthday Card


Hello and welcome to my blog; today I will be sharing a card that I am going to be making during my Saturday Simple Stamping Facebook Live.  Today, I am going to be making a masculine birthday card using the Best Catch Stamp Set from the 2019 Stampin' Up! Occasions (Spring/Summer) Catalog.  Here's a look at the card that I will be making.

Best Catch, Stampin' Up!, Rick Adkins #simplestamping

As a remember simple stamping is a way to share with someone that has never stamped before how to create a card using mainly just stamps, ink, and paper.  Which is what I did with this card.  I started out with a card base of Early Espresso cardstock 4 1/4 x 11 scored at 5 1/2.  Next I stamped the fisherman and the fish on a piece of whisper white cardstock (4 x 5 1/4) using Early Espresso ink.  I stamped the fisherman in the top left hand corner.  I did this because of his size in comparison to the fish.  In art there are spacial rules.  One is that the farther away something is the smaller the object will look, the closer the object is the larger it will appear.  So knowing this rule, I placed the fisherman in that corner, then I placed the fish in the bottom right corner. 


Once I had everything stamped I added a mat made of designer series paper.  I used the 2017-2019 In Color Designer Series Paper Pack and picked the tranquil tide stripped piece of DSP to create the mat.  I also used this same designer series paper (DSP) to the envelope as well.  I also stamped the fish on the envelope and the fly.  Yes, you should be impressed that I knew that that was called a fly even without having to look it up online.  By the way the mat for this card was cut at 5 3/8 x 4 1/8.

Simple Stamping Video Tutorial: 


Let's Look at the Inside Story: 

For the inside of the card I used another piece of whisper white cardstock (4 x 5 1/4).  I stamped the fly in the inside at the top right and bottom left.  I added this to the inside with multipurpose liquid glue.  I didn't add the designer series paper to the inside because I wanted to make sure that the inside still had a masculine feel as well as stayed with out goal of simple stamping.  

As I said I wanted  to keep everything simple but masculine as well, even with the envelope.  I shared a little about it up at the top but I wanted to share just a little more.  For the front of the envelope I stamped the fish right next to where the address will go, and at the bottom added the fly.  On the flap I added a piece of the same designer series paper as I used for the card.  I cut a sheet down to 2 1/2 x 6 and adhered it to the envelope flap.  Then trimmed it out around the edge.  I ended up with the polka dots showing because I added glue to the wrong side, LOL, but I think that it worked out really well.  I ended up liking the polka dots it reminded me of bubbles.  

Thanks for dropping bye, I hope that you have enjoyed this weeks episode of #simplestamping.  Make sure to join me next week for another Saturday Simple Stamping Episode.  Have a great weekend.  

Happy Stamping
Rick 


Supply List: 


Friday, February 15, 2019

Today's the Day!!!! Saleabration 2nd Release & a Sneak Peek at the Saleabration Coordination Products


Hello and welcome to my blog; today  I am sharing with you the products in the second release of Saleabration, as well as I am gong to share with you the products that will be available in March with the Saleabration Coordination Release.  Let's first start off with the products in the second release of Saleabration items.  Starting today there are four new items that can be earned based on your orders.  

New Level One Items:  ($50.00 purchase) 


I am going to start with the two new items that are in the level one categories.  At this level you have the new All Adorned Stamp set or the Country Floral Dynamic Textured Impression Embossing Folder to pick from.  Both are so pretty and fun to use.  I've only gotten to play with them just a little but I am super excited to share with you some of those products next week.  But, I am going to share with you a couple samples from Stampin' Up! that showcase these products.  

All Adorned Stamp Set (image by Stampin' Up!) 

Country Floral Dynamic Textural Impression Embossing Folder (image by Stampin' Up!) 
I told you that they projects were super cute and you would love these products.  Here's a little video about the All Adorned Stamp Set from Stampin' Up!.


Level Two Items: ($100.00 order) 

One of my favorite new additions to the Saleabration items is the Painted with Seasons Bundle.  Not only do you get the fabulous stamp set but you get the Painted Seasons Designer Series paper too.  This is one of my favorite packs of paper from Saleabration and this is the only way you are able to get it.  The designer Series paper features images for all four seasons and some geometric patterns.  


Painted Seasons Cards by Stampin' Up! 
Here's a little video that tells more about this wonderful bundle.  


I hope that you have enjoyed this little walk through of the new release items that started today.  You can download the brochure by clicking here or by clicking the image below.  


Other Saleabration Items: 


Free with $100.00 Orders: 

Free with a $50.00 Order: 


Saleabration Coordination:


The Saleabration Coordination products will be available for purchase starting March 1, 2019.  These select items will coordinate with products from Saleabration.  Inside the Saleabration Coordination products you will find four framelits that will match different Saleabration stamp sets, a punch that matches the Part of my Story Stamp Set and another stamp set that coordinates with all the stamp sets from Saleabration.  Here's a look at all the Saleabration Coordination products that can be purchased starting March 1.  I will be sharing samples and more about each of these products in the coming days and weeks.   


The Four Season Framelits coordinate with the NEW Saleabration Level 2 Painted Seasons Bundle.  


The Call Me Cupcake Thinlits coordinates with the Hello Cupcake Stamp Set.  


The Hop Around Framelits Dies coordinate with the So Happy Together Stamp Set.  


The Lily Framelits Dies coordinates with the Lasting Lily Stamp Set.  


The Story Label Punch Coordinates with the Part of My Story Stamp Set.  


And the More than Words stamp set have different sentiments that coordinates with all the stamp sets in the Saleabration selection of products.  You can see how adding these items in March will add to your stamping experience, and make your stamping your projects so much more fun.  

Thanks for dropping bye today I hope that you have enjoyed this little walk through of these products and that you love these products as much as I.  Remember that the second release of Saleabration can be earned today based on your purchases while supplies last until the end of Saleabration.  The Saleabration Coordination products will be available from March 1-31 and can only be purchased.  

Happy Stampin'
Rick  


Template Designed by creativeworkerbee