Wednesday, January 30, 2019

By the Bay Watercolor Window Card


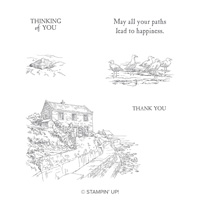
Hello and welcome to my blog.  Today, I am going to share with you the card that I created during yesterdays YouTube Live.  I did a basic lesson on how to watercolor; and the By the Bay Stamp Set was the perfect stamp set to do this with.  Here's a look at the stamp set that inspired today's card.
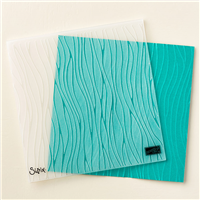
Image by Stampin' Up! 


 Here's a look at my card.

By the Bay, Watercolor, Rick Adkins, Saleabration 2019

Tips & Tricks: 

By the Bay, Rick Adkins, Saleabration, Watercolor I started out this card by taking a piece of Pacific Point cardstock (cut at 4 x 5 1/4) and cut out a circle in the center top 1/3 of the card.  Next I used the Seaside Texture Impression Embossing Folder and sandwiched the two together and ran it through the Big Shot.  Each Big Shot is different and you may have to adjust how you ran it through.  My Big Shot and this embossing folder works best if I either use the original platform set on the embossing tab or if I spritz it with a little water before running it though with the embossing platform.  Next I used the largest and third largest circle framelits in the Layering Circle Framelits and cut out a Crumb Cake Circle frame.  

At this point I set the card front aside and worked on the watercoloring.  I stamped the bay image on a piece of watercolor cardstock(cut at 4 x 2 3/4) I actually ended up cutting the watercolor cardstock down after I finished to fit behind the circle cut out.  

My top tips for watercolors are start light and work your way to the darker shades.  Don't squeeze the Aqua painter that adds more water to the ink or paint on the brush and waters down the color.  The lighter things are the farther away they are, and the darker something is the closer it is.  

Video Tutorial: 


In order to get the watercolor piece placed just right I had to lay down my card front where I wanted it to be and trace the inside of the circle with a pencil.  I then added the watercolor piece to that area with a little multipurpose liquid glue.  To create a the window and make it stand up I added a lot of Stampin' Dimensionals behind the card front.  

By the Bay Stamp Set, Watercolor, Rick Adkins, Saleabration

For the inside of the card I simply stamped the sentiment that read "May all your paths lead to Happiness" and stamped the seagulls at the bottom of the 4 x 5 1/4 Whisper White Cardstock.  

By the Bay Stamp Set, Rick Adkins, Watercolor, Saleabration
If you notice on the cards I did the embossing on the card front with the same embossing folder.  But, on one of the cards I used the embossed side and on the other one I used the debossed side.  Which one do you like better?  Leave me a comment letting me know which one you like best.  

By the Bay Stamp Set, Watercolor, Rick Adkins, Saleabration
Debossed Card front 

By the Bay Stamp Set, Watercolor, Rick Adkins, Saleabration
Embossed side
If you would like to get your own By the Bay Stamp Set it's super easy.  All you have to do is place a $50 order in my online store and pick it as you free Saleabration item.  You will find a full list of the supplies that I used on my cards today under the Product List below. 

Happy Stampin'
Rick

Supply List:  

Price: $110.00


Tuesday, January 29, 2019

Saturday Simple Stamping Episode 9: featuring Sweetest Thing

Hello and welcome to my blog and YouTube channel.  Today, I am going to share with you Saturday's Simple Stamping Episode #9 featuring the Sweetest Thing stamp set.  This is a very fun birthday set that was one of my favorites from the Occasions catalog.  But, I am not using it as a birthday card today, I created a Valentine Card using this set.  Here's a look at my card.


Simple Stamping involves just stamps ink and paper.   All demonstrators were challenged at our convention that we had back in November in Orlando called OnStage to share cards that used just stamps ink and paper monthly.  For January we where challenged to use the simple stamping method but could also use a punch with it; to create a Valentine Card.  

Tips & Tricks:  

I designed my card so that you could move the sentiment around the card where you needed it.  Depending on where you put the sentiment you can get a different look from the card.  

This was my first go with this card design.  I put all the small stamps in the stamp set onto one block to create a background stamp.  I used a Clear Block size D and arranged all these wonderful sweet stamps on.  I then inked up the all the stamps at one time; which was easy since we put them on just the single block.

 I inked up the stamps in Coastal Cabana Classic Ink to start with and stamped them going down the left hand side.  Next I used Granny Apple Green and stamped the images down the center.  I finished off the stamping with Gorgeous Grape down the right hand side.

I then stamped the sentiment on a piece of whisper white and used the same three colors I punched the main image with a 2 1/4" circle punch and stamped the Sweets for You sentiment twice on scrap whisper white in Granny Apple Green and Gorgeous Grape inks.  Next I took my paper snips and cut the sentiments apart and trimmed off the s at the end of sweets.  I then arranged the words to read for you sweet, and added a heart that I drew using a granny apple green stampin' write marker.  I added a 2 1/2" circle punched from granny apple green cardstock.  I layered both circles together and popped it up using stampin' dimensionals.

For the second card I repeated the same process but changed up the order of the colors, and changed the placement of the sentiment.  

Video Tutorial: 


I hope that you give #simplestamping a try and if you do make sure you share it online with the #simplestamping.  You will find a list of all the supplies I used in the product list below.  

Happy Stampin'
Rick


Monday, January 28, 2019

Kylie's International Highlights Winners Blog Hop


Hello and welcome to my second post for today.  And, I am super excited to be part of Kylie Bertucci's International Highlights Top Ten Winners Blog Hop this month.  This month's theme was Encouragement.  I created a card using one of the same stamp set that I used on the card that was picked as a wining card.  I will share a look at that card in just a little bit.  Here's a look at the card I created for today's blog hop.  


Here's a look at the card that was picked as one of the wining cards for the International Highlights. 

Lovely Lattice Black Magic Card by Rick Adkins

Tips & Tricks: 

I used the same techniques that I used earlier today on my card this morning.  I stamped the image on my piece of Thick Whisper White Cardstock (4 x 5 1/4), but instead of stamping the Lovely Lattice image up and down I turned it on it's side and then stamped it.  This created a totally new look for the stamp set which worked really really nicely.  I then masked off the image and stamped the vine image from the Beauty Abound Stamp Set.  

I removed the mask and started coloring with my stampin' blends.  As far as the colors goes I used Flirty Flamingo Light & Dark mixed with Petal Pink light and dark and a little pink pirouette (which is retired but mixed beautifully with the flirty flamingo.)  You can currently find the Pink Pirouette Stampin' Blends in the Clearance Rack at this time.  To color the leaves I used Mint Macaron (light & dark) and Soft Sea Foam (light & dark).  

After all the coloring was complete it was time to do a little watercoloring.  I took my watercolor paint and mixed up two colors.  I mixed one that was as close to Flirty Flamingo and Petal Pink as I possibly could.  I added a little water around the top left and bottom right corners of the flowers and added a little paint and let it flow.  I then flicked on some watercolor into the still damp paper.  You can watercolor on the Thick Whisper White cardstock as long as you use very little water, and don't flood the paper with to much water.  The flicking allowed for the texture on the cardstock.  At this point it was time to dry it.  I hit it with my heat tool until it was completely dry.  I ran it \through my Big Shot to flatten the paper back out.  Here's a close up look at the coloring.  


Once I had all the coloring done it was time to add the graphic detail to the card.  I took a t-square ruler and a pencil and added a few lines behind the stamped and colored flowers.  I did six lines total and then used journaling pens and went over the pencil lines.  After that I took the Basic Black Stampin' Blends and colored the lines in.  


To make the lines from the vines that disappeared from coloring in the lines; I used a white gel pen and went over them.  I only went over the parts that would overlap the black.  I did go in and added some white dots on all the flower centers to add a little more texture.  


To finish off the card I added a few of the Iridescent Sequins in Powder Pink and Pear Pizzazz.  I adhered them with a little multipurpose liquid glue.  Once I did this I added the card front to a piece of Mint Macaron Cardstock cut at 4 1/8 x 5 3 /8.  I then placed the entire card front to my Flirty Flamingo Card base (4 1/4 x 11 scored at 5 1/2).  I did add a whisper white insert to the inside of my card that was cut at 4 x 5 1/4.

As I sat and looked at the card which I always do to make sure it was complete or not.  I decided that It still needed a sentiment on the outside of the card.  So I took a small strip of Soft Sea Foam cardstock and my versamark ink pad and stamped the I Believe in You sentiment from the Amazing Life stamp set in the 2019 Occasions Catalog.  This was the perfect sentiment for an encouragement card.  I mean really what better sentiment could I have picked than that.  

Thanks for dropping by today for the blog hop I know the other winners have done a great job with there cards for you you will find the blow roll below.  Below the blog roll you will find the shopping list for this project.  Remember that we have just kicked off Saleabration and you can earn the Lovely Lattice Stamp Set as your free Saleabration item with a $50 order in my online store

Happy Stampin'
Rick

Blog Roll: 


Product List
Stamparatus
[146276]
$49.00
Heat Tool
[129053]
$30.00

Template Designed by creativeworkerbee