Showing posts with label wrapped in plaid dsp. Show all posts

Thursday, December 12, 2019

Wrapped In Plaid Holiday Host Gift Set

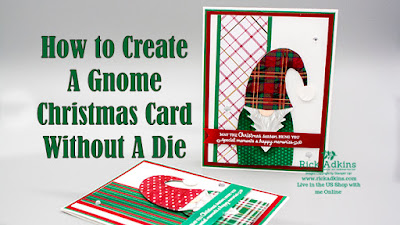
Hello and welcome to my blog; today I am going to share with you the projects I made last night during my Facebook Live.  My projects last night featured products from the Holiday Catalog and a Sneak Peek of a product that will be coming out in the January - June Mini Catalog.  I used the All Dressed Up Dies to create a super cute little gift bag with the Wrapped in Plaid Designer Series Paper and then created a matching card.  I actually did two versions of each project.  Here's a look at the projects.

Tips & Tricks: 

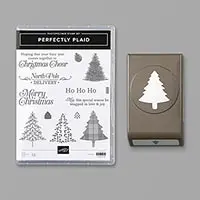
For the card I used a sketch from Casing Tuesday Sketches; I started off by picking my designer series paper first.  Then I pulled the colors of ink, and cardstocks I was going to use.  After that it was just a matter of picking the stamp set.  I picked the two host stamp sets from the Holiday catalog.  The Greatest Part of Christmas Stamp set has some of the best sentiments for the holiday with the best fonts.  So if you are a font person you differently will want this set if you haven't earned it yet with a qualifying order.  
The first card I made with this sketch was the one above.  I used Shaded Spruce cardstock as my card base and the Wrapped in plaid DSP for the main part of the card.  For the second card I used Cherry Cobbler for the card base, but I added a mat of Shaded Spruce since I was using the cherry cobbler with whisper white dot dsp.  The first card didn't have to have the additional mat layer since it had a big contrast between the base the DSP.  
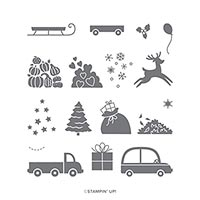
After working on the cards I made the bags.  I used the All Dressed Up Dies from the Best Dress Suite in the upcoming January-June Mini Catalog.  The January-June Mini is the new name for the Occasions (Spring/Summer) Catalog; which goes live on January 3, 2019.  This set of die not only matches the Dressed to Impress Stamp Set, but there's a great die that makes this cute little gift bag and dies to make other parts of the bag/purse.
 The bag/purse takes two pieces of 6 x 6 Designer Series Paper to make the base.  I will say that it's a lot easier to put together than the Parcel Die from the Annual Catalog.  And the best part is that the dies once cut out can make different versions of purses.  I am planning on putting a gift card inside for my oldest niece for Christmas.  I think she will love this little purse/bag.  

Video Tutorial: 

If you are viewing this post by email you may have to click here or the image below to view the video.  

Sizes & Dimensions: 

  • Cherry Cobbler Cardstock:  5 1/2 x 8 1/2 scored at 4 1/4
  • Wrapped in Plaid Designer Series Paper:  4 x 5 1/4 & 3/4 x 3 1/2
  • Vellum Cardstock 3 x 3 
  • Whisper White Cardstock:  1 7/16 x 2 3/4, 4 x 5 1/4
Happy Stampin' 
Rick Adkins 

If you live in the US.  I would love you to choose me as your demonstrator.  If you would like to purchase any of these products you can click on the Shop Now Button or by clicking on any of the images below.  Alternatively, you can also contact me by email to place your order.  Please be sure to use the monthly host code and I’ll send a little something out to you the following month to say Thank You!  

December HOST CODE:  CEUXJX6R
  1. Spend any amount with me this month and receive the Creative Stampers Tutorial Bundle.  Plus get a gift from me in January.
Please remember that if you use the host code you cannot use that order towards my KCRP’s (Kinmon Crafty Reward Points) that would be double dipping and is not allowed.  For more information on KCRP’s click here.  

Three main reasons to Join!  
1.     You Get at least a 20% discount on all your orders while you are a demo.   
2.     You get to join my fun Kinsmon Crafters Team and Private Facebook Group.
3.     Access to directions to all my online classes 

Stampin' Up! Shopping List: 


Tuesday, December 10, 2019

Wrapped in Plaid Gnome Christmas Card

Hello and welcome to my blog; I hope that you are having a great day.  I am going to share with you how to make a Gnome Card for Christmas without using a die.  Yes, you can create your own super cute Gnome card without a die; it just takes a little planning and cutting some paper.  But, don't be afraid I promise it's super easy as you will see in the video tutorial.  I used the Wrapped in Plaid designer series paper for my card today.  Here's a look at my card.


Tips & Tricks: 

Gnomes are super trendy now and surprisingly Stampin' Up! doesn't have a Gnome stamp set or matching dies.   So I had watched a few YouTube videos on the dies that came out recently from another company and thought I can make my own.  So I started out with the Tree punch and punched out his beard.  To make it look more like a beard I used my Stampin' blends to do some wispy lines and a little blending to make it look more realistic. 
Next I used the "beard" to measure and draw out a little template for the body and hat.  I just laid down the tree and went from the each end and made a ovalish shape.  For the hat I just did a simple santa hat shape but with a longer top more like a sleeping cap from A Christmas Carol.   As I am looking at the body now I am thinking I could have just used a oval die or punch and snipped off the bottom.  So if you don't want to draw out a simple template you totally could use that for a body.  After I sketch this out on some scrap cardstock I just cut it out with my snips and traced around it on my designer series paper.  I am using the Wrapped in Plaid Designer Series Paper today on my card.
There's a lot of great patterns in this pack of paper, but you can use any you may have on hand.  You can find a ton of different patterns to make your own cute little gnomes.  Once I had the hat and body cut out I used my blends to add just a little shading to both.  I then punched out two circles using the 1/2" circle punch from Whisper White Cardstock.  One was colored with Petal Pink for the nose and one was colored with Smoky Slate for the ball at the end of the hat.  So once all that was done I had all my Gnome pieces ready to go.
All of the pieces of the Designer Series Paper for this card can be pulled from your scraps if you want.  Once I had everything cut and ready to go it was time to assemble.  I used a little snail adhesive to put everything together and then secured it on the back with some Stampin' Dimensionals.  This also allowed for my little Christmas Gnome to be raised off the card.

Sizes and Dimensions: 

  • Cardbase - Whisper White Thick Cardstock 4 1/4 x 11 scored at 5 1/2
  • Mat #1 - Shaded Spruce 5 3/8 x 4 1/8
  • Mat #2 - Cherry Cobbler 4 x 5 1/4
  • Card front - Whisper White 3 3/4 x 5
  • Gnome - Scraps of Wrapped in Plaid DSP, Whisper White
  • Sentiment Strip - scrap that's 5/8" x 3/3/4 
  • DSP layer - 1 3/4 x 5
  • DSP mat - Cherry Cobbler or Shaded Spruce 2 x 5

Video Tutorial: 

If you are viewing this post by email you may have to click here or the image below to watch the video.  
Thanks for dropping by today I hope that you find this post helpful and that you have fun making your own little Gnome for your cards this holiday season.  
Happy Stampin' 
Rick Adkins 
If you live in the US.  I would love you to choose me as your demonstrator.  If you would like to purchase any of these products you can click on the Shop Now Button or by clicking on any of the images below.  Alternatively, you can also contact me by email to place your order.  Please be sure to use the monthly host code and I’ll send a little something out to you the following month to say Thank You!  

Stampin' Up! Shopping List: 


Price: $10.00

Sunday, November 3, 2019

Wrapped in Plaid Color Inspiration

Hello and welcome to my blog; today I am going to share with you this weeks color inspiration.  Every other week I have been sharing color inspiration with you, and where to find your color inspiration.  This week I pulled color inspiration from the Wrapped in Plaid Designer Series Paper.  Looking at the colors in any pack of designer series paper makes finding colors that work together super easy.  Here's a look at my card for today.

I started designing my card by pulling out the colors I wanted to use.  I went with Cherry Cobbler, Shaded Spruce and Gold, all of which came from the designer series paper.  Once I picked the pattern I wanted to use I cut my cardstock.  For my cardbase I picked a piece of  Cherry Cobbler cut at 5 1/2 x 8 1/2.  I added my designer series paper to the front of the card.  I then stamped three of the pine trees and used the matching punch to punch them out.
I added some of the Shaded Spruce/gold stripped ribbon to the front of the card.  I stamped the sentiment to a piece of whisper white and cut it out using the stitched rectangle dies.  To finish off the card I added a bow made out of the same ribbon.
Thanks for dropping by today, I hope that you are finding this bi-weekly series helpful.  If you need any of the supplies I used to create my card today you can picked them up in the online store.

Happy Stampin' 
Rick Adkins 

If you live in the US.  I would love you to choose me as your demonstrator.  If you would like to purchase any of these products you can click on the Shop Now Button or by clicking on any of the images below.  Alternatively, you can also contact me by email to place your order.  Please be sure to use the monthly host code and I’ll send a little something out to you the following month to say Thank You!  

November HOST CODE:  QU2TJBJN
1.     Spend any amount with me this month and receive the Creative Stampers Tutorial Bundle.  Plus get a gift from me in December.
Please remember that if you use the host code you cannot use that order towards my KCRP’s (Kinmon Crafty Reward Points) that would be double dipping and is not allowed.  For more information on KCRP’s click here.  


Three main reasons to Join!  
1.     You Get at least a 20% discount on all your orders while you are a demo.   
2.     You get to join my fun Kinsmon Crafters Team and Private Facebook Group.
3.     Access to directions to all my online classes 

Stampin' Up! Shopping List: 


Template Designed by creativeworkerbee