Showing posts with label spring card. Show all posts

Friday, March 11, 2022

Sending Warm and Happy Wishes This Spring

Hell and welcome to my blog; today I am going to share a fun springtime card with you today.  This card just screams Spring.  With it's playful floral designer series paper on the front and the sneak peek of the bunny on the inside of the card.  Here's a look at today's card.  

You will be sending warm and happy wishes this spring with the cards you make with the Easter Friends Stamp Set & the Flowering Fields DSP!


Tuesday, March 24, 2020

Timeless Tulips for The Spot Color Challenge #103

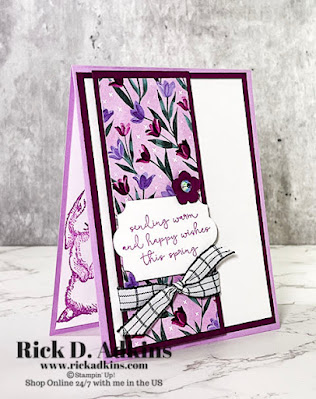
Hello and welcome to my blog; today I am going to share with you the card that I made for this week's Color Challenge over at The Spot.  This week we have a super fun color challenge for you to play along with and it's perfect for Springtime.  I used the Timeless Tulips Bundle to create my card for today's colorful challenge.  I thought it matched perfectly with the colors that were put together.  Here's a look at my card.


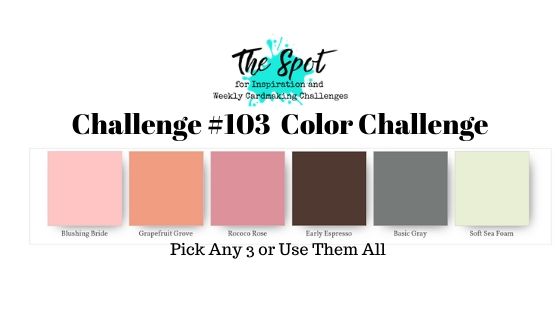
And here's a look at this week's color challenge that inspired my card today.  You can click on the challenge image to play along or (click here) just to see what all the other design team members came up with.

Tips & Tricks: 

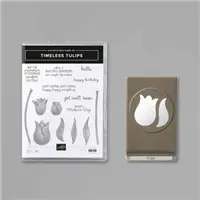
I picked five of the six colors to create my card with today.  I went with Blushing Bride, Grapefruit Grove, Rococo Rose, Early Espresso and Soft Sea Foam.  I wanted to create something that was very springy in feel so I thought those colors would be fun to play with.  I also picked the Timeless Tulips Bundle to feature on my card because I thought it would lend itself to a very spring filled card.  
Once the colors and stamp set were picked it was pretty easy to move forward


Then it was just a matter of figuring out how I wanted to use the items.  I decided that I would make a springtime bouquet on my card and make it an encouragement card.  I thought it was a great time for a card like this with everything going on right now.  So I started out my stamping all my stems in a grouping to mimic a bundled bouquet.  Then I needed to stamp my tulips.  I stamped three on them directly on the card and then two I used the matching punch to punch them out.  For the triumph tulip I stamped the leaf in the that matches the punch twice.  One I did mirror stamping and then punched it out.  On that tulip I actually inked it up first with Blushing Bride and used a sponge dauber to go around the outside with Rococo Rose to create a darker area as well.    I repeated the inking process on the other tulip that I punched as well.  I just changed the starting color to Grapefruit Grove instead of the Blushing Bride.  I kept the Rococo Rose around the outside to create the two tone.  


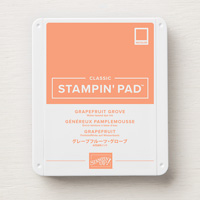
I popped those two tulips up on a couple Stampin' Dimensionals to add a little height to the card.  Next I needed something to bond the bundle together so I decided to use the Polka Dot Tulle Ribbon but died it with a little Early Espresso ink, a clear block and a baby wipe.  Once I had the ribbon die I tied it into a bow and added it to the card front.  I added my sentiment in Early Espresso Classic Ink at the bottom left of the card front.  


I added the card front on to a piece of Early Espresso Cardstock cut at 4 1/8 x 5 3/8.  And, then added the entire thing to my Soft Seafoam Card base.  I decided at this point that I did a little more dimension to the card so I stamped one more leaf in Soft Sea Foam and punched it out and added it to the card with a little liquid glue and a dimensionals behind.  


Thanks for dropping by today, and I hope that you will play along with use this week over at The Spot.  We have fun cardmaking and paper crafting challenges every week.  So make sure you go and check it out and have a little fun.  If you need any of the supplies you have seen today you can pick them up in my online store 24/7 by clicking on the items in the shopping list below.  
Happy Stampin' 
Rick Adkins 

Stampin' Up! Shopping List: 


Use the March Host Code on any order of $50 (before taxes & shipping) or more during the month and receive a gift from me in April as a Thank You.  If your order is $150 or more, please don't use the host code.  You will forfeit your Stampin' Rewards if you do; and I want you to get those rewards.


If you place any size order with me during the month of March, you will receive the March Creative Stampers Tutorial Bundle from me as a little thank you.  This month's tutorial bundle features fourteen floral themed tutorials.  The Creative Stampers Tutorial Bundle can either be earned for FREE with any size order or Can be purchased for $20 from me.

Monday, February 24, 2020

Wishing You Much Happiness today and Always - So Sentimental - Bird Ballad Notecard

Hello and welcome to my blog; today I am going to share with you a super cute and easy notecard using products from the January-June Mini and the 2019 Stampin' Up! Annual Catalog  For my project today I created a note card to share with someone that maybe getting married, or maybe they are going through something, or maybe they just need a little encouragement.  These little notecards are perfect for all those occasions you may run into.  I picked one of my favorite Sentiment sets and one of my favorite Designer series papers for this project.  Here's a look at the notecard.


I used the Bird Ballad designer series paper and the So Sentimental Bundle for my project today.  I love the fun spring feel of the designer series paper.  I am really feeling the spring-fever right now, as you may have noticed from my projects as of late.  And, the Bird Ballad Designer series paper helps kind of curves the I am Ready for Spring feeling I've got going on.  I wanted to showcase the big sentiment from the So Sentimental Stamp Set so I keep the card really simple in design.  Just a little designer series paper and a few colored rhinestones.  Which by the way I colored with my Dark Daffodil Delight Stampin' Blend.


My note card was cut from a piece of thick whisper white cardstock which measures 4" x 10 1/2" and I scored it at 5 1/4" to make the top folding note card.  I actually did this by accident I thought was cutting down two pieces of whisper white for another project but learned after I had it cut that it was a Thick Whisper White Card base; I think it all worked out because I adore the card that it made.  The Bird Ballad Designer Series Paper was cut to fit the entire front of the card.  I used another piece that I had cut down for the center of the card to add a little color interest plus to help ground the sentiment.  I also added a little strip to the inside of the card to make everything tie in.
After all the designer series paper was attached I stamped my sentiment onto a scrap of the thick whisper white cardstock in Daffodil Delight ink and used the matching dies from the bundle to cut it out.  The So Sentimental Bundle includes the So Sentimental Stamp Set and the Stitched So Sweetly Dies.

SO SENTIMENTAL CLING STAMP SET

Create tags, labels, and more with the phrases in the So Sentimental Stamp Set. These greetings are suitable for so many occasions—celebrating birthdays, welcoming new babies, saying “thank you.”
* 11 cling stamps
* Suggested clear blocks (sold separately): a, b, c, d


STITCHED SO SWEETLY DIES

Create frames and tags of various shapes and sizes using the Stitched So Sweetly Dies. Pair the dies with the coordinating So Sentimental Stamp Set to quickly cut out sentiments for your handmade cards, tags, and more. You’ll love the versatility of these dies and the all-occasion sentiments from the stamp set.

Thanks for dropping by today, I hope that I have inspired you to power thorough your mess ups and try to create something beautiful with them.  Sometimes it's just a matter at looking at things just a little differently to get over that hurdle.  If you need any of the supplies that I used today you can pick them up in my online store 24/7 by clicking on the items in the shopping list below.

Stampin' Up! Shopping List: 


Happy Stampin' 
Rick Adkins 

Thursday, April 11, 2019

OSAT Blog Hop Spring Fling

Hello and welcome to this month's One Stamp At A Time Blog Hop.  This month's theme is Spring Fling.  I know that everyone has created some great projects with this month's theme.  I have a super cute set of projects for you today.

For my projects this month I used the Fable Friends Stamp Set.  This is one of my favorite stamp sets from the 2019 Stampin' Up! Occasions Catalog.  This set features some fun story book like charter; as well as sentiments for both Easter and Spring.  Here's a look at my projects.
I used the geese image from the stamp set for both my card and dimensional project.  For my card I used the Mother goose and the little goslings.  For the dimensional project I used just the babies.  Again I just adore this set the images are all so cute and adorable.

The Card: 

I started this month's projects by creating the card.  I knew that I wanted to use that stamp set and I knew that I wanted to do something with coloring.  So I settled on the goose and gosling images and I used my watercolor pencils to color in the images.  Once I had everything colored in I used a blender pen to soften the pigment.  I then cut down the image and matted it with a piece of Daffodil Delight cardstock.  I used a piece of So Saffron cardstock (5 1/2 x 8 1/2 scored at 4 1/4) as my card base.  I added a piece of the Gingham Gala Designer Series Paper in Daffodil Delight between the card base and the matted image.  

Dimensional Project: 

For my dimensional project I used one of the sweet cups from the Occasions Catalog, and hand painted the base of the cup to match the card.  and then stamped the goslings going around the entire thing once dried.  Next I painted in each little goose to match my card.  I used acrylic paint from Arteza to do this.  Once everything was dried it was time to decorate the top of the cup.  I used two strips of the matching designer series paper as the card and attached it around.  I then used daffodil delight cardstock to cover the top of the cup and the handle.  
I then used the daisy punch and punched out four daisies from the Gingham Gala designer series paper and attached each with a mini glue dot and a stampin' dimensional.  I added a clear faceted gem to the center of the cluster.  I then punched out a few leaves using the leaf punch and some scraps of Lemon Lime Twist Cardstock.  I added two bows to the handle.  I used the Lemon Lime Twist Ombre ribbon for this.  
Thanks for dropping by today, I hope that you have a wonderful day and that you have enjoyed my projects.  If you need any of the supplies you can order them in my online store.  I hope that you have fun hopping along today; I know that everyone have created wonderful projects for you today.   If you are viewing this post via my wordpress site you will have to click here to view the blog roll.  

Happy Stampin' 
Rick Adkins 

Blog Roll: 


Stampin' Up! Shopping List
Blender Pens
[102845]
$12.00
Daisy Punch
[143713]
$18.00
Leaf Punch
[144667]
$16.00
Glue Dots
[103683]
$5.25
Sweet Cups
[148573]
$8.50

Template Designed by creativeworkerbee