Hello and welcome to my blog! I hope that you are doing well today and I am glad that you are visiting with me. Twila Davis is our team designer this week. Check out her a wonderful project below.
Hello and welcome to my blog; today is 3D Thursday and I am the designer for this weeks 3D Thursday team designer. As always with the 3D Thursday posts I have a Free project tutorials for you. For this weeks project I created this super cute little Fall Gift Box using the Through It Together stamp Set.
Hello and welcome to my blog! I hope that you are doing well today and I am glad that you are visiting with me. Jo Anne Hewins from https://luv2create.typepad.com/ is our team designer this week. Check out her a wonderful project below.
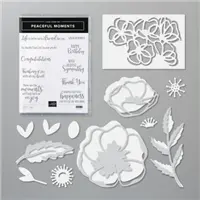
Hello ans welcome to my blog; today I am going to share with you my Lidded Poppy Box, that I made. I used the Peaceful Moments Bundle for my flower and sentiment and created this super cute little box for you today. The Peaceful Moments Bundle includes the Peaceful Moments Stamp Set and the Poppy Moments Dies. Create fancy, layered die-cut poppies, leaves, and more to add beauty and depth to your handmade cards, scrapbooks, journals, and other paper crafts using the Poppy Moments Dies. Pair the dies with the coordinating Peaceful Moments Stamp Set to add heartfelt sentiments to your projects for birthdays, congratulations, sympathy, thank you, and more. Here's a look at today's project.
Tips & Tricks:
To created the multi colored flower on the top of my box I used the Peaceful Moment Dies and cut out all the pieces of cardstock. I used scraps to create the flower. As far as cardstock goes I used scraps of Daffodil Delight, Mango Melody, for the flower and Mossy Meadow and Old Olive for the leaves. I did a little sponging of the colors onto the cardstock to create the different values. I also added a little Whisper White Craft Ink for the highlights. I used a sponge dauber to get into the areas and sponged on the ink. Once all the inking was completed and dried I glued everything together with a little liquid glue.
I then created my box top and base with a little cardstock and put them together with a little Tear & Tap. The box was a basic box construction so nothing fancy there. The base was created from a 8 x 8 piece of Daffodil Delight cardstock and the top was made from a 6 x 6 piece of Thick Whisper White Cardstock. I wrapped a little of the Daffodil Delight Ruched Ribbon around the top and tied it into a pretty little knot so it would stay in place. You can add a few mini glue dots under the ribbon if you don't want it to move at all.
Once the box was completed I added the poppy with a few Stampin' Dimensionals. I then created a double fish tail banner for my sentiment which comes from the Peaceful Moments Stamp Set in Mango Melody Ink. Greetings, greetings, and more greetings. Whatever the situation, the Peaceful Moments Stamp Set has the words you need to express your thoughts. I thought this made for a prefect little gift box for someone. Thanks for dropping by today I hope that you have a wonderful day and stay safe. If you need any of the supplies you can order them in my online store by clicking on the item below.
Happy Stampin'
Rick Adkins
Use the March Host Code on any order of $50 (before taxes
& shipping) or more during the month and receive a gift from me in April as
a Thank You.If your order is $150 or
more, please don't use the host code.You will forfeit your Stampin' Rewards if you do; and I want you to get
those rewards.
If you place any size order with me during the month of
March, you will receive the March Creative Stampers Tutorial Bundle from me as
a little thank you.This month's
tutorial bundle features fourteen floral themed tutorials.The Creative Stampers Tutorial Bundle can
either be earned for FREE with any size order or Can be purchased for $20 from
me.
Hello and welcome to my blog; today I am going to share with you the Large Chocolate Truffle Box that I made during last nights Facebook Live. I do a Facebook Live each Wednesday at 8 pm CST on my Facebook Business Page. This is a large box that's holds a half a bag of Lintz or Moser Roth Truffles. This box measures 7" x 2" x 2", so you can see it's a great size for gift giving. For my project today I used the Toile Tidings Designer Series Paper to decorate my box. Here's a look at my project.
As I mentioned I used the Toile Tidings Designer Series Paper to decorate my box today. The base of the box was made with cardstock. I used either Real Red or Garden Green for the base and then the other color for the mats for the designer series paper. I used the same color of the box base for the designer series paper. With the Toile Tidings it was super easy to pick which color to use. There are only three colors in the designer series paper; Very Vanilla, Real Red, and Garden Green. The same pattern is on each side of the paper but in either Very Vanilla and Real Red or Very Vanilla and Garden Green so it makes creating super easy.
The Real Red version was the first one that I made for my Facebook Live. I used the 1" Real Red Ruched Ribbon to tie the box close. This box uses one full sheet of 8 1/2 x 11 cardstock to make the base. I scored the base cardstock on the short side at (on the 8 1/2" side) at 2, 4, 6, and 8. On the long side (11" side) I scored at 2" and 9".
The box was decorated with three pieces of cardstock (cut at 6 3/4 x 1 3/4) for the front, top, and back. The two side mats were cut at 1 3/4 x 1 3/4. The Designer Series Paper for the box was cut at 6 1/2 x 1 1/2" (you need three) and 1 1/2 x 1 1/2 (you need two). To add a little more decoration I used ribbon to secure it close. I used the Garden Green Double Stitched Ribbon and the Very Vanilla & Copper Classic Weave Ribbon on the Garden Green Box.
Video Tutorial:
If you are viewing this post by email you may have to click here or on the image below to view the video.
Sizes & Dimensions:
Real Red or Garden Green Cardstock (Base) - 8 1/2 x 11
Real Red or Garden Green Cardstock (Mats) - (2) 1 3/4 x 1 1 3/4, (3) 6 3/4 x 1 3/4
Designer Series Paper - (2) 1 1/2 x 1 1/2 (3) 6 1/2 x 1 1/2"
I created another version of the same box using new products from the upcoming January - June Mini Catalog. For this box which I designed for Father's Day I used the Country Club Suite of Products. I have a free PDF tutorial that you can download featuring the Country Club Products. Click here to download the tutorial.
Thanks for dropping by I hope that you have a wonderful day.
Happy Stampin'
Rick Adkins
If you live in the US. I would love you to
choose me as your demonstrator. If you would like to purchase any of
these products you can click on the Shop Now Button or by clicking on any of
the images below. Alternatively, you can also contact me by email to
place your order. Please be sure to use the monthly host code and I’ll
send a little something out to you the following month to say Thank
You!
December HOST CODE: CEUXJX6R
Spend any amount with me this month and receive the
Creative Stampers Tutorial Bundle. Plus get a gift from me in January.
Please
remember that if you use the host code you cannot use that order towards my
KCRP’s (Kinmon Crafty Reward Points) that would be double dipping and is not
allowed. For more information on KCRP’s click here.
Three
main reasons to Join!
1. You Get at least a 20% discount on all your orders
while you are a demo.
2. You get to join my fun Kinsmon Crafters Team and
Private Facebook Group.


 Ruched Ribbon")
 Double-Stitched Ribbon")
 Classic Weave Ribbon")
