Showing posts with label friend card. Show all posts

Sunday, January 19, 2020

From My Heart Case the Catalog

Hello and welcome to my blog; today I am going to share with you another card that I received in the CASE the Catalog swap I took part in.  CASE stands for Copy and Share Everything or Copy and Selectively Edit.  Casing is a great way to take a design in the catalog and either recreate it just as you see it or use it as the base of the design and change things up a little.  This is a super cute card and came from page 8 of the January - June Mini Catalog.  On the very first page of the From My Heart Suite.  Here's a look at the card.

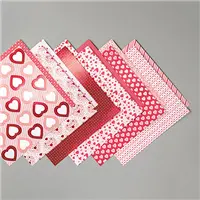
This super cute card features the From My Heart Speciality Designer Series Paper.  There's four different designer series paper designs featured on this card.  This is one of those card designs that will allow you to use up your designer series paper.  But, it's okay you can order more.  The From My Heart Speciality Designer Series Paper features playful heart patterns that have red and pink foil accents on some designs.  Some images from the paper can be cut out using the Heart Punch Pack. This paper is excellent for valentines, cards, and scrapbook pages.


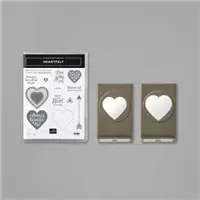
The sentiment comes from the Heartfelt Stamp Set which is part of the Heartfelt Bundle.  The bundle contains the Heartfelt stamp set and the Heart Punch Pack.  The heart punches in the punch pack coordinate with some of the images from the From My Heart designer series paper, as well as images from the stamp set.  You can use both punches and punch out information from either the paper or the stamp set.

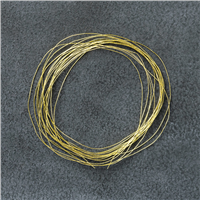
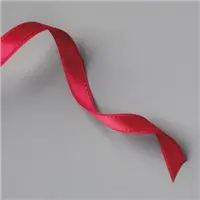
The designer series paper was layered together onto the Flirty Flamingo card base.  The sentiment was added to a whisper white strip in real red ink.  Behind the sentiment strip is a nest of gold thread and another strip of the SDSP.  Behind the punched out heart is a strip of Real Red Double Stitched Ribbon.

Sizes & Dimensions: 

  • Flirty Flamingo Cardstock 5 1/2" x 8 1/2" scored at 4 1/4"
  • From My Heart Speciality Designer Series Paper (White background with hearts) 3 3/4" x 4 1/2"
  • From My Heart SDSP (Red background with Pink Hearts) 3 1/4" x 4 1/4"
  • From My Heart SDSP (striped design) 1/4" x 3 3/4" 
  • Whisper White Cardstock:  4" x 5 1/4" (inside) & 1/2" x 3 3/4"
  • Real Red Double Stitched Ribbon: 3" 
Thanks for dropping by today, I hope that you are inspired to CASE a card in the catalog.  
Happy Stampin' 
Rick Adkins 


Join my NEW Online Technique & Fancy Fold Club!  You can find out all the details by clicking here!

Receive the January Creative Stampers Tutorial Bundle with any size order!

Stampin' Up! Product & Shopping List: 

Friday, January 17, 2020

Life is Better With a Friend Like You

Hello and welcome to my blog; today I am going to share with you a card that I made using the die cut coloring hack I shared during this weeks Facebook Live.  If you missed that post and video you can click here to see it.  I used the Peaceful Moments Bundle to create my card for today's project.  The sentiment from today's card came from the Peaceful Moments Stamp Set.  Here's a look at the card I created.

This is a little more geared toward the casual or avid crafter with all the die cutting involved.  The technique is the same just a little more die cutting involved.  I started out by cutting everything out using the Poppy Moments Dies.  I started out by cutting the Poppy Parade piece of cardstock first.  I cut it first to 4 1/2" x 3 1/4" and then ran it through the die cutting machine twice with the more decorative die.  Once facing one way and then flipped it around and cut it again in the other direction.
For the poppies and leaves I used the following cardstocks; Poppy Parade, Very Vanilla, Daffodil Delight, Mango Melody, Shaded Spruce, and Pear Pizzazz.  I used the following ink to add the coloring for the die cuts.  I added a little Poppy Parade ink in the center of the Vanilla flower and added a little daffodil delight in the center.  I then added the craft white around the edges.  On the poppy parade flower I used poppy parade ink around the center and white around the edges.  For the buds I used Daffodil Delight at the base of the buds and white at the top just a little.  For the leaves I used Shaded Spruce on the dark part and came in and used a little white just around the edges.  I did the same what the Pear Pizzazz just but used the matching ink.  This allows for multiple tones and values on the same leaves and flowers. 
Once everything was cut colored and died I could put them together.  I glued everything together using Multipurpose liquid glue.  I popped the Poppy Parade die cut panel up on Stampin' Dimensionals in the center of a Pear Pizzazz card base (5 1/2 x 8 1/2 scored at 4 1/4).  I then arranged all the die cuts around the card popping some up with dimensionals and letting others flat on the die cut panel.  I stamped the sentiment in pear Pizzazz ink on a strip of Whisper White Cardstock cut at 5/8" x 4 1/4".  I tucked one end under the poppies just where the sentiment showed.
Thanks for dropping by I hope that you will give the die cut coloring hack a try.  If you need any of the supplies that I used today you can pick them up in my online store by clicking on the item in the product list below.
Happy Stampin' 
Rick Adkins 


Join my NEW Online Technique & Fancy Fold Club!  You can find out all the details by clicking here!

Receive the January Creative Stampers Tutorial Bundle with any size order!


Product List

Template Designed by creativeworkerbee