Showing posts with label fall card. Show all posts

Wednesday, October 30, 2019

Fall Leaves and Plaid- Gather Together Stampin 'Up! #PCC357

Hello and welcome to my blog!  This week the Paper Craft Crew's weekly challenge is a Tic Tac Toe Challenge.  From the challenge image I had to go with sponging and fall as two of the main elements for my card today.   I have a love of all the colors in Fall and actually my inspiration for my projects came from my very own front door.  I pulled inspiration from the Fall wreath that we have hanging.  Here's a look at my card.


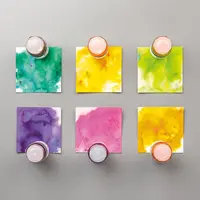
Here's the inspiration image for this weeks challenge.  You can play along just like the game of tic tac toe we played as kids.  I went with the bottom row straight across.

Tips & Tricks: 

I started off my card with a piece of Thick Very Vanilla Cardstock cut at (You guessed it 4 1/4 x 11 scored at 5 1/2).  I used post it tape and my grid paper to mask off lines in different colors in one direction so that I could use my sponge daubers and create the ink blended plaid background.  Once I had all the lines in different sizes going in one direction I came back and did it again going to opposite way to create the plaid.  I used Pumpkin Pie, Cajun Craze, Old Olive, and Crushed Curry Inks for this.  
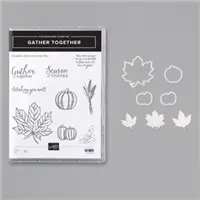
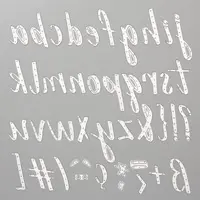
I then stamped three leaves from Gather Together Stamp set and colored them with my colored pencils.  I used a little oil painting solvent to blend the color pencils you can also use baby oil.  I then let that dry and cut them out using the matching die.  While I was die cutting I used the Hand letter Prose dies and cut out the word Fall from some so saffron cardstock.   So while I still had my die cutting machine out I cut out the largest stitched nested label die from a scrap of Very Vanilla cardstock and sponged around the edge with some Crumb Cake ink.  
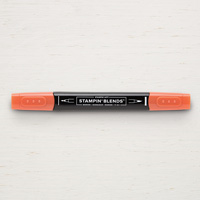
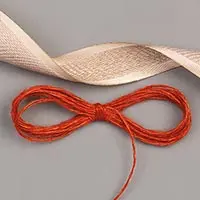
Once everything was cut out I popped up the large stitched nested label on my card and cut off a little that was hanging off the side of the card front.  I then added one of the leaves popped up on Stampin' dimensionals and the letters that spelled out Fall.  I then tucked the other two leaves under this.  To finish off the card I added a double bow made with the Cajun Craze Linen thread from the holiday catalog Come Gather Ribbon Combo Pack and added a few rhinestones I colored using my dark Cajun Craze stampin' blend.  
Thanks for dropping by I hope that you like my card today, and that you will give making your own plaid background a try.  If you don't you can get the Wrapped in Plaid 6 x 6 Designer Series Paper for your Holiday crafting in my online store.  
Happy Stampin' 
Rick Adkins 

If you live in the US.  I would love you to choose me as your demonstrator.  If you would like to purchase any of these products you can click on the Shop Now Button or by clicking on any of the images below.  Alternatively, you can also contact me by email to place your order.  Please be sure to use the monthly host code and I’ll send a little something out to you the following month to say Thank You!  

November HOST CODE:  QU2TJBJN
1.     Spend any amount with me this month and receive the Creative Stampers Tutorial Bundle.  Plus get a gift from me in December.
Please remember that if you use the host code you cannot use that order towards my KCRP’s (Kinmon Crafty Reward Points) that would be double dipping and is not allowed.  For more information on KCRP’s click here.  


Three main reasons to Join!  
1.     You Get at least a 20% discount on all your orders while you are a demo.   
2.     You get to join my fun Kinsmon Crafters Team and Private Facebook Group.
3.     Access to directions to all my online classes 

Stampin' Up! Shopping List: 

Monday, October 28, 2019

Stampers Showcase October Blog Hop: It's Fall Y'all

Hello and welcome to my second post today; I am sharing a project for the Stampers Showcase October Blog Hop.  The theme this month is It's Fall Y'all.  I have created a fun Fall themed card using the Gather together stamp set.  Here's a look at my card.
I started may card by stamping the large leaf image from the Gather Together Stamp set over and over masking each time on a piece of Crumb Cake cardstock.  Once I had all the leaves stamped felling up the entire piece of cardstock, I started coloring each of them using my Polychromos Colored Pencils.  I think that color pencils look better on darker color cardstocks.
I started each leaf the same way.  I started coloring with my white pencil and then added in other colors.  I always start out with a light hand and build up layer by layer and eventually getting heavy with the pigment of the pencil to fill in the tooth of the paper.  By starting out with a very light hand I can build up multiple layers overlapping the colors letting the colors underneath show through the layers on top.  This is called glazing.  Once I start pressing firmer on the pencils this starts to blend the colors.  You can also use a blending pencil to do this once you have all your colors laid down.  Because with the blending pencil it puts a coating on top of the pencils and doesn't allow for more pigment to be added.
With all the leaves colored I added the crumb cake piece to a piece of whisper white cardstock that was cut at 5 3/8 x 4 1/8.  I then added the focal image to my card base made out of Pumpkin Pie cardstock.  I added a pumpkin pie banner and a sentiment banner to the front of the card.  I added some gold sequins to finish off my card.

Thanks for dropping by today, you can click on the next button above to go to the next blog on the list.

Happy Stampin' 
Rick Adkins 

If you live in the US.  I would love you to choose me as your demonstrator.  If you would like to purchase any of these products you can click on the Shop Now Button or by clicking on any of the images below.  Alternatively, you can also contact me by email to place your order.  Please be sure to use the monthly host code and I’ll send a little something out to you the following month to say Thank You!  

November HOST CODE:  QU2TJBJN
1.     Spend any amount with me this month and receive the Creative Stampers Tutorial Bundle.  Plus get a gift from me in December.
Please remember that if you use the host code you cannot use that order towards my KCRP’s (Kinmon Crafty Reward Points) that would be double dipping and is not allowed.  For more information on KCRP’s click here.  


Three main reasons to Join!  
1.     You Get at least a 20% discount on all your orders while you are a demo.   
2.     You get to join my fun Kinsmon Crafters Team and Private Facebook Group.
3.     Access to directions to all my online classes 


Product List

Thursday, October 17, 2019

How to Use Pigment Sprinkles & A Frosted Foliage Fall Card - Stampin' Up! Frosted Foliage Bundle (Video Tutorial)

Hello and welcome to my blog; today I am going to share with you the card I made during last nights Facebook Live.  Where I shared some tips and tricks about using the new Pigment Sprinkles by Stampin' Up!.  Pigment Sprinkles come in Stampin' Up! colors and coordinates with all out products. .You get them in a set of six and they come in the following colors; Daffodil Delight, Mango Melody, Gorgeous Grape, Granny Apple Green, Melon Mambo, and Bermuda Bay.  If you notice those colors are your primary and secondary colors, and just with those you can make any color you need.  Here's a look at the card I made last night with the Pigment Sprinkles and the Frosted Foliage Bundle.

Basics of Pigment Sprinkles:  

Pigment Sprinkles can be a fun media to play with as well as one of the most intimidating!  Why you may ask; well, it's because it's such a freeing carefree media and very hard to control.  One of the reasons it's hard to control is the fact that it's a powder.  Unlike traditional watercolors or watercolor pencils; Pigment Sprinkles has very little control.  Well, that's what most people think anyway.  But, if you know how to use them you can find it very freeing and controllable.   It all depends on how you use them.  You can if you take your time control where the sprinkles will go, it's a matter of the control you have with your hand and the heaviness or lightness of your application.  More sprinkles means more pigment on the paper, less sprinkles mean less pigment.  You can also use a aqua painter to apply the pigment to the paper, you will see this in the video tutorial below.

Pigment Sprinkles are a dry media that you have to add water too.  You do this by spritzing the watercolor paper with a little water in a Stampin' Spritzer.  This way it helps to keep most of the pigment on the paper rater than your work area.  Don't get me wrong it does still get off the paper, as you can see in the picture above and below.  Once you have the pigment put down; you then can spritz it with more water to really activate the pigment.  This is when you really start to see the magic happen.

As far as what surface you can use with the Pigment Sprinkles, as long as it's a heavy paper meant for watercoloring you are fine and ready to go.  We offer both watercolor paper and shimmery white cardstock as the paper of choice for watermedia.  Both are able to take a lot of pigment and water, so they are the go to for this or any type of watermedia.  So just a few things to keep in mind when you start using the Pigment Sprinkles.
You can use your heat tool to speed the drying time, but to me if you just let it dry naturally you achieve much better results.  The air from the heat tool can move the wet pigment around a little more and if you let it dry naturally the wet pigment stays in place and can create some beautiful light and dark areas on it's own.

Frosted Foliage Card: 

Once you have the watercolor or shimmery white cardstock all Sprinkled up and dried then you can really start playing with them.  You can use it as just a background for a card or you can do like I like to, and cut them up with my dies.  This creates some fun colorful shapes to play with on your cards.  I used the new Frosted Foliage Bundle to create the card that I shared last night during my Facebook Live.  I had predone some watercolor paper using the Pigment Sprinkles so that they would be dry enough for me to die cut.  
I used the largest die from the Frosted Frame dies to create the focal image on my card.  At first I decided to just stamp a sentiment in the middle of this piece.  After doing so, I decided I didn't like it and cut out the next size down and stamped my sentiment on that with some 2nd generation stamping for added fun.  I then layered those two pieces together and liked it so much better.  
For my card base I used some Very Vanilla Thick Cardstock cut at 4 1/4 x 11 and stamped the berries from the stamp set around the outside edge.  I then layered my foliage frame in the center.  I also had die cut some of the other foliage pieces in the set in two other pieces of watercolor paper that I had used the Pigment Sprinkles on.  I then added these die cuts at the top and bottom sticking them under the frame.  This added more interest and color to the card.  
To finish off my card design I added some Rhinestone Basic Jewels around the card.  This helped to add a little sprinkle and shine to the card; as well as help draw the eye to the sentiment.  As if the foliage frame needed any help at all.  

Video Tutorial: 


If you are viewing this post by email you may have to click here or on the photo below to view the video.  Sometimes certain mail servers do not show the embedded video.  
Thanks for dropping by today, I hope that you have a wonderful day, and I will see you again tomorrow with another card design.  

Happy Stampin' 
Rick Adkins 


If you live in the US.  I would love you to choose me as your demonstrator.  If you would like to purchase any of these products you can click on the Shop Now Button or by clicking on any of the images below.  Alternatively, you can also contact me by email to place your order.  Please be sure to use the monthly host code and I’ll send a little something out to you the following month to say Thank You!  


October HOST CODE:  SQ2WWJZN
1.     Spend any amount with me this month and receive the Creative Stampers Tutorial Bundle featuring Fall & Halloween Projects.  Plus get a gift from me in November.
Please remember that if you use the host code you cannot use that order towards my KCRP’s (Kinmon Crafty Reward Points) that would be double dipping and is not allowed.  For more information on KCRP’s click here.  


Three main reasons to Join!  
1.     You Get at least a 20% discount on all your orders while you are a demo.   
2.     You get to join my fun Kinsmon Crafters Team and Private Facebook Group.
3.     Access to directions to all my online classes 

Stampin' Up! Shopping List: 

Template Designed by creativeworkerbee