Showing posts with label daisy punch. Show all posts

Monday, June 3, 2019

Daisy Lane It's Time to Shine

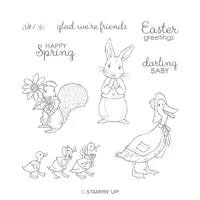
Hello and welcome to my blog; today I am going to be sharing with you a card that uses a new stamp set from the 2019-2020 Stampin' Up! Annual Catalog (which goes live on June 4th at 12 pm MT Time).  This is also the stamp set that I picked to use for my Online Class this month.  I am using the New Daisy Lane Stamp Set.  This is a fun set and coordinates with the Daisy Delight Stamp Set that's in the current catalog as well as the large daisy punch.  When this set goes live it will also have a new matching punch (Medium Daisy Punch) as part of a cost saving bundle.  Here's a look at my card.

Daisy Lane Stamp Set, Rick Adkins, Stampin' Up!, Flirty Flamingo Cardstock, Daffodil Delight Cardstock, Blackberry Bliss Cardstock
I picked the colors for my card today from the Perennial Essence Designer Series Paper.  This pack of designer series paper is very artistic and the designer actually studied Monet Paintings and then hand painted the designs where they where photographed and then turned into this lovely paper you see today.  Just a little fun fact for you.  Any way back to the card.  I stamped the large Daisy (twice) from the set and used my large daisy punch to cut that out.  I added the designer series paper to a piece of Blackberry Bliss cardstock cut at 4 1/8 x 5 3/8 and then attached that to the card base.  Oh I forgot to mention my sentiment was stamped directly on the lovely designer series paper in Blackberry Bliss ink.  I thought it was such a wonderful mix of sentiments for a friend to get in the mail. I added some punch out sprigs (using the sprig punch returning to the new catalog) in Daffodil Delight & Blackberry Bliss.  I popped the daisy up on a stampin' dimensional and that was pretty much my card.  The card base is a piece of Flirty Flamingo cut to portrait size (in the us that's 4 1/4 x 11 scored at 5 1/2).  
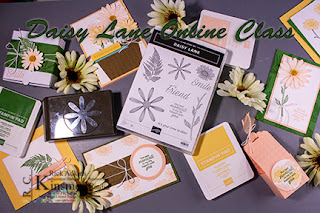
I love that this stamp set coordinates with both stamp sets and punches we already have in the catalog.  That makes it not only do double duty but it gives us way more options to pick from without a lot of extra cost.  This set is my Featured product this week so you will be seeing a lot more examples of this stamp set.  Plus if you sign up for my Daisy Lane Online Class you will have seven more card ideas to go along with the ones I share this week.  Deadline to sign up for the class is the 4th.  
To tie in the envelope I used a strip of the matching paper and attached it to the front.  I still have room to write the address and the post office still has room to run it through their post machine without interference.  Which is good.  I love to make the envelope coordinate when I can by either adding a little of the matching designer series paper or by stamping.  You shouldn't be sending a naked envelope use those scrips of dsp you have that matches your card.  I also used a strip on the inside of the card as well to help tie it to the front.  

That's all for me this morning I have another post for you this afternoon so make sure you watch for that.  Remember to add the Daisy Lane Stamp Set onto your wish list, you are going to love it.  The new Annual Catalog goes lives tomorrow!  Wow it's been such a long awaited time.  I also wanted to mention I have kicked off my three month Sizzlin' Summer promotion so you can check out those details here and earn a chance to win a prize from the Holiday Catalog in September.  
Thanks for dropping by I planning to get back to the normal schedule soon. 
Happy Stampin' 
Rick Adkins 


June Host Code:  C7W2JPBM
1.       Spend any amount up to $50 (before taxes & shipping) and get the June Creative Stampers Tutorial Bundle Free
2.      Spend $50.00 (before taxes & shipping) in my Online Store using the current host code during June and get a card kit to make the all the projects for my June Monthly Card Class.  (kits will not ship out until the 20th of the month all qualifying orders past that will be put down for the July Monthly Card kit)
3.       Spend $150 or more (before taxes and shipping) and get both my June Monthly Card Class kit, and the June Creative Stampers Tutorial Bundle FREE as my gift to you. 

Stampin' Up! Shopping List: 


Sprig Punch
[148012]
$18.00
Daisy Punch
[143713]
$18.00
Glue Dots
[103683]
$5.25

Click to Learn More: 


Thursday, May 16, 2019

Daisy Lane Online Class Preorder


Guess what?  I have a brand-new online class preorder for you today and it's one that you will love!!!

The Daisy Lane Online Class is perfect for all levels of stampers and crafters from beginner to advanced!

This class features some new products from the 2019 Stampin' Up! Annual Catalog!
You will need the following ink pads for this class:  I have a upgrade option available if you don't own these yet.    Petal Pink, Garden Green, and So Saffron ink pads. 
You will also need a bone folder, paper snips, the following adhesive snail or Multipurpose Liquid Glue, Stampin' Dimensionals, Mini Glue Dots, and Tear & Tape & the Large Daisy Punch.  


This Class has Three Options:  

Option 1:  Daisy Lane Online Class (with the Daisy Lane Bundle) 

  • Cost:  $62.00 (includes all shipping and taxes) 
  • Includes: 
    • The Daisy Lane Stamp Set & Medium Daisy Punch (NEW) Bundle Price
    • Perennial Essence Floral Centers (NEW) 
    • White Baker's Twine (FREE as my gift to you) 
    • Seven Make & Take Packets 
    • Video Tutorial & PDF printable Instructions

Option 2:  Daisy Lane Online Class (Stamp Set only no punch) 

  • Cost:  $52.00 (includes all shipping & taxes) 
  • Includes:
    • Daisy Lane Stamp Set (stamp set only no punch) 
    • Perennial Essence Floral Centers (NEW) 
    • White Baker's Twine 
    • Seven Make & Take Packet 
    • Video Tutorial & PDF printable Instructions

Option #1 and #2 both ship priority for $8 (included in price). 


Option 3:  Daisy Lane Online Class Tutorials only

  • Cost:  $15.00 
  • PDF only- want to cut your own cardstock and already own the products? This is the option for you. If you purchase the PDF Only option, you will be emailed the links on or before June 20th.  

Option 4: 

  • Cost $12.00 
  • Kinsmon Crafters Members (my downline) can purchase this option for the make and take kits and PDF.  Look for the registration link in our weekly email. (Separate Registration Page) 
If you want to add on either of the following you can do so by telling me in your email and I will send you the appropriate links.  

Add On Option 1:  Large Daisy Punch Upgrade:  Add $16.00 Add On Option 2:  Ink Pad Upgrade (Includes Petal Pink, Garden Green, and So Saffron ink pads)  Add $22.50 

All class kits and included product will be ordered and prepared together after the deadline. This is a preorder only and per SU policy, I do not have product on hand ready to ship. Because of this, it takes about 1 week after the deadline for me to order, cut, prepare and ship all the class kits.  Class Kits can only be mailed within the United States. If you live out of the US, you can still purchase the PDF.
  

Class Schedule: 

May 15 - June 4th 2019 Sign ups 
May 28th - Invoices will be sent out (all invoices must be paid by June 4th) 
June 5th - All orders for Class Materials Placed
June 13th - Class kits will be mailed out (pending backorders) 
June 20th - Class PDF instructions & Video Link emailed out. (sent on or before)  

Wednesday, May 1, 2019

Daisy Lane for #PCC335

Hello and welcome to my blog; today I am going to share with you another card that features both new, and retiring products.  I created this card for this weeks Paper Craft Crew Sketch Challenge.  This week we have a really fun sketch for you to play along with.  I used the Daisy Lane Cling Mount Stamp Set from the 2019 Stampin' Up! Annual Catalog.  This is a great new stamp set that coordinates with the popular Daisy Punch.  So this is a great set to add to your collection if you have the wonderful Daisy Punch.  I also used some of the Gingham Gala Designer Series paper which is sadly retiring.  Here's a look at my card.

Here's a look at the sketch that inspired my card today.  You can click on the sketch image and it will take you to the Paper Craft Crew website so you can play along and/or see what the other design team members came up with.
I stamped the ferns first and then fussy cut them out.  Then I stamped the daisy twice so that I could use my daisy punch and punch each one out.  My card base is a piece of Pear Pizzazz cut at 5 1/2 x 8 1/2 scored at 4 1/4.  My Whisper White piece that is on the front of the card base was cut at 4 x 5 1/4.  I added a strip of the Gingham Gala Designer Series Paper in Daffodil Delight.
I stamped the sentiment in the bottom right hand corner.  I used stampin' dimensionals to put the daisy together.  I added the ferns behind the daisy with a little liquid glue and a dimensional at the end of a couple so that there was a little more dimension.  I finished off the card by adding a couple rhinestones that I colored with my dark Daffodil Delight Dark Stampin' Blend.  To finish off the design I added a little of the designer series paper to the inside of the card.
Thanks for dropping by today, I hope that you have enjoyed this little sneak peek and a look at the retiring Gingham gala designer series paper.  I would suggest that if you love this paper to stock up on it now.  If you need to pick up the designer series paper and the other supplies you can do so in my online store.  The Daisy Lane Stamp set will be available in June.  I am also planning a fun online class using this stamp set so be watching for that as well.
Happy Stampin' 
Rick Adkins 

May Host Code:  KKTS7NHU

  1. Spend $50.00 (before taxes & shipping) in my Online Store using the current host code during May Creative Stampers Tutorial Bundle and get two PDF tutorials sent to you starting the 20th of the month. 

Stampin' Up! Shopping List: 


Daisy Punch
[143713]
$18.00

Wednesday, April 24, 2019

How to Paint a Sweet Cup using Arteza Acrylic Paint & Fable Friends Stamp Set

Hello and welcome to my blog and YouTube Channel; today I am going to share with you how I decorated a sweet cup a couple weeks ago for a blog hop.  I used the Fable Friends Stamp Set and some acrylic paint.  The acrylic paint that I used was from Arteza.

I was asked to review the Arteza Acrylic Paints and I had to come up with a way to do it and Incorporate Stampin' Up! as well.  It was super easy to come up with a project to do this.  I admittedly thought about a project that I did in the 5th or 6th grade in art class.  The art teacher had us paint ice cream containers.  This project stuck with me and I had to recreate it using the great Arteza paint and a sweet cup.  Here's a look at the finished project.


Yes I am loving the quality of the Acrylic paint from Arteza it has a great body and painted easily.  So I would highly recommend it.  Using this paint was even easy to stamp on top of and paint it in as you can see in the video tutorial about how I painted the sweet cup.

Video Tutorial: 

If you are getting this post by email you may not see the embedded video; some mail services will not show the video you may have to click here to see it.   

Tips & Tricks: 


  • I did cover the sweet cup with a very thin coat of Gesso (which is a hard compound of plaster of Paris or whiting in glue, used in sculpture or as a base for gilding or painting on wood canvas or paper.)  When you do this before you add acrylic paint It will take less paint to cover the surface and provides a better archival surface.  
  • After the gesso was dry I painted in the background.  Using a mixture of blues and greens.  I also added a little yellow to the green to create different shades.  
  • I stamped the image in archival black ink (yes I kept mine) but you could use stazon instead.  You do have to let the ink dry before painting.  
  • The Arteza acrylic painted very well, much like I have found in more expensive paint.  I also blended with ease.  I could also paint dark to light without a problem.  
  • To finish off the sweet cup after it dried I added a couple strips of the gingham gala designer series paper around the rim.  
  • To decorate the top I cut out a circle from matching cardstock and placed it on top.  I then punched four daisies using the daisy punch and the same gingham designer series paper.  I curled the ends up and down on some of the layers using my bone folder.  I added a clear faceted gem to the top, and a few leaves punched with the leaf punch under it.  
  • I layered each daisy up with mini glue dots and stampin' dimensionals.  
  • The handle was made with a little cardstock and was secured with tear & tape.  
If you like mixed media projects the Arteza Acrylic paint is a great option.  It comes at a great price and there are different size kits you can buy.  You can check them out here.  You will find all the other supplies I used int he shopping list below.  
Happy Stampin'
Rick Adkins 

Stampin' Up! Shopping List: 

I send catalogs to all my customers that have purchased from me in the last six months.  If you haven't placed a order I asked that you pay $6.00 for the catalog.  This way it helps me cover the shipping.  I purchase all my catalogs and mail them so I am out this cost if you don't order or order from someone else.  

Template Designed by creativeworkerbee