Showing posts with label best dressed DSP. Show all posts

Monday, January 6, 2020

Beautifully Braided Thank You Card

Hello and welcome to my blog; today I am going to share with you a super cute little thank you card using the new Beautifully Braided Bundle from the 2020 Stampin' Up! January - June Mini Catalog.  My card today features the large floral image from the stamp set and a little stampin' blend coloring.  Since I need to make a few thank you cards I thought it was the prefect time to play with this new set.  Here's a look at my card.

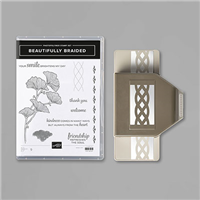
The Beautifully Braided Bundle: 

The Beautifully Braided Bundle includes the Beautifully Braided Stamp Set and the Braided Border Punch.  Create elegant borders with flowers, scallops, and braided patterns in the Beautifully Braided Stamp Set.  With the included phrases, you can make greeting cards for your friends.  Cut a beautiful braided border for your cards and paper crafts using the Braided Border Punch.  Punch, align, and repeat to create a custom-sized border.
Image by Stampin' Up! 

Tips & Tricks: 

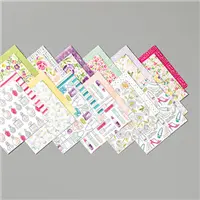
I thought that the Beautifully Braided stamp set matched perfectly with the florals from the Best Dressed Designer Series Paper.  I pulled the colors that I used for my card from this pack of designer series paper.  I used Purple Posy, Lovely Lipstick, and Old Olive as my main colors.  I did pop in a little Petal Pink just for fun.  
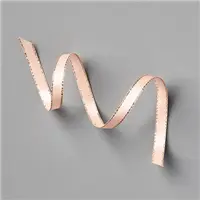
I used my Stampratus to stamp the large flower from the stamp set onto a piece of whisper white card stock and colored it in with my Purple Posey Old Olive and Lovely Lipstick Stampin' Blends.  I added the colored image onto a piece of Old Olive cardstock to act as a mask.   I cut a small piece of the designer series paper and some scraps of old olive.  I used the scrap to punch out the braid from the braided border Punch.  I then split it down the middle to added it to the top and bottom of the designer series paper.  Once the designer series paper and braid was attached to the card I popped up the flower panel using dimensionals after adding a little of the Petal Pink Metallic Edge Ribbon to the bottom of it and added a flat knot.  To finish off the card I added a few of the Champagne rhinestones.  
Thanks for dropping by I hope that you have a wonderful day.  Remember that you can pick up all these supplies now in my online store.  
Happy Stampin' 
Rick Adkins 

Heartfelt Online Bundle Class To Go
Deadline to register January 9, 2020 
Click here for details 

January Creative Stampers Tutorial Bundle 
Features 16 Love/Valentine Themed projects 
Get it free with any size order in my online store or you can purchase it for $25 US

Stampin' Up! Shopping List: 


Price: $49.00

Saturday, December 21, 2019

Teepee Card Tutorial Featuring Dressed To Impress Stamp Set

Hello and welcome to my blog; today I am going to share with you a super fun and easy fun fold card that look s impressive but is one of the absolute easiest cards to put together.  This is also the last project for my 25 Days of Christmas Holiday Project Series this year. I was so surprised how easy this card was to put together.  I saw this card last week at a demonstrator event, and got one as part of a card swap.  I loved it so much I had to come home and try it.  This was such a fun card that I had to share it with you as well.  For my card I used some Holiday Catalog Products as well as some new products from the upcoming January-June Mini Catalog (which used to be the Occasions Catalog).  I picked the Dressed To Impress Stamp Set (available January 3, 2020) to showcase on my card today.  Here's a look at my card using this super fun and easy Teepee Fold (or Pyramid Card).

 Tips & Tricks: 

This card uses just a few supplies to make.  Three pieces of square cardstock for the base, a piece or two of designer series paper and whisper white.  Once you pick out the colors of the cardstock you are going to use; it's then time to do a little scoring and a little stamping.  I picked Old Olive as my card base.  I used the Best Dressed Designer Series Paper and a piece of Whisper White.  You are going to take the three pieces of cardstock and score them from point to point.  The DSP and whisper white are cut down the middle from point to point.  
After you get everything cut and scored it's time to put the card together.  I found it easier to line up the square on the grid paper to put the card togher.  You will line up the other two pieces of cardstock up against the score line in the middle.  Just slightly off the score line just a little bit.  The best way to think of it is to line up point to point.  When adding the glue, you will only add glue to the top of the folded triangle.  Just one one side.  Just a little tip make sure that you work the score lines a couple times to make them fold up easier.  
After I got the card put together I stamped one of the images from the Tags, Tags, Tags Stamp Set and colored it with my Stampin' Write Markers in Real Red, Crushed Curry, and Old Olive).  I then cut it out with the matching dies and added it to one side.  I then stamped the high heel from the Dressed to Impress stamp set and colored it with the Real Red stampin' write marker.  
I added the whisper white to the inside and one to the back so that I had room for a sentiment and room for writing a message.  
To keep the car together you can use either little magnets or velcro dots.  

Video Tutorial: 

If you are viewing this post by email you may have to click here or click on the photo below.  Some emails servers will not show the video.  

Sizes and Dimensions: 

  • Old Olive cardstock 4 x 4
  • Whisper White 3 3/4 x 3 3/4
  • Dressed to Impress Designer Series Paper 3 3/4 x 3 3/4
Happy Stampin' 
Rick Adkins 


If you live in the US.  I would love you to choose me as your demonstrator.  If you would like to purchase any of these products you can click on the Shop Now Button or by clicking on any of the images below.  Alternatively, you can also contact me by email to place your order.  Please be sure to use the monthly host code and I’ll send a little something out to you the following month to say Thank You!  


December HOST CODE:  CEUXJX6R
  1. Spend any amount with me this month and receive the Creative Stampers Tutorial Bundle.  Plus get a gift from me in January.
Please remember that if you use the host code you cannot use that order towards my KCRP’s (Kinmon Crafty Reward Points) that would be double dipping and is not allowed.  For more information on KCRP’s click here.  


Three main reasons to Join!  
1.     You Get at least a 20% discount on all your orders while you are a demo.   
2.     You get to join my fun Kinsmon Crafters Team and Private Facebook Group.
3.     Access to directions to all my online classes 

Stampin' Up! Shopping List: 


Template Designed by creativeworkerbee