Showing posts with label Home decor. Show all posts

Thursday, November 18, 2021

Be Jolly Christmas to Remember Frame Decor - 3D Thursday & Free Project Sheet

 Hello and welcome to my blog!  I hope that you are doing well today and I am glad that you are visiting with me.  Jo Anne Hewins from Love to Create Blog is our team designer this week.  Check out her a wonderful project below.  

Thursday, November 4, 2021

Pretty Pumpkin Home Décor Sampler - 3D Thursday Project & Free Project Tutorial


Hello and welcome to my blog!  I hope that you are doing well today and I am glad that you are visiting with me. Sherri Everett Bishop from Stamp With Sharecroppers Blog is our team designer this week.  Check out her a wonderful project below.  

Thursday, July 1, 2021

Desktop Memo Board - Garden Birdhouses Stampin' Up!

 Hello and welcome to my blog; today I wanted to share with you a cute idea for a desktop memo board using the Hand Penned Designer Series Paper, Garden Birdhouses Stamp Set an inexpensive frame and notebook from the Dollar Store and some a little backing from either a Paper Pumpkin Kit or cardboard backing from some DSP.  Here's a look at the finished project.  

Learn how to make a super easy Desktop Memo Board with the Garden Birdhouses Stamp Set from Stampin' Up! Click here for details

Thursday, July 30, 2020

Summer Sampler Class Registration


Date: August 18, 2020

Time: 7 pm – 9 pm CST

Location: Rick’s Zoom Classroom

RSVP & Payment Due By: August 4, 2020

Cost: $46.00


Details:

Join me as I kick off my Home Décor Sampler Class Series with a fun little Summer Sampler.  Samplers are extremely popular for home décor right now because you can create something for every season, holiday, or décor type.  

This is a example of a Home Decor Sampler 

Above is an example of what a sampler is I have had a few questions about it. So I wanted to share with you an example to better explain what you would be making in the class.   

In this class we will be making a Summer Sampler that will be perfect for any home.  You will receive a swag bag of products to use to make your sampler with some left over to make other projects   You also have the option to add on the featured stamp set/bundle for this and the other classes in this series.  Those that sign up for all five of my Sampler Classes will get a free embellishment sent to them from the January – December Mini Catalog in January.  I will list all the dates of the classes at the bottom.  So, that you can plan.  

Space is limited so do not delay in registering!  

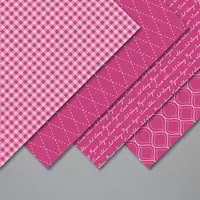
In the Summer Sampler Class I am featuring the Daisy Lane Stamp Set you may add that on to your class or you can use something you may already own. 

Sampler Series Dates:


Class:

Class Date:

RSVP & Payment Due:

Summer Sampler Class

August 18, 2020

7 pm – 9 pm CST

August 4, 2020

Halloween Sampler Class

September 22, 2020

7 pm – 9 pm CST

September 8, 2020

Fall Sampler Class

October 20, 2020

7 pm – 9 pm CST

October 6, 2020

Christmas Sampler Class

November 17, 2020

7 pm – 9 pm CST

November 3, 2020

Winter Sampler Class

December 15, 2020

7 pm – 9 pm CST

December 1, 2020


Included in the Class:

  • ·      ½ a pack of Designer Series Paper
  • ·         A bolt of ribbon
  • ·         A embellishment
  • ·         All the cardstock needed to create the sampler precut and ready to go
  • ·         PDF Printable Tutorial
  • ·         Includes USPS Priority Shipping to you

You will need your own 12 x 12 cardstock, frame, inks, and adhesive for this class.  Once you sign up for the class, I will send out an email with the additional supplies you will need listed in the class.  You can order what you need from my online store or use something you already own. 

The cost of each class will vary based on the Designer Series Paper, ribbon, and embellishments. 

Click Here to Register for the Class

Saturday, April 11, 2020

Easter 12 x 12 Sampler - Easter Promise Stamp Set

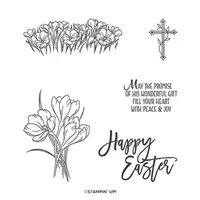
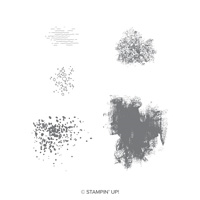
Hello and welcome to my blog; today I am going to share with you the Easter Sampler I made a few weeks back.  I used the Easter Promise and Artisan Textures Stamp Set for most of the sampler.  Samplers are a great way to create custom home decor pieces for your home with supplies you may already have around your house.  I mean really they are just some cardstock, stamped images, embellishments and designer series paper arranged in a super pretty way.  I did a little watercoloring on my Easter Sampler using my Watercolor Pencils.  Here's a look at the Sampler.  


Easter Promise Stamp Set, Artisan Textures Stamp Set, Easter Sampler, Rick Adkins, Stampin' Up!

Tips & Tricks: 

As with any sampler I create I first start by picking out what I want to focus on.  I knew I wanted to do a Easter Sampler, but with all the cute Easter stamp sets in the January-June Mini Catalog I had to narrow it down.  I ended up picking the Easter Promise Stamp Set.  The Easter Promise Stamp Set allows you to create messages of hope with the Easter greetings and springtime flower images.  Once I had the stamp set picked out it was time to decide on a color theme.  I went with a few of my favorite springtime colors; Soft Seafoam, Gorgeous Grape, Melon Mambo, Daffodil Delight, and threw in a little Granny Apple Green just for fun.  Next I figured out how big I wanted everything to be and how many squares I wanted to use.  So I cut all the pieces for the basic set up.  I did eight Gorgeous Grape squares in 3 1/4 x 3 1/4 and one at 3 1/2 x 3 1/2.  I then started cutting my white pieces.  3 x 3 and 3 1/4 x 3 1/4 for the center.  I stamped the images I knew I wanted to watercolor first so that they would dry.  


I started with my center panel and colored the crocus flowers with my watercolor pencils.  I softened the color with my blender pen.  I love to use the blender pen to color and watercolor images.   To me they are much easier to work with than the Aqua Painters, because of the fine tip I and very little moisture that comes out.  Once I had everything colored I repeated the process for the other two images.  I placed the center panel onto my 12 x 12 whisper white cardstock, after matting it with the one 3 1/2 x 3 1/2 piece of Gorgeous Grape.  I then started arranging everything else around it.  For the cross square next to the largest square I added a little Daffodil Delight Designer series paper that was cut using one of the stitched squares from the Stitched Shapes Dies.   I also cut out the cross image with a smaller one.  I embossed a piece of Melon Mambo cardstock with the Ornate Floral 3D Embossing Folder before putting it all together.  


I stamped the other floral image in the top panel in Gorgeous Grape Ink and used one of the images from the Artisan Texture Stamp Set to add a little color to the image.  I stamped off twice to achieve the lighter color.  For the center panel at the top I used some of the Very Vellum Sale-A-Bration paper in the background over a piece of Whisper White and then used the Cross of Hope Dies to cut one cross from Gorgeous Grape Cardstock, one from Gold Foil, and one from the Vellum.  I layered them all up and added some of the Purple Tricolor Ribbon behind and placed the crosses together over it.  


For the bottom panels I used the floral images again, using first, second and even third generation stamping to get the look I wanted.  You will notice that you will see all the colors, images, and techniques repeated in my sampler at least three times.  This creates a very pleasing visual interest to the sampler and to the eye.  


 Thanks for dropping by today I hope that you have a wonderful and safe Easter Holiday.  You will find a list of all the supplies I used below so that you can make your very own sampler.  
Happy Stampin' 
Rick Adkins 

Stampin' Up! Shopping List: 


Tuesday, December 3, 2019

Let it Snow Scandinavian Star Ornament Home Decor Piece Video Tutorial

Hello and welcome to my blog; today I am going to share with you a super cute home decor piece that's super easy to make and actually quick.  One other thing that is great about this project is you can use up some of that Designer Series Paper you may have on hand or in your stash.  I saw this on a video and in industry magazine recently and just had to try it.  I have been making the smaller version of the Scandinavian Star Ornaments for one of our Christmas Trees.  We have a few different trees that we put up every year, you can see past Christmas Open House photos by doing a search in the search bar.  If not I will try to come back and try to link it from a couple years ago.  We decided this year to create a tree with handmade ornaments, so I am super excited to see it completed.  Anyway here's a look at my home decor piece.

Tips & Tricks: 

This project only takes 12 1" x 12" strips to make.  So you can make a lot of them with one pack of DSP.  Once you have your Designer Series Paper cut into the strips you are going to take six of them and weave together.  You start with three stripes and weave the other three together.  Once all together you are going to turn it into an x and then glue the two closes strips together as shown on the video.  You are going to repeat this all the way around and repeat with the other six stripes.  
Once both stars are constructed you are going to put both together.  To secure both stars together you are going to weave the leftover strips into the curls and secure with glue.  To finish it off you are going stamp and color one of the snow men from the stamp set or whatever you decided to put on the inside.  Color it with coordinating colors and layer together with dimensionals.  Attach to the center of the put together stars with a little liquid glue.  Create a hole at the top and add your ribbon.  Make a loop for the top and a bow to add a little pretty.  At this point you are ready to hang. 

Video Tutorial: 

If you are viewing this post by email you may have to click here or on the image below to see the video.  Some mail servers will not play the embedded video.  
I hope that you have enjoyed this project and that I have inspired you a little to try this at home.  This would make a great decoration for any season by changing up the paper.  Thanks for dropping by I will see you again very soon.  
Happy Stampin' 
Rick Adkins 

Stampin' Up! Shopping List: 


Template Designed by creativeworkerbee