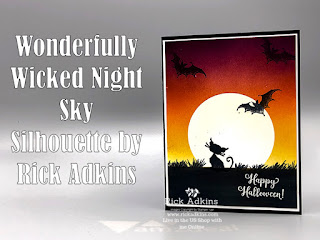
Hello and welcome to my blog; today I am going to share a super cute evening silhouette card with you! This little cutie is perfect for Halloween or any other time of the year. For my card today, I used the Wonderfully Wicked stamp set on page 55 of the 2019 Stampin' Up! Holiday Catalog. In the video tutorial I show you how to create the ink blended background complete with my tips on creating the perfect moon. Here's a look at my card.
The Wonderfully Wicked Stamp Set was the perfect choice for today's card because of the perfect sentiments, and the fun little silhouette images. You'll have a wicked good time using the Wonderfully Wicked Stamp Set. The silhouette images look great stamped solid in any color as I did on today's card. With the sentiments in this stamp set you can combine individual greetings to create a custom sentiment.
To create the moon I used one of my Layering Circle dies and cut out a piece of Masking Paper. For masking paper I use Avery Reuseable Labels, which can be picked up online or in some office supplies stores. I ordered mine from Amazon. The pack is huge so it will last forever. I've had it since last year. Once I had my mask in place I did my ink blending. I use Makeup brushes for this because they don't hurt my hands. I started out with Crushed Curry and then faded that into Pumpkin Pie. Next I used Rich Razzleberry and Blackberry Bliss inks to finish everything off.
I used a t-square ruler to draw my horizon line and then stamped my images in tuxedo black ink. For the cat I used my Stamparatus to be able to stamp it a couple times to get him black enough. I then filled in the ground with multiply layers of the Dark Soft Suede and both Dark and Light Basic Black Stampin' Blend Markers. I flicked up some grasses using the Dark Basic Black Stampin' Blend. To finish off my card I used Versamark ink to stamp my sentiment and White Stampin' Emboss Powder and heat set it. I stamped some more bats on my inside piece and then layered everything together.
Video Tutorial:
If you are viewing my post via email you may not be able to see the embedded video. Some mail servers will not show them. You will need to click here or click on the image below to see it.
Thanks for dropping by today, I hope that you have enjoyed my little card. If you need any of the supplies you have seen today you can pick them up in my online store.
Happy Stampin'
Rick
If you live in
the US. I would love you to choose me as
your demonstrator. If you would like to
purchase any of these products you can click on the Shop Now Button or by
clicking on any of the images below. Alternatively,
you can also contact me by email to place your order. Please be sure to use the monthly host code
and I’ll send a little something out to you the following month to say Thank
You!
October HOST
CODE: SQ2WWJZN
Spend any amount with me this month and receive the Creative
Stampers Tutorial Bundle featuring Fall & Halloween Projects. Plus get a gift from me in November.
Please
remember that if you use the host code you cannot use that order towards my KCRP’s
(Kinmon Crafty Reward Points) that would be double dipping and is not
allowed. For more information on KCRP’s click here.
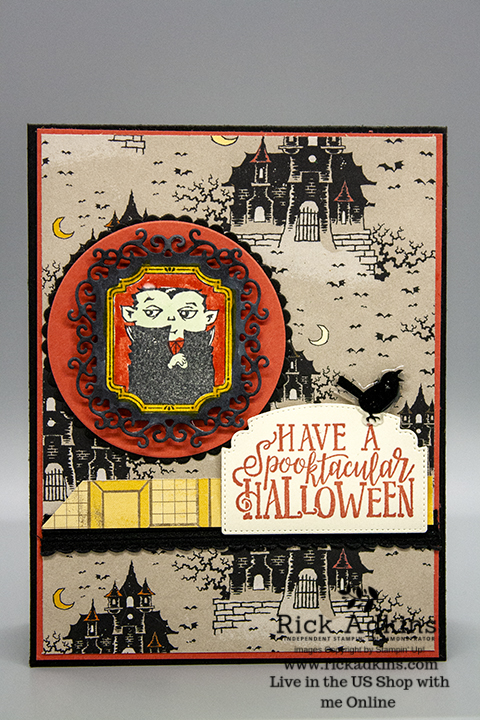
Hello and welcome to my blog; today I am going to share with you a Spooktacular Halloween Card. I used products from the Monster Bash Suite in the 2019 Holiday Catalog which goes live on September 4th. I picked this suite of products to create my card because it's just so darn cute and fun to color. And, the Spooktacular Bash Bundle comes with the Spooktacular Bash Stamp Set and the Ornate Frames Dies. These super cute dies can be used for so many more things than just matching this stamp set. Here's a look at my spooky little card.
Halloween will be here before you know it and little ghouls will be inviting you to all types of Spooktacular Bashes, and you will be ready to create not so spooky projects with these sweet monsters and sweet sentiments in the cute Spooktacular Bash Stamp Set. When paired with the other products in the suite you will sink your teeth into creating.
You can see with the Monster Bash Designer Series Paper has a fresh spin on classic Halloween images. I used a piece here to add a little more of a spooky touch. I used another little strip right above the Basic Black scalloped ribbon. To add just a little more spookiness to the card I added one of the Monster Bash Enamel Shapes to the sentiment. I added it with the adhesive on the back plus one of the mini black stampin' dimensionals. I also added some of the regular size black dimensional under the vampire. Now you have seen me mention Black Stampin' Dimensionals a couple times now, yes they are a real thing that will be available in the Holiday Catalog. These little cushions of goodness will be perfect for all your Halloween projects.
Thanks for dropping by today I hope that you have enjoyed my little sneak peek of the new Monster Bash Suite. I have a little tutorial that I have created for you featuring this card you can click here to download the PDF.
Happy Stampin'
Rick
September HOST CODE:VBBR3SCM
Spend any amount with me this month and receive the Creative
Stampers Tutorial Bundle featuring Fancy Fold or Interactive Projects.Plus get a gift from me in October.
Please
remember that if you use the host code you can not use that order towards my KCRP’s
(Kinmon Crafty Reward Points) that would be double dipping and is not
allowed.For more information on KCRP’s click here.
Hello and welcome to my blog; today I am going to share with you a little sneak peek at some of the products in the 2019 Holiday Catalog. I am using one of my favorite stamp sets from the Holiday/Fall Winter Catalog in today's project. If you read the title you know that it's Birds of A Feather. This is a great all around stamp set, it has images and sentiments for four different holidays. With this one stamp set you can cover Halloween, Thanksgiving, Christmas and Valentine's Day; which is a super thing. This is just one of the stamps sets in the Holiday Catalog that does this very same thing. I also used one of the new embossing folders as well as the new Delicata Metallic Inks on my card today. Here's a look at my card.
I am sharing a look at both cards that I created. The one on the left is the one that I created for the video tutorial; the one on the right was my original design. After creating the original card I decided that the card needed one additional layer instead of the embossing and distressing the front of the card base. I also changed up the colors slightly to show you two different variations.
Original Concept:
As I mentioned above this was my original design for today's card but I decided it needed an additional layer. One because here in the South it was so humid yesterday that after all the embossing and distressing with the ink the card base started to buckle and sway. So the additional layer added more stability to the card. Here's a closer look at the original card.
You can see in this picture after all I put the card base through it started to bend in places. This was after creating the card and then taking it outside to sit it up and look at. I always do this when I am designing and creating a new project. I will take it and go to my front porch sit it up and sit in the swing a little bit away from the design. And, then I study it. I see what works, what's not working, and this also allows me to get a fresh perspective on the project. Because once I sit the card down I turn around and walk to the swing; when I turn back around and sit down my eyes have changed focus and my mind has had a little break from the project. I learned this in college in many of my studio classes; so it's carried over in my card making as well. And, let me just tell you it's paid off. Because with that little break you can see things totally different. I can find design issues much quicker by doing this. So as I was sitting there studying the card I noticed the humidity was starting to effect the distressed card base. So my solution was to add an additional layer that would contain all the distress work.
Complete Version:
You can see in the image above that the extra layer fixed the problem with just distressing the card base. There's no strange bends or anything else. So once that was solved the card went together super quick. I did distress the layer above by first streaking tuxedo black ink across the cardstock and then I added layers of each of the three new Delicata inks in the same way. I also added some to the embossing folder before running it through my die cutting/embossing machine. This direct to paper technique did two things it added more detail when embossing plus added just a little extra of the metallic ink to the card. You can see how I did that in the video.
Once all the distress work was done it was time to color the cute little duckie all dressed up in his Pirate outfit. I used my Stampin' blends to do that, you can find a full list of the colors I used in the shopping list below. Once I had him all colored It was time to layer everything up. Since I did a lot of distress work I added everything with the Multipurpose Liquid Glue. Embossed images need a nice strong glue any way and I prefer the liquid glue over others because it gets down in the debossed areas as well and covers more surface. I added a few of the Monster Bash Enamel Shapes to finish off the card.
Video Tutorial:
If you are viewing this post by email you may not be able to see the embedded video. You will need to click here to see the video.
Thanks for dropping by I hope that you have enjoyed this little sneak peek of Birds of A Feather Stamp Set and my super cute little pirate duck card today. Remember that all the Holiday Catalog products are available starting September 4, 2019 for customers. But Demonstrators can order now. If you would like to get your hands on these products early there's still time to take advantage of the Extra Extra Joining Promotion; and pick out a $155 of new products from either the holiday or annual catalogs for only $99. I would love to have you as part of my Kinsmon Crafters family.


")


 Scalloped Edge Ribbon")


