Showing posts with label Birthday. Show all posts

Friday, January 21, 2022

It's Birthday Time - Awesome Otters

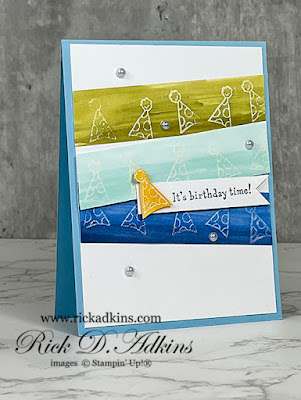
Hello and welcome to my blog; today I am going to share a fun card idea that I got from the 2022 Sale-A-Bration Brochure.  I CASEd the card because I loved it so much and thought it was super fun.  Here's a look at the card.  

It's Birthday Time no matter when you birth month is when you use the Awesome Otters Stamp Set to CASE the catalog and Sale-A-Bration Brochure.

Wednesday, December 15, 2021

Rick's Free Online Birthday Card Class #1 - plus Ordering Special

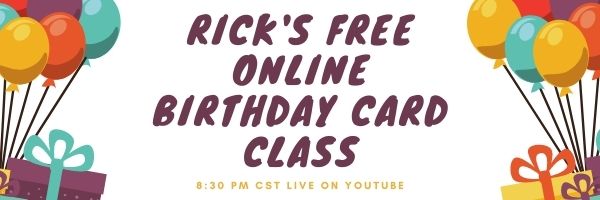
 Watch the Replay today: My First Online Birthday Card Class in this series! You can All join! Come and watch the replay of this weeks Birthday Card Class!

Saturday, March 21, 2020

Botanical Prints Product Medley - Saturday Simple Stamping

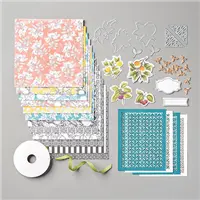
Hello and welcome to my blog; today I am going to share a Simple Stamping card with you using products from the Botanical Prints Products Medley plus a few additional supplies.  Creativity comes easy when you've got amazing coordinating products. Stampin' Up! doesn't want to brag, but coordination is one of their strong points. The Botanical Prints Product Medley is a perfect example. The medley includes stamps, paper, dies, and accessories for creating cards and more.  With everything included in this product medley it's perfect to make Simple Stamping Cards with when you are just starting out.  Because a majority of what you need plus more is right in the box.  Here's a look at my Saturday Simple Stamping card for this week.

Tips & Tricks: 

Since simple stamping is all about stamps, ink, and paper I found the products in the Botanical Prints Product Medley perfect to create some #simplestamping cards.  I cut a piece of the Botanical Prints Designer Series Paper down and added a matching mat layer behind my designer series paper to enhance the mix of black and white imagery with the bold beautiful colors on the paper.  I added my layer to a piece of Thick Whisper White cardstock that I cut down to 4 x 5 1/4.  I simple stamped friend in Terracotta Tile Classic Ink at the bottom of this layer and added it to a Thick Whisper White Base that I cut to 5 1/2 x 8 1/2.  


For the inside of the card I stamped the Happy Birthday sentiment from the Happy Birthday to You Stamp Set (which is a Saleabration set this year and can be earned for Free with a qualifying order).  I added a couple of the matching floral images from the Botanical Prints Stamp Set on the inside of the card to tie it in.  I keep the color pallet simple and only used the one color ink.  When you are a beginner this makes your card making so easy because you don't have to hunt for matching ink colors or colors that coordinate.   But if you have followed me for anytime at all you know that I firmly believe as long as you pull your colors from a pack of designer series paper they will match because Stampin' Up! has done all the coordinating work for us.  So, you can rest assured that the colors you pick from the designer series paper will be a perfect match on your card or project.  


To create a perfect matching envelope I stamped the same botanical print in Terracotta Tile Classic Ink on the flap of the envelope.  This creates the perfect coordinating envelope and gives the person on the receiving end a little hint at what's inside.  If you need any of the products you have seen today you can order them in my online store by clicking on the items in the shopping list below.  Thank you for stamping bye don't forget to follow my blog for daily inspiration.  
Happy Stampin' 
Rick Adkins 


Use the March Host Code on any order of $50 (before taxes & shipping) or more during the month and receive a gift from me in April as a Thank You.  If your order is $150 or more, please don't use the host code.  You will forfeit your Stampin' Rewards if you do; and I want you to get those rewards.


If you place any size order with me during the month of March, you will receive the March Creative Stampers Tutorial Bundle from me as a little thank you.  This month's tutorial bundle features fourteen floral themed tutorials.  The Creative Stampers Tutorial Bundle can either be earned for FREE with any size order or Can be purchased for $20 from me.

Stampin' Up! Shopping List: 


Wednesday, March 4, 2020

So Inviting - Pleased As Punch Facebook Live Mini Class

Hello everyone, it's time for this weeks Facebook Live Mini Class!  This week I am going to share with you three projects featuring the So Inviting Stamp Set Set from the  January - June Mini Catalog and the Pleased As Punch Designer Series Paper (a Coordinating Product Release Product).


Saleabration is Stampin' Up!'s biggest Sale of the year; where you get rewarded with free items based on your orders.  There are two different levels as the last few year.

During this weeks Facebook Live Mini Class I am going to be making three projects with you to get you ready for any Birthday Party.  I decided to use the new So Inviting stamp sets in this mini class, which is featured in My So Inviting Invitations Class.  I just love everything about this stamp set and I 've waited a long time for a set that would allow me to create custom invitations and thank you cards and more for a party or event.

Image by Stampin' Up! 

 In case you've never joined me for Facebook Live, I go live every week, (typically on Wednesday at 8:00 pm CST) on my Facebook business page with one to three projects.  On the second Wednesday of the month I will be doing my Facebook Live mini Class at 4 pm CST due to scheduling conflict.  Everyone is welcome to join!

If you were unable to join me live I will have uploaded the video here afterwards.  If you are viewing this post by email you may have to click here to see the video.


This Week's Projects: 

One of the first things you have to do when you are going to have a party or event is you have to send out invitations, right!  Well, what's better than making your own with the So Inviting Stamp Set.  So that's the first thing we are going to do.  We need an invitation to send out so I used the Pleased As Punch DSP and the So Inviting Stamp Set to create a fun invite that would work for any occasion.  And with the help of the Happy Birthday To You Stamp Set (SAB item) it was super easy to make a fun Birthday Themed Invite.  


So once the invites are created and mailed we are going to need a little party favor for our guests right?  So I used some of the products from the January-June Mini Catalog and created a quick and easy party favor so everyone could have a little something to take home.


Now that the party is over and we have received some wonderful gifts!  It's time to make a few Thank you cards and send out thanking everyone for coming and to thank the people that sent or brought gifts.  So I used the same stamp set and DSP and did just that.


  You can check the PDF for the measurements.  

**All of the details for today's three 
projects can be found on the 
project sheets here. ** 

They have all the products I used and measurements for each project.

***Remember, if you put in an order ($40 minimum before taxes and shipping) by 
Monday, March 9th, 2020 at midnight, 
I'll send you all three make and takes for free! 
But, your order MUST be in by Monday at midnight!! 
You must use Host/Hostess Code 3GMWAD27 .


If you are interested in learning how to make more invitations there's still time to sign up for my So, Inviting Online Class.  Deadline is March 13, 2020.  Read more about the class and signup here.  

Join my NEW Online Technique & Fancy Fold Club!  You can find out all the details by clicking here!

Last day to sign up for my Monthly Card Club by March 20, 2020!  Sign up and learn more about Card club by clicking here!  March's featured stamp set is the Memorable Mosaic; and we will be poppin like mad with a great time learning something new.  Stamps sets are not included in the club but may be purchased using the host code as an add on.  Or you may use something you already own.

Receive the March Creative Stampers Tutorial Bundle with any size order!  Features 14 projects designed by Stampin' Up! demonstrators from around the world.  This month we all featuring different floral themed projects.

Have you thought about joining my monthly card club.  Learn more about this fun budget friendly way to create fun projects for all occasions.
Do you have a blog? Do you love to create fun projects?  Do you love to take part in creative challenges?  Join me over at The Spot for my weekly Creative Challenges.  You never know your project my just hit the spot and be picked as this weeks winner.  There's still time to join in the fun.  Click here and check out this weeks creative challenge.  

Thursday, February 6, 2020

Masculine Valentine/Birthday Card-Special Someone & Special Day Dies -Stampin' Up!

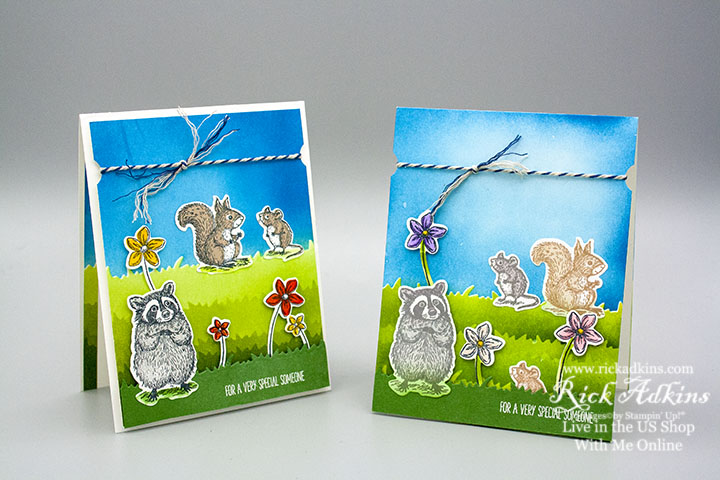
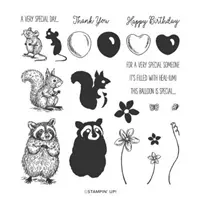
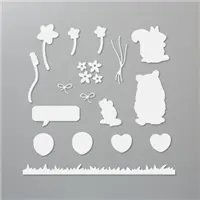
Hello and welcome to my Blog; today I’m going to share with you my Facebook Live Replay from Last night and the masculine card that you can make into a Valentines or a birthday card.   I used the Special Someone Stamp Set and new Coordinating Special Day Dies from Stampin’ Up!   I also shared a few types on how I create a ink blended background in the video last night.   If you have problems ink blending my little no nonsense tips may help you.   This is a great little card design that can be used for either occasion or any occasion for that matter just by changing the sentiment on the inside.


Make tags, greeting cards, and more with the adorable animals in the Special Someone Stamp Set. Use them to create fun messages for birthdays, thank you, and get well. This is a Two-Step Stampin’ set; it allows you to layer two or more images to create one final image with extra texture and dimension in the colors you want.

Create custom die-cut balloons, flowers, hearts, and animals with the Special Day Dies. Pair the dies with the Special Someone Stamp Set to quickly and easily cut out stamped images from the set. Use the dies to make beautiful handmade cards and other paper crafts   These Dies are part of the new Coordination Product Release and are only available while supplies last or until March 31st
   

Video Tutorial: 

If you are viewing this post by email you will have to click here or on the image to view the video.  
Thanks for dropping by I hope that you will give this a try and that the tips in the video will help you with ink blending.  You can find a full list of supplies used below.  
Happy Stampin' 
Rick Adkins 

Stampin' Up! Shopping List: 

Saturday, December 28, 2019

Two Cards One Layout - Timeless Tropical

Hello and welcome to my blog; today I am going to share with you how to make two different cards using the same layout, but with different looks.  This is a fun technique which will allow you to be very creative without a lot of work and you can use with just a few supplies to make quick easy cards that are sure to impress.  For my cards today I used products from the Tropical Oasis Suite from the 2020 January - June Mini Catalog from Stampin' Up! which goes live on January 3, 2020 along with a Sale-a-bration item (that you can earn for free).  Here's a look at my projects!

Product Details: 

Add a pop of paradise to your crafting with lush foliage and tropical images. The Tropical Oasis Suite Bundle features retro tropical images and glorious colors to make a statement on your projects. It’s just another day in papercrafting paradise when you use the stamps and dies to create your own dreamy designs. Invoke a touch of the tropics with bronze-finish trinkets including a pineapple, hibiscus, ukulele, and palm leaves. When you’re all done, hold the project to your ear and listen for the waves gently crashing onto the shoreline.  The Timeless Tropical Bundle includes the Timeless Tropical Stamp Set and the In the Tropics Dies.  

The Timeless Tropical Stamp Set:  Create memorable projects with the retro tropical imagery in the Timeless Tropical Stamp Set. Combine the tropical images with the striking sayings to make greeting cards to brighten someone’s day.  
The In the Tropics Dies:   Create fun tropical die cuts for cards and projects using the In the Tropics Dies. The dies include die-cut palm trees, hibiscus flowers, a pineapple, and more. Pair with the coordinating Timeless Tropical Stamp Set to quickly cut out stamped images from the set. Make thank you cards, birthday cards, and more.
The Metallic Baker's Twine and Sequin Combo Pack:  Metallic twine and patterned sequins from the Metallic Baker’s Twine & Sequins Combo Pack add the perfect finish to handmade cards and other paper projects. The twine has metallic thread woven through for delicate glimmer. Earn this embellishment combo pack FREE with a qualifying purchase January 3–March 31, 2020, during our Sale-A-Bration promotion! 


Tips & Tricks: 

As I mentioned above I created all my cards with the same layout but changed up the sentiment and what the sentiment was put on.  I also moved the cut designer series paper around to create different looks with the same layout.  I love cards that you can get a different look from just by moving things around a little.  For these cards you are going to need two pieces of Designer Series Paper cut at 4 x 5 1/4.  I then put them together and cut off a 1" strip from the bottom.  Next I turned them completely around to the long side and cut off another 1" strip.  From the last 1" strip (1" x 5 1/4") I then cut off a 1" square.  
Once I had the two pieces of the Tropical Oasis Designer Series Paper Cut as instructed above.  I cut a mat of Coastal Cabana to layer everything onto my Thick Whisper White card base.  I always start with the largest piece of the designer series paper and place it in which ever corner I choice.  Next I started with the smaller strips.  For some I use the reverse side of the paper and others the front side.  One of the other great things about this technique is that it allows you to use and see both sides of your designer series paper so no more worrying about which side to use.  
In between each layer I left a very small border around each side.  Like 1/16" small.  Once that was done It was time to add the card front to card base.  I did this with a little liquid glue.  For my first card I stamped the Birthday sentiment from the Timeless Tropics Stamp Set using Early Espresso Ink.  I then stamped the leaf from the stamp set using Pear Pizzazz ink.  Next I used the Everyday Label Punch to punch it out.  I added it to the card front with Stampin' Dimensionals.  I finished off the card by stamping the same leaves on the inside of the card with Pear Pizzazz.  I then used the So Saffron Metallic Baker's Twine from the Metallic Baker's Twine and Sequins Combo Pack.  I tied the baker's twine into a double bow and added it with a mini glue dot.  


For the second lay out I used the pineapple die cut from the In the Tropics Dies along with the Aloha die.  I cut the top of the pineapple out with Pear Pizzazz cardstock, and the bottom from Early Espresso Cardstock.  I placed the pineapple onto a large stitched oval in So Saffron Cardstock.  The Aloha was die cut from whisper white cardstock and attached with a little liquid glue.  I popped the oval up with Dimensionals.  Since the pineapple top goes over the oval I added one dimensional behind so everything was balanced.  I finished off the card by adding some of the pretty stripped sequins from the Twine sequin combo pack.  

Video Tutorial: 


 If you are viewing this post by email you may have to click here or the image below to view the video not every server will show the embedded video.

Sizes and Dimensions: 

  • Whisper White Thick Cardstock:  4 1/4 x 11 (scored at 5 1/2) 
  • Coastal Cabana Cardstock:  5 3/8 x 4 1/8 
  • Whisper White Cardstock:  Scarp for Aloha and Everyday Label 
  • Pear Pizzazz Cardstock:  Scrap for Top of Pineapple 
  • Early Espresso Cardstock:  Scarp for Bottom of Pineapple
  • So Saffron Cardstock:  Scrap for large Stitched Oval 
 Thanks for dropping by today I hope that you give this a try with some of your designer series paper.  The supplies that I used today will be available starting January 3, 2020.  And at the time you will also be able to start every Free Saleabration items with each qualifying amount.  
Happy Stampin'
Rick Adkins 
Independent Stampin' Up! Demonstrator 


Product List:

Template Designed by creativeworkerbee